React Native 凭借快速的开发周期和跨平台兼容性,已经成为构建移动应用的热门选择。为了充分发挥 React Native 开发的优势,开发者通常会借助 React-Query 和 Zustand 这样的第三方库来处理数据请求和状态管理。React-Query 提供了一种灵活高效的方式来获取、缓存和管理数据,而 Zustand 则以极简的方式让状态管理既简单又强大。
在这篇文章中,我们将探讨如何有效地测试使用了这两个库的 React Native 应用。我们会以一个简单的商店应用为例,并提供全面而详细的示例,帮助你理解测试的过程。读完本文,你会很好地理解如何在 React Native 应用中使用和测试 React-Query 与 Zustand
1:搭建环境
我们将使用 React Native 0.71.2 版本来初始化商店应用,并使用 React-Query(Tanstack query)3.39.3 版本和 Zustand 4.3.2 版本来处理数据请求和状态管理。我会在 GitHub 上提供整个应用的完整源码,如果你想直接上手看看实际效果,可以通过文末分享的链接访问。这样你就可以跟着示例一起操作,并看到应用的完整代码。
1.1:设置商店 API
我们将使用 https://fakestoreapi.com 作为 API,来演示 React Native 中有效的测试技巧。我们的商店应用会从这个 API 获取一组商品,并提供每个商品的详情视图。虽然 FakeStoreProduct 还有其他可以利用的 REST API,但用上它们会增加复杂度,偏离本文的主要目标。
为了在整个应用中与 API 通信,我们会创建一个 axios 实例。
1.2:设置 axios 实例
import axios from "axios";

export const BASE_URL = "https://fakestoreapi.com";

export const api = axios.create({
  baseURL: BASE_URL,
});
接下来,我们要为 API 创建 react-query 的配置。
1.3:创建用于管理查询缓存的 key-factory
什么是 key-factory?
虽然我们的应用很简单,不一定需要缓存,但我们仍然会使用 React-Query 强大的缓存功能。因此,我们会创建一个简单的 key factory,如下所示。
export const productKeyFactory = {
  products: ["all-products"],
  productById: (id: number) => [...productKeyFactory.products, id],
} as const;
1.4:使用 react-query 获取商品
import { AxiosError } from "axios";
import { useQuery, UseQueryOptions } from "react-query";
import { api } from "../axios.instance";
import { productKeyFactory } from "./key-factory";
import { Product } from "./types";

export const getAllProducts = async () => {
  return (await api.get<Array<Product>>("/products")).data;
};

export const useGetAllProducts = (
  options?: UseQueryOptions<
    Array<Product>,
    AxiosError,
    Array<Product>,
    readonly [string]
  >
) => {
  return useQuery({
    queryKey: [...productKeyFactory.products],
    queryFn: getAllProducts,
    ...options,
  });
};
上面我们创建了用于获取商品的 useGetAllProducts hook,并用上了上一节创建的 query key。
1.5:使用 react-query 获取商品详情
import { AxiosError } from "axios";
import { useQuery, UseQueryOptions } from "react-query";
import { api } from "../axios.instance";
import { productKeyFactory } from "./key-factory";
import { Product } from "./types";

export const getProductById = async (productId: number) => {
  return (await api.get<Product>(`/products/${productId}`)).data;
};

export const useGetProductById = (
  productId: number,
  options?: UseQueryOptions<
    Product,
    AxiosError,
    Product,
    readonly (string | number)[]
  >
) => {
  return useQuery({
    queryFn: () => getProductById(productId),
    queryKey: [...productKeyFactory.productById(productId)],
    ...options,
  });
};
和上一个 hook 几乎一样,只不过这次 useGetProductById hook 用于根据 id 获取商品详情。
1.6:商品类型
我们不要跳过这一步,先看看商品对象长什么样。
export interface Product {
  id: number;
  title: string;
  price: number;
  description: string;
  category: string;
  image: string;
  rating: Rating;
}

export interface Rating {
  rate: number;
  count: number;
}
1.7:zustand 登场,管理购物篮中的商品
应用会包含一些基础功能:用户可以向购物篮添加商品或从中移除商品,也可以调整单个商品的数量。此外,用户还可以清空整个购物篮。这些功能将用 Zustand 来管理。下面我们来看看它的实现。
import { create } from "zustand";
import { shallow } from "zustand/shallow";
import { Product } from "../api/product";

export type ProductInBasket = {
  product: Product;
  quantity: number;
};

export const updateProductQuantity = (
  productsInBasket: Array<ProductInBasket>,
  productId: number,
  updateType: "increase" | "decrease"
) => {
  return productsInBasket.map((productInBasket) => {
    if (productInBasket.product.id === productId) {
      return {
        ...productInBasket,
        quantity:
          updateType === "increase"
            ? productInBasket.quantity + 1
            : productInBasket.quantity - 1,
      };
    }
    return productInBasket;
  });
};

export const increaseProductQuantityInBasket = (
  productsInBasket: Array<ProductInBasket>,
  productId: number
) => {
  return updateProductQuantity(productsInBasket, productId, "increase");
};

export const decreaseProductQuantityInBasket = (
  productsInBasket: Array<ProductInBasket>,
  productId: number
) => {
  return updateProductQuantity(productsInBasket, productId, "decrease");
};

export interface ProductStore {
  productsInBasket: Array<ProductInBasket>;
  actions: {
    addProductToBasket: (val: Product) => void;
    removeProductFromBasket: (productId: number) => void;
    increaseProductQuantityInBasket: (productId: number) => void;
    decreaseProductQuantityInBasket: (productId: number) => void;
    resetAllProductsInBasket: () => void;
  };
}

export const useProductStore = create<ProductStore>((set, get) => ({
  productsInBasket: [],
  actions: {
    addProductToBasket: (product) =>
      set({
        productsInBasket: [
          ...get().productsInBasket,
          { product: product, quantity: 1 },
        ],
      }),
    removeProductFromBasket: (productId) =>
      set({
        productsInBasket: [
          ...get().productsInBasket.filter(
            (productInBasket) => productInBasket.product.id !== productId
          ),
        ],
      }),
    increaseProductQuantityInBasket: (productId) => {
      set({
        productsInBasket: increaseProductQuantityInBasket(
          get().productsInBasket,
          productId
        ),
      });
    },
    resetAllProductsInBasket: () => set({ productsInBasket: [] }),
    decreaseProductQuantityInBasket: (productId) => {
      set({
        productsInBasket: decreaseProductQuantityInBasket(
          get().productsInBasket,
          productId
        ),
      });
    },
  },
}));

export const useProductActions = () =>
  useProductStore((state) => state.actions);

export const useProductsInBasket = () =>
  useProductStore((state) => state.productsInBasket, shallow);
export const useProductsInBasketCount = () =>
  useProductStore((state) => state.productsInBasket.length);
export const useProductInBasketQuantityById = (productId: number | undefined) =>
  useProductStore(
    (state) =>
      state.productsInBasket.find(
        (productInBasket) => productInBasket.product.id === productId
      )?.quantity
  );
代码的第一部分定义了三个函数:updateProductQuantity、increaseProductQuantityInBasket 和 decreaseProductQuantityInBasket,它们是用来更新购物篮中商品数量的辅助方法。updateProductQuantity 函数接收一个对应 productsInBasket 的对象数组、一个商品 ID 和一个更新类型(增加或减少)作为输入,并返回一个新的 productsInBasket 数组,其中给定商品的数量已经更新。
ProductStore 接口定义了商品 store 的结构。它包含两个属性:
-
productsInBasket 是一个 ProductInBasket 对象数组,表示购物篮中的商品。
-
actions 是一个对象,包含管理购物篮商品的函数,包括添加商品、移除商品、增加或减少数量,以及清空购物篮。
useProductStore hook 是用 Zustand 的 create 函数创建的。它返回包含 state 和 actions 的商品 store。
其余的 hook,也就是 useProductActions、useProductsInBasket、useProductsInBasketCount 和 useProductInBasketQuantityById,都是从 useProductStore hook 派生出来的 selector。它们可以访问商品 store 的特定部分,比如 actions 或者已收藏商品的数量。
另外值得一提的是,我们在 useProductsInBasket 中使用了 zustand 的 shallow。这是因为 useProductsInBasket 返回的对象数组不是原始类型*,会导致重新渲染,因此我们通过传入浅比较函数,告诉 zustand 我们希望对这个对象做浅层对比。
1.8:安装测试所需的包
现在,我们可以进入更关心的部分:测试。我们会用到下面这些包:
为了简洁,也为了不让文章太长,我们会省略配置测试环境的一些步骤,比如 jest.config.js 和 ts-jest。
你可以通过文末提供的完整源码链接,看看我们最终是如何搭建测试环境的。
1.9:用 MSW 模拟 API 数据
为了用 react-query 有效地测试应用,我们需要模拟 API。为此,我们将使用 mock service worker(MSW)。
import { rest } from "msw";
import { setupServer } from "msw/node";
import { BASE_URL } from "../../src/api/axios.instance";
import {
  GET_ALL_PRODUCTS_MOCK_RESPONSE,
  GET_PRODUCT_BY_ID_MOCK_RESPONSE,
} from "./mock-data";

const getAllProductsUrl = BASE_URL + "/products";
const getProductByIdUrl = BASE_URL + `/products/:id`;

const getAllProductsHandler = rest.get(getAllProductsUrl, (_req, res, ctx) => {
  return res(ctx.status(200), ctx.json(GET_ALL_PRODUCTS_MOCK_RESPONSE));
});

const getProductByIdHandler = rest.get(getProductByIdUrl, (_req, res, ctx) => {
  return res(ctx.status(200), ctx.json(GET_PRODUCT_BY_ID_MOCK_RESPONSE));
});

const handlers = [getAllProductsHandler, getProductByIdHandler];

export const mswServer = setupServer(...handlers);

const getAllProductsFailedHandler = rest.get(
  getAllProductsUrl,
  (_req, res, ctx) => {
    return res(ctx.status(500));
  }
);

const getProductByIdFailedHandler = rest.get(
  getProductByIdUrl,
  (_req, res, ctx) => {
    return res(ctx.status(500));
  }
);

export const setupGetAllProductsFailedHandler = () =>
  mswServer.use(getAllProductsFailedHandler);

export const setupGetProductByIdFailedHandler = () =>
  mswServer.use(getProductByIdFailedHandler);
在上面的代码中,我们导入了必要的模块并设置了 MSW 的 handler。我们创建了两个模拟端点,一个用于获取所有商品,另一个用于根据 id 获取商品,两者都返回成功的响应。为了测试得更全面,我们还为这两个端点创建了失败的 handler,用来模拟并测试失败的场景。
为了完成上面的模拟配置,我们需要在 jest.setup.js 中使用 mswServer 对象。我们只需在所有测试用例之前初始化 mswServer,在每个测试用例之后重置 handler,最后把它关闭。
import "react-native-gesture-handler/jestSetup";
import { mswServer } from "./__mocks__/msw/handlers";

jest.useFakeTimers();

// https://mswjs.io/docs/getting-started/integrate/node#setup

// Establish API mocking before all tests.
beforeAll(() => mswServer.listen());
// Reset any request handlers that we may add during the tests,
// so they don't affect other tests.
afterEach(() => mswServer.resetHandlers());
// Clean up after the tests are finished.
afterAll(() => mswServer.close());

// Silence the warning: Animated: `useNativeDriver` is not supported because the native animated module is missing
jest.mock("react-native/Libraries/Animated/NativeAnimatedHelper");
现在我们已经模拟了 API,可以在测试中使用它了。但还没有全部完成。我们还需要按照官方提供的文档为 zustand 配置测试。这样在测试用例中使用 zustand 时,就可以在测试之间重置 state。
1.10:为测试配置 zustand
// https://docs.pmnd.rs/zustand/guides/testing#resetting-state-between-tests-in-react-dom
const { create: actualCreate } = jest.requireActual("zustand"); // if using jest
import { act } from "@testing-library/react-native";

// a variable to hold reset functions for all stores declared in the app
const storeResetFns = new Set();

// when creating a store, we get its initial state, create a reset function and add it in the set
export const create = (createState) => {
  const store = actualCreate(createState);
  const initialState = store.getState();
  storeResetFns.add(() => store.setState(initialState, true));
  return store;
};

// Reset all stores after each test run
beforeEach(() => {
  act(() => storeResetFns.forEach((resetFn) => resetFn()));
});
这里的关键是根据测试环境把上面的文件放到正确的目录中。因为我们使用的是 jest,所以应该按照文档的说明把这个文件放在 mocks/zustand.js。
处理(测试)环境的搭建可能已经让你有点吃不消了,但我还是需要把这些讲清楚,因为它们是整个环境的骨架。
话虽如此,我们直接进入下一节,创建用于展示商品的页面。
2:商品列表页面概览
前面提到过,我们会有一个展示商品的页面。下面来看看商品列表页面的完整代码:
import { DefaultTheme } from "@react-navigation/native";
import * as React from "react";
import {
  FlatList,
  ListRenderItemInfo,
  RefreshControl,
  StyleSheet,
  Text,
  View,
} from "react-native";
import { SafeAreaView } from "react-native-safe-area-context";
import { Product, useGetAllProducts } from "../api/product";
import ProductListCard from "../components/product-list-card";
import ScreenLoading from "../components/screen-loading";
import Spacing from "../components/spacing";
import useRefreshByUser from "../hooks/useRefreshByUser";
import { RouteNames } from "../navigation/route-names";
import { ProductListScreenProps } from "../navigation/types";
import { useProductActions, useProductsInBasket } from "../store/product";
import { COMMON_STYLES } from "../theme/common-styles";

type Props = ProductListScreenProps;

const ProductListScreen: React.FC<Props> = ({ navigation }) => {
  const { data, isLoading, refetch, isError, isSuccess } = useGetAllProducts();

  const { isRefetchingByUser, refetchByUser } = useRefreshByUser(refetch);

  const { addProductToBasket, removeProductFromBasket } = useProductActions();
  const productsInBasket = useProductsInBasket();

  const onAddToBasketPress = React.useCallback(
    (product: Product) => () => {
      if (
        productsInBasket.find(
          (productInBasket) => productInBasket.product.id === product.id
        )
      ) {
        removeProductFromBasket(product.id);
      } else {
        addProductToBasket(product);
      }
    },
    [addProductToBasket, productsInBasket, removeProductFromBasket]
  );

  const onProductCardPress = React.useCallback(
    (productId: number) => () => {
      navigation.navigate(RouteNames.productDetail, { id: productId });
    },
    [navigation]
  );

  const renderItemSeparator = () => (
    <Spacing
      backgroundColor={DefaultTheme.colors.background}
      height={COMMON_STYLES.screenPadding}
    />
  );

  const getKeyExtractor = (item: Product) => item.id.toString();

  const renderItem = ({ item: product }: ListRenderItemInfo<Product>) => {
    return (
      <ProductListCard
        {...product}
        testID={`product-list-card-${product.id}`}
        basketButtonTestID={`basket-button-${product.id}`}
        isInBasket={
          typeof productsInBasket.find(
            (productInBasket) => productInBasket.product.id === product.id
          ) !== "undefined"
        }
        onAddToBasketPress={onAddToBasketPress(product)}
        onPress={onProductCardPress(product.id)}
      />
    );
  };

  if (isLoading) {
    return <ScreenLoading />;
  }

  return (
    <SafeAreaView style={COMMON_STYLES.flex} edges={["bottom"]}>
      {isError && (
        <View style={COMMON_STYLES.flexCenter}>
          <Text>An error occurred</Text>
        </View>
      )}

      {isSuccess && (
        <FlatList<Product>
          data={data}
          testID="product-list-flat-list"
          refreshControl={
            <RefreshControl
              refreshing={isRefetchingByUser}
              onRefresh={refetchByUser}
            />
          }
          renderItem={renderItem}
          numColumns={2}
          ItemSeparatorComponent={renderItemSeparator}
          columnWrapperStyle={styles.columnWrapper}
          contentContainerStyle={styles.contentContainerStyle}
          showsVerticalScrollIndicator={false}
          keyExtractor={getKeyExtractor}
          style={COMMON_STYLES.flex}
        />
      )}
    </SafeAreaView>
  );
};

export default ProductListScreen;

const styles = StyleSheet.create({
  contentContainerStyle: {
    flexGrow: 1,
    padding: COMMON_STYLES.screenPadding,
  },
  columnWrapper: {
    justifyContent: "space-between",
  },
});
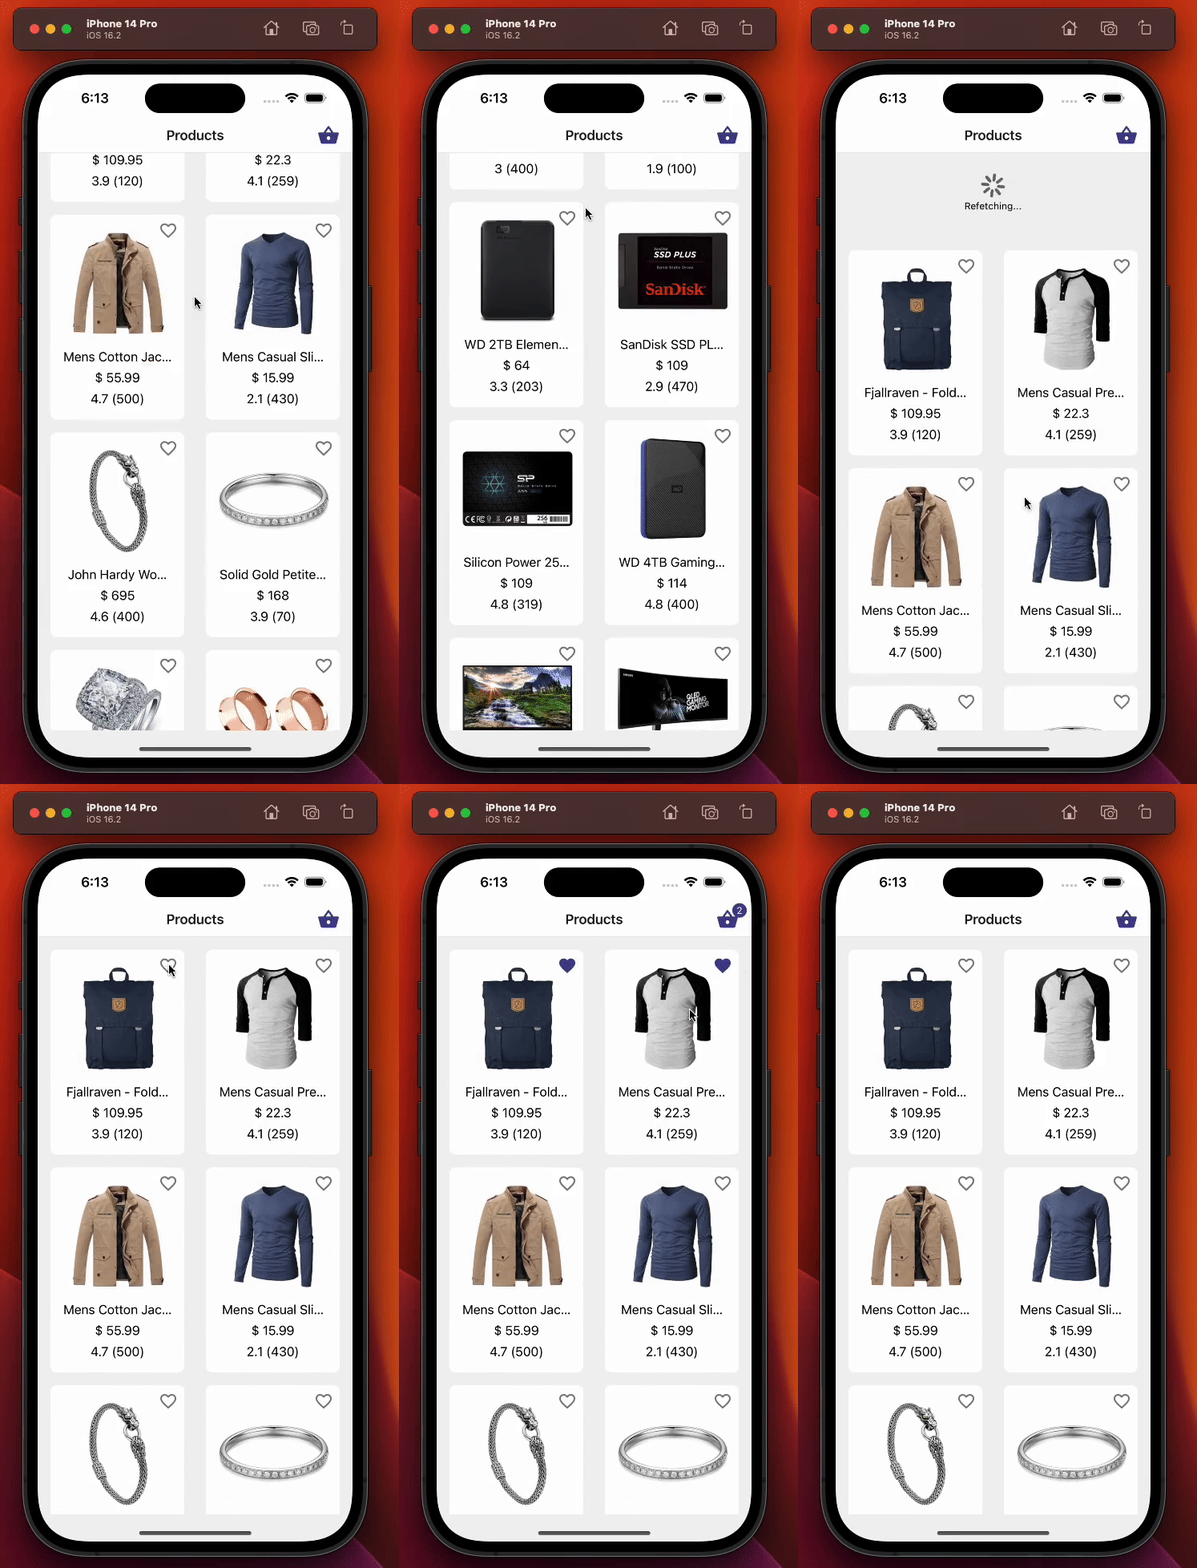
这个页面负责以下事情:
-
使用我们在 1.4:使用 react-query 获取商品 一节中创建的自定义 react query hook useGetAllProducts 展示商品。
-
让用户通过自定义 zustand hook useProductActions 向购物篮添加或移除商品,这个 hook 同样在 1.7:zustand 登场,管理购物篮中的商品 一节中讲过。
-
通过下拉刷新重新获取商品。
-
更新页头右侧购物篮图标上显示的数量文字。
下面是商品列表页面的演示:
2.1:测试商品列表页面
在这一节中,我们会对商品列表页面进行测试。首先要执行的测试用例如下:
-
一开始应该显示加载指示器。即使我们模拟了数据,react-query 中的 isLoading 布尔标志仍然会在短时间内为 true。数据获取完成后,isLoading 会变为 false,加载器也就不再显示。
-
数据获取完成后,商品列表应该正确显示。我们会利用 ProductListCard 组件的 testID prop 来验证这一点。
-
如果获取所有商品的查询失败,页面应该显示错误信息。我们会用到在 1.9:用 MSW 模拟 API 数据 中创建的辅助函数 setupGetAllProductsFailedHandler
2.1.1:测试用例:一开始应该显示加载指示器
import { renderHook } from "@testing-library/react-hooks";
import { render, screen } from "@testing-library/react-native";
import React from "react";
import { useGetAllProducts } from "../../api/product";
import { createReactQueryWrapper } from "../../utils/testing";
import ProductListScreen from "../product-list";

const navigateMock = jest.fn();
const navigation = { navigate: navigateMock } as any;
const route = jest.fn() as any;

const component = <ProductListScreen navigation={navigation} route={route} />;

describe("Product list screen", () => {
  it("should display loading indicator initially", async () => {
    // We render the component and expect to see a loading indicator
    render(component, { wrapper: createReactQueryWrapper });
    expect(screen.queryByTestId(`screen-loader`)).toBeTruthy();

    // We render the product list using useGetAllProducts hook and wait until the products are loaded
    const { result, waitFor } = renderHook(() => useGetAllProducts(), {
      wrapper: createReactQueryWrapper,
    });
    await waitFor(() => result.current.isSuccess);

    // We expect the loading indicator to disappear after the products are loaded
    expect(screen.queryByTestId(`screen-loader`)).not.toBeTruthy();
  });
});
在文件顶部,我们导入了运行测试所需的模块。然后创建了一个名为 component 的变量来保存商品列表页面,这样就可以在各个测试用例中复用它。另外,因为它是一个页面,而我们在 2:商品列表页面概览 一节以及 第 22 行 中声明了页面的 props,所以还需要提供必需的页面 props,也就是 navigation 和 route。至于上面为什么要解构 navigation 对象,我们会在后面的测试用例中再讲。
为了理解测试用例,我们需要简单回顾一下几个术语:
-
render:深度渲染给定的 React 元素,并返回用于查询输出组件结构的辅助函数。
-
renderHook:渲染一个测试组件,每次渲染时都会调用传入的回调函数,包括其中调用的所有 hook。
本文的主要目标是指导如何进行测试,而不是介绍测试库及其函数,所以我们不会深入讲解它们的细节。反正整篇文章中会有足够多的示例展示它们的用法。
上面的测试用例检查页面加载器组件是否在一开始显示在页面上。render 函数渲染了被 createReactQueryWrapper 函数包裹的 ProductListScreen 组件,createReactQueryWrapper 是一个简单的工具函数,用于创建 QueryClientProvider。screen.queryByTestId() 函数检查页面加载器是否显示在页面上。
renderHook 函数用于测试 useGetAllProducts hook,ProductListScreen 组件正是用这个 hook 获取商品数据的。我们把 wrapper 选项传给 renderHook 函数,用 createReactQueryWrapper 函数包裹 useGetAllProducts hook。result 变量保存着 useGetAllProducts hook 返回的值。同时,waitFor 函数会一直等到 result 对象的 isSuccess 属性为 true,也就是商品数据已经成功获取。
第二部分检查商品数据成功获取后,页面加载器组件是否已经不再显示。
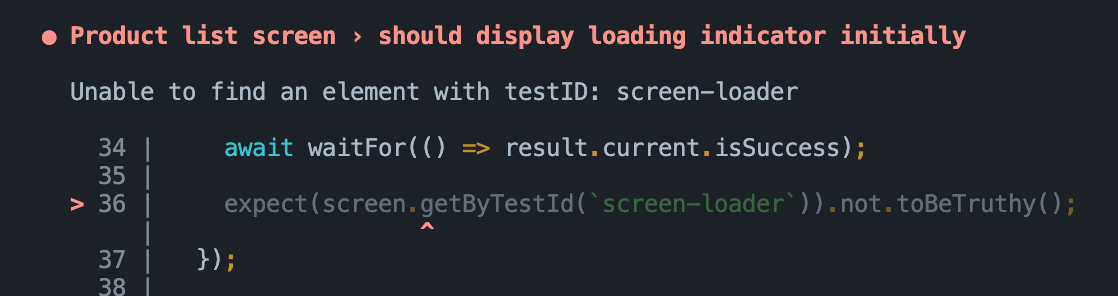
我们使用 queryByTestId 而不是 getByTestId,是因为我们知道数据获取之后页面加载器组件将不可见,所以使用 getByTestId 会抛出错误。
如果使用 getByTestId,我们可能会遇到下面这个错误:
2.1.2:测试用例:应该正确显示商品列表数据
import { renderHook } from "@testing-library/react-hooks";
import { render, screen } from "@testing-library/react-native";
import React from "react";
import { useGetAllProducts } from "../../api/product";
import { createReactQueryWrapper } from "../../utils/testing";
import ProductListScreen from "../product-list";

const navigateMock = jest.fn();
const navigation = { navigate: navigateMock } as any;
const route = jest.fn() as any;

const component = <ProductListScreen navigation={navigation} route={route} />;

describe("Product list screen", () => {
  it("should display product list data correctly", async () => {
    // Render the component and wait for it to load
    render(component, { wrapper: createReactQueryWrapper });

    // Check that no product card is rendered before fetching data
    expect(screen.queryByTestId(`product-list-card-1`)).not.toBeTruthy();

    // Fetch the product data
    const { result, waitFor } = renderHook(() => useGetAllProducts(), {
      wrapper: createReactQueryWrapper,
    });

    // Wait for the data to be fetched successfully
    await waitFor(() => result.current.isSuccess);

    // Check that each product card is rendered for each product in the data
    for (const { id } of result.current.data!) {
      expect(screen.queryByTestId(`product-list-card-${id}`)).toBeTruthy();
    }
  });
});
这段测试代码测试商品列表页面是否正确显示获取到的商品数据。
这一次我们同样先等待数据成功获取,然后遍历获取到的数据,期望数据中的每个商品都存在一个 testID 为 product-list-card-${id} 的商品列表卡片,以此确保商品列表数据显示正确。id 属性是根据商品 ID 动态生成的。如果测试失败,就说明商品列表项没有正确显示商品数据。
注意下面我们是如何用 renderItem 函数渲染列表项的。我们取 product.id,与字符串 product-list-card 组合,为 ProductListCard 组件生成一个动态的 testID。这样一来,我们就能连同各自的 testID prop 一起测试所有商品。
const renderItem = ({ item: product }: ListRenderItemInfo<Product>) => {
  return (
    <ProductListCard
      {...product}
      testID={`product-list-card-${product.id}`}
      basketButtonTestID={`basket-button-${product.id}`}
      isInBasket={
        typeof productsInBasket.find(
          (productInBasket) => productInBasket.product.id === product.id
        ) !== "undefined"
      }
      onAddToBasketPress={onAddToBasketPress(product)}
      onPress={onProductCardPress(product.id)}
    />
  );
};
2.1.3:测试用例:获取所有商品的查询失败时应该显示错误文字
在这个测试用例中,我们测试获取所有商品的 API 调用失败的场景。
import { renderHook } from "@testing-library/react-hooks";
import { render, screen } from "@testing-library/react-native";
import React from "react";
import { setupGetAllProductsFailedHandler } from "../../../__mocks__/msw/handlers";
import { useGetAllProducts } from "../../api/product";
import { createReactQueryWrapper } from "../../utils/testing";
import ProductListScreen from "../product-list";

const navigateMock = jest.fn();
const navigation = { navigate: navigateMock } as any;
const route = jest.fn() as any;

const component = <ProductListScreen navigation={navigation} route={route} />;

describe("Product list screen", () => {
  it("should display error text in case get all products query fails", async () => {
    // Set up the mock handler for GET requests to the /products endpoint that returns an error response
    setupGetAllProductsFailedHandler();

    // Render the ProductListScreen component wrapped in the React Query wrapper
    render(component, { wrapper: createReactQueryWrapper });

    // Set up a mock React hook that calls the useGetAllProducts hook from the API module
    const { result, waitFor } = renderHook(() => useGetAllProducts(), {
      wrapper: createReactQueryWrapper,
    });

    // Wait for the useGetAllProducts hook to throw an error
    await waitFor(() => result.current.isError);

    // Assert that the "An error occurred" text is displayed on the screen
    expect(screen.getByText(`An error occurred`)).toBeTruthy();
  });
});
为了模拟 API 失败,我们使用 mock server worker(msw)中的 setupGetAllProductsFailedHandler 函数,它是我们在 1.9:用 MSW 模拟 API 数据 一节的第 38 行实现的。然后我们用 render 函数渲染 ProductListScreen 组件,并用 renderHook 函数调用获取数据的 useGetAllProducts hook。
我们使用 @testing-library/react-hooks 中的 waitFor 函数,等待 result.current 对象的 isError 属性变为 true。这样可以确保 hook 已经执行完毕,并且 API 调用已经失败。最后,我们用 @testing-library/react-native 中的 getByText 函数检查文字是否存在,以此断言错误信息 “An error occurred” 会显示在页面上(你可以查看商品列表页面的源码再确认一下)。
2.1.4:测试用例:点击第一个商品项时应该调用导航操作
我们要测试下面这段代码,它实际上是从商品列表页面中提取出来的。这段代码负责处理用户点击列表中任意一个商品列表卡片的操作。
const onProductCardPress = React.useCallback(
  (productId: number) => () => {
    navigation.navigate(RouteNames.productDetail, { id: productId });
  },
  [navigation]
);

const renderItem = ({ item: product }: ListRenderItemInfo<Product>) => {
  return (
    <ProductListCard
      {...product}
      testID={`product-list-card-${product.id}`}
      basketButtonTestID={`basket-button-${product.id}`}
      isInBasket={
        typeof productsInBasket.find(
          (productInBasket) => productInBasket.product.id === product.id
        ) !== "undefined"
      }
      onAddToBasketPress={onAddToBasketPress(product)}
      onPress={onProductCardPress(product.id)}
    />
  );
};
下面来看看我们如何测试它:
import { renderHook } from "@testing-library/react-hooks";
import { fireEvent, render, screen } from "@testing-library/react-native";
import React from "react";
import { useGetAllProducts } from "../../api/product";
import { RouteNames } from "../../navigation/route-names";
import { createReactQueryWrapper } from "../../utils/testing";
import ProductListScreen from "../product-list";

const navigateMock = jest.fn();
const navigation = { navigate: navigateMock } as any;
const route = jest.fn() as any;

const component = <ProductListScreen navigation={navigation} route={route} />;

describe("Product list screen", () => {
  it("should call navigation action on pressing the first product item", async () => {
    // render ProductListScreen component with createReactQueryWrapper as a wrapper
    render(component, { wrapper: createReactQueryWrapper });

    // render hook for useGetAllProducts with createReactQueryWrapper as a wrapper
    const { result, waitFor } = renderHook(() => useGetAllProducts(), {
      wrapper: createReactQueryWrapper,
    });

    // wait for useGetAllProducts to succeed
    await waitFor(() => result.current.isSuccess);

    // find first product item and simulate a press event on it
    const firstProductItem = screen.getByTestId(`product-list-card-1`);
    fireEvent.press(firstProductItem);

    // assert that navigation action was called with correct route name and params
    expect(navigateMock).toHaveBeenCalledWith(RouteNames.productDetail, {
      id: 1,
    });
  });
});
在这段测试代码中,我们测试点击商品项时是否会调用导航操作。首先,我们渲染 ProductListScreen 组件,并像前面的测试用例一样等待数据成功获取。之后,我们从列表中取出第一个商品项,用 fireEvent.press 模拟点击它。最后,我们期望 navigation 对象的 navigate 函数被调用,并且传入了预期的 RouteName 和 productId 参数。
2.1.5:测试用例:点击商品项的购物篮图标时应该正确添加或移除商品
下面的测试用例测试的场景是:用户在商品列表页面上点击商品卡片上的购物篮图标,向购物篮添加商品,然后再移除。
import { NavigationContainer } from "@react-navigation/native";
import { renderHook } from "@testing-library/react-hooks";
import { fireEvent, render, screen } from "@testing-library/react-native";
import React from "react";
import { useGetAllProducts } from "../../api/product";
import ProductStack from "../../navigation/product-stack";
import { useProductStore } from "../../store/product";
import { createReactQueryWrapper } from "../../utils/testing";

// We render the whole app stack instead of rendering just the screen
// because we need access to the react-navigation's header, which wouldn't
// be possible if we just rendered the screen.
const rootAppComponent = (
  <NavigationContainer>
    <ProductStack />
  </NavigationContainer>
);

describe("Product list screen", () => {
  it("should add/remove product item correctly on pressing product items basket icon", async () => {
    // We render the entire app stack and use the createReactQueryWrapper as a
    // wrapper for the render function to set up the React Query Provider.
    render(rootAppComponent, {
      wrapper: createReactQueryWrapper,
    });

    // We use the renderHook function to invoke the useGetAllProducts hook which
    // fetches the data.
    const { result, waitFor } = renderHook(() => useGetAllProducts(), {
      wrapper: createReactQueryWrapper,
    });

    // We use the renderHook function to get access to the useProductStore hook
    // which we will use to check that the products in the basket were added/removed correctly.
    const { result: productStore } = renderHook(() => useProductStore(), {
      wrapper: createReactQueryWrapper,
    });

    // We wait for the useGetAllProducts hook to complete fetching the data before proceeding
    // with the test.
    await waitFor(() => result.current.isSuccess);

    // We get the basket button for the first product item using the getByTestId function.
    const firstProductItemBasketButton = screen.getByTestId(`basket-button-1`);

    // We click the basket button for the first product item.
    fireEvent.press(firstProductItemBasketButton);

    // We check that the basket icon quantity text is present using the getByTestId function.
    expect(screen.getByTestId("basket-icon-quantity-text-1")).toBeTruthy();

    // We check that the products in the basket have been added correctly using the productStore.
    expect(productStore.current.productsInBasket).toHaveLength(1);
    expect(productStore.current.productsInBasket[0].quantity).toBe(1);
    expect(productStore.current.productsInBasket[0].product).toMatchObject(
      result.current.data![0]
    );

    // We click the basket button for the first product item again to remove it from the basket.
    fireEvent.press(firstProductItemBasketButton);

    // We check that the basket icon quantity text is not present.
    expect(
      screen.queryByTestId("basket-icon-quantity-text-1")
    ).not.toBeTruthy();

    // We check that the products in the basket have been removed correctly using the productStore.
    expect(productStore.current.productsInBasket).toHaveLength(0);
  });
});
为了测试页头上购物篮图标的功能,除了 ProductListScreen 之外,我们还需要渲染整个 ProductStack。这是因为我们需要访问商品列表页面的页头,通过 test ID 获取购物篮图标。这就要求我们把整个 ProductStack 连同 NavigationContainer 一起渲染出来。
商品成功获取之后,测试用 fireEvent.press 模拟点击第一个商品项上的购物篮图标,把商品加入购物篮。然后我们检查购物篮图标是否显示正确的数量,以及商品是否以正确的数量和商品对象被加入商品 store 的 productsInBasket 数组。
之后,我们再次模拟点击购物篮图标,把商品从购物篮中移除,并检查购物篮图标不再显示数量,同时商品 store 中的 productsInBasket 数组为空。
总之,这个测试用例测试的是:在商品列表页面上点击商品卡片的购物篮图标,向购物篮添加和移除商品以及调整数量的功能,并确认商品 store 正确地管理了购物篮中的商品及其数量。
2.1.6:商品列表页面的完整测试流程
商品列表页面的完整测试流程如下:
import { NavigationContainer } from "@react-navigation/native";
import { renderHook } from "@testing-library/react-hooks";
import { fireEvent, render, screen } from "@testing-library/react-native";
import React from "react";
import { setupGetAllProductsFailedHandler } from "../../../__mocks__/msw/handlers";
import { useGetAllProducts } from "../../api/product";
import ProductStack from "../../navigation/product-stack";
import { RouteNames } from "../../navigation/route-names";
import { useProductStore } from "../../store/product";
import { createReactQueryWrapper } from "../../utils/testing";
import ProductListScreen from "../product-list";

// We render the whole app stack instead of rendering just the screen
// because we need access to the react-navigation's header, which wouldn't
// be possible if we just rendered the screen.
const rootAppComponent = (
  <NavigationContainer>
    <ProductStack />
  </NavigationContainer>
);
const navigateMock = jest.fn();
const navigation = { navigate: navigateMock } as any;
const route = jest.fn() as any;

const component = <ProductListScreen navigation={navigation} route={route} />;

describe("Product list screen", () => {
  it("should display loading indicator initially", async () => {
    // We render the component and expect to see a loading indicator
    render(component, { wrapper: createReactQueryWrapper });
    expect(screen.queryByTestId(`screen-loader`)).toBeTruthy();

    // We render the product list using useGetAllProducts hook and wait until the products are loaded
    const { result, waitFor } = renderHook(() => useGetAllProducts(), {
      wrapper: createReactQueryWrapper,
    });
    await waitFor(() => result.current.isSuccess);

    // We expect the loading indicator to disappear after the products are loaded
    expect(screen.queryByTestId(`screen-loader`)).not.toBeTruthy();
  });

  it("should display product list data correctly", async () => {
    // Render the component and wait for it to load
    render(component, { wrapper: createReactQueryWrapper });

    // Check that no product card is rendered before fetching data
    expect(screen.queryByTestId(`product-list-card-1`)).not.toBeTruthy();

    // Fetch the product data
    const { result, waitFor } = renderHook(() => useGetAllProducts(), {
      wrapper: createReactQueryWrapper,
    });

    // Wait for the data to be fetched successfully
    await waitFor(() => result.current.isSuccess);

    // Check that each product card is rendered for each product in the data
    for (const { id } of result.current.data!) {
      expect(screen.queryByTestId(`product-list-card-${id}`)).toBeTruthy();
    }
  });

  it("should display error text in case get all products query fails", async () => {
    // Set up the mock handler for GET requests to the /products endpoint that returns an error response
    setupGetAllProductsFailedHandler();

    // Render the ProductListScreen component wrapped in the React Query wrapper
    render(component, { wrapper: createReactQueryWrapper });

    // Set up a mock React hook that calls the useGetAllProducts hook from the API module
    const { result, waitFor } = renderHook(() => useGetAllProducts(), {
      wrapper: createReactQueryWrapper,
    });

    // Wait for the useGetAllProducts hook to throw an error
    await waitFor(() => result.current.isError);

    // Assert that the "An error occurred" text is displayed on the screen
    expect(screen.getByText(`An error occurred`)).toBeTruthy();
  });

  it("should call navigation action on pressing the first product item", async () => {
    // Render the ProductListScreen component along with react-query wrapper
    render(component, { wrapper: createReactQueryWrapper });

    // Render the useGetAllProducts hook with react-query wrapper to fetch data
    const { result, waitFor } = renderHook(() => useGetAllProducts(), {
      wrapper: createReactQueryWrapper,
    });

    // Wait for the data to be fetched
    await waitFor(() => result.current.isSuccess);

    // Find the first product card in the list and simulate a press event on it
    const firstProductItem = screen.getByTestId(`product-list-card-1`);
    fireEvent.press(firstProductItem);

    // Expect that the navigation function is called with the correct route name and params
    expect(navigateMock).toHaveBeenCalledWith(RouteNames.productDetail, {
      id: 1,
    });
  });

  it("should add/remove product item correctly on pressing product items basket icon", async () => {
    // We render the entire app stack and use the createReactQueryWrapper as a
    // wrapper for the render function to set up the React Query Provider.
    render(rootAppComponent, {
      wrapper: createReactQueryWrapper,
    });

    // We use the renderHook function to invoke the useGetAllProducts hook which
    // fetches the data.
    const { result, waitFor } = renderHook(() => useGetAllProducts(), {
      wrapper: createReactQueryWrapper,
    });

    // We use the renderHook function to get access to the useProductStore hook
    // which we will use to check that the products in the basket were added/removed correctly.
    const { result: productStore } = renderHook(() => useProductStore(), {
      wrapper: createReactQueryWrapper,
    });

    // We wait for the useGetAllProducts hook to complete fetching the data before proceeding
    // with the test.
    await waitFor(() => result.current.isSuccess);

    // We get the basket button for the first product item using the getByTestId function.
    const firstProductItemBasketButton = screen.getByTestId(`basket-button-1`);

    // We click the basket button for the first product item.
    fireEvent.press(firstProductItemBasketButton);

    // We check that the basket icon quantity text is present using the getByTestId function.
    expect(screen.getByTestId("basket-icon-quantity-text-1")).toBeTruthy();

    // We check that the products in the basket have been added correctly using the productStore.
    expect(productStore.current.productsInBasket).toHaveLength(1);
    expect(productStore.current.productsInBasket[0].quantity).toBe(1);
    expect(productStore.current.productsInBasket[0].product).toMatchObject(
      result.current.data![0]
    );

    // We click the basket button for the first product item again to remove it from the basket.
    fireEvent.press(firstProductItemBasketButton);

    // We check that the basket icon quantity text is not present.
    expect(
      screen.queryByTestId("basket-icon-quantity-text-1")
    ).not.toBeTruthy();

    // We check that the products in the basket have been removed correctly using the productStore.
    expect(productStore.current.productsInBasket).toHaveLength(0);
  });
});
总结
总而言之,本文探讨了如何为使用 React-Query 和 Zustand 的 React Native 应用制定有效的测试策略,这两个库如今在 React 和 React Native 应用中都相当流行。我们以一个简单的商店应用为例,提供了全面而详细的示例,讲解了测试的过程,以及如何通过编写测试来保证代码质量。欢迎通过下面的链接查看完整源码。祝你有美好的一天!
发布于
本文也发布在: