
充分利用类型定义:React Navigation
如今,导航已经是任何移动应用的基础功能。在 React Native 的世界里,我们手里有 React Navigation。
本文会介绍如何用 TypeScript 实现一个典型的 React Navigation 结构,同时对比几种不同的 TypeScript 用法。
更重要的是,本文还会介绍如何充分利用 TypeScript 的特性,为导航搭建一个更具扩展性的架构。
注意:本文中的示例基于 @react-navigation@6.x 版本。
注意:本文介绍的方法和策略并不是你必须严格遵守的,它们只是我个人的偏好,我觉得有用,所以分享给读者。React Navigation 关于 typescript 用法已经有一个非常出色、文档完善的章节。 也就是说,只要按照这份文档来做,你就已经能搭建出很棒的 react-navigation typescript 结构了。
创建 Stack Navigator
来看看如何用 React Navigation 包创建一个 stack navigator。
看下面这个取自 React Navigation 的示例:
import { createStackNavigator } from "@react-navigation/stack";
import * as React from "react";
import { View } from "react-native";

const Stack = createStackNavigator();

const Home = () => <View />;
const Notifications = () => <View />;
const Profile = () => <View />;
const Settings = () => <View />;

function AppStack() {
  return (
    <Stack.Navigator>
      <Stack.Screen name="Home" component={Home} />
      <Stack.Screen name="Notifications" component={Notifications} />
      <Stack.Screen name="Profile" component={Profile} />
      <Stack.Screen name="Settings" component={Settings} />
    </Stack.Navigator>
  );
}
可以看到,这里并没有什么 TypeScript 特有的东西,我们给这段代码加一点 TypeScript。
import { createStackNavigator } from "@react-navigation/stack";
import * as React from "react";
import { View } from "react-native";

type AppStackParamList = {
  Home: undefined;
  Notifications: undefined;
  Profile: undefined;
  Settings: undefined;
};

const Home = () => <View />;
const Notifications = () => <View />;
const Profile = () => <View />;
const Settings = () => <View />;

const Stack = createStackNavigator<AppStackParamList>();

function AppStack() {
  return (
    <Stack.Navigator>
      <Stack.Screen name="Home" component={Home} />
      <Stack.Screen name="Notifications" component={Notifications} />
      <Stack.Screen name="Profile" component={Profile} />
      <Stack.Screen name="Settings" component={Settings} />
    </Stack.Navigator>
  );
}
上面我们给 createStackNavigator 加上了 ParamList 类型。不过,我们怎么知道 createStackNavigator 接受泛型类型呢?有几种方法可以弄清楚。先查阅文档一直是好习惯。在这个例子里,你会发现文档里已经有专门的章节讲这个。
另一方面,假设官网上没有记录 createStackNavigator 的这个类型定义,那么判断这个函数是否带有类型定义的一个办法,就是直接跳转到函数的类型定义。一开始可能会有点吓人,因为到处都是类型、接口和泛型,但你越习惯跳转到类型定义,就越不会觉得无从下手。
更新!
如果你愿意处理 typescript 带来的额外复杂度,同时也想忽略 React 团队提供的绝妙 TS 工具类型(React.ComponentProps),可以继续读到文章结尾。
不过恐怕,这一节可能就是结尾了!
我们可以用 React.ComponentProps
完整示例见下方:
import { createStackNavigator } from "@react-navigation/stack";
import * as React from "react";
import { View } from "react-native";

type AppStackParamList = {
  Home: undefined;
  Notifications: undefined;
  Profile: undefined;
  Settings: undefined;
};

const Home = () => <View />;
const Notifications = () => <View />;
const Profile = () => <View />;
const Settings = () => <View />;

const Stack = createStackNavigator<AppStackParamList>();

const routes: Array<React.ComponentProps<typeof Stack.Screen>> = [
  {
    name: "Home",
    component: Home,
  },
  {
    name: "Notifications",
    component: Notifications,
  },
  {
    name: "Profile",
    component: Profile,
  },
  {
    name: "Settings",
    component: Settings,
  },
];

function AppStack() {
  return (
    <Stack.Navigator>
      {routes.map((routeConfig) => (
        <Stack.Screen key={routeConfig.name} {...routeConfig} />
      ))}
    </Stack.Navigator>
  );
}
没错,它依然有智能提示,如果你往 stack 里放了一个不相关的页面(比如一个不在 stack 类型声明里的页面),它依然会警告你,就像这样:
 无效的页面
智能提示同样有效:
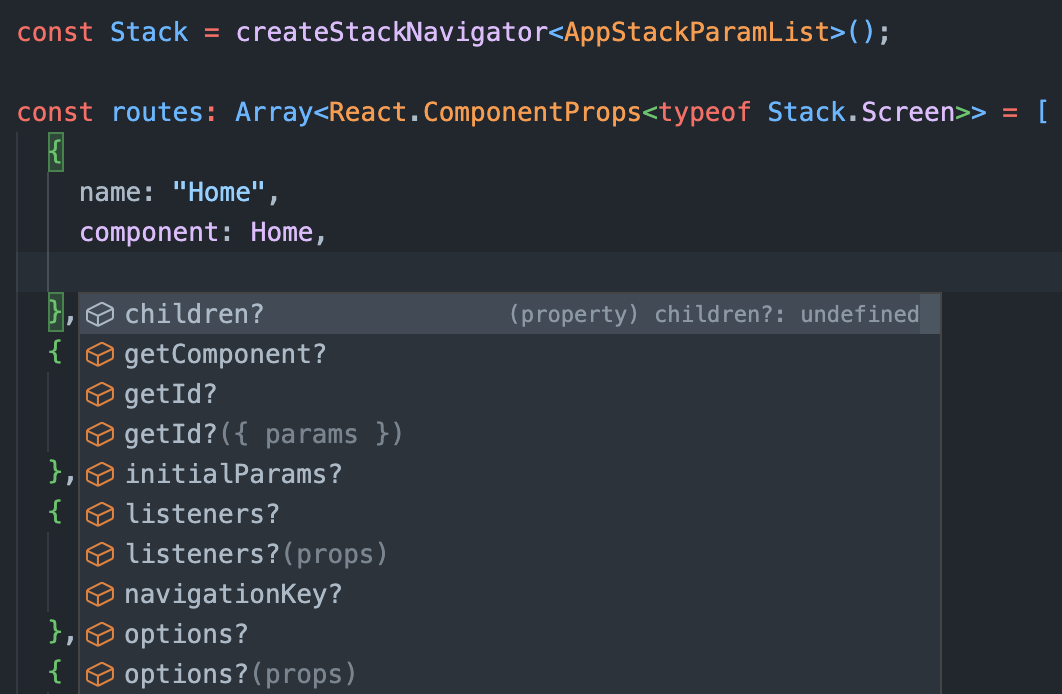
它还更简洁、更可配置、更灵活:
const getAuthStackRoutes = (
  // other parameters...
  theme: ThemeType
): Array<React.ComponentProps<typeof Stack.Screen>> => {
  // more business logic...

  return [
    {
      name: "Home",
      component: Home,
      options: {
        headerStyle: {
          backgroundColor: theme.colors.primary,
          // other theme stylings...
        },
      },
    },
  ];
};
总之,这种方式让我们可以轻松管理复杂的导航结构(至少和本文中的其他方式相比是这样)。因为你不仅能得到更简洁的 JSX,还能以更灵活、更模块化的方式配置路由。
把 TypeScript 的用法再往前推一步
它当然不仅限于声明 createStackNavigator 的泛型类型。那 Stack.Navigator 的子元素类型呢?虽然这个概念在官方文档里已经定义得很清楚了,我们还是来看看如何灵活运用它,以一种更解耦的方式来搭建结构。
import type { RouteConfig, StackNavigationState } from "@react-navigation/core";
import {
  createStackNavigator,
  StackNavigationEventMap,
  StackNavigationOptions,
} from "@react-navigation/stack";
import * as React from "react";
import { View } from "react-native";

// stack param list type
type AppStackParamList = {
  Home: undefined;
  Notifications: undefined;
  Profile: undefined;
  Settings: undefined;
};

// type of the single route in app stack
type AppStackRoutesType = RouteConfig<
  AppStackParamList,
  keyof AppStackParamList,
  StackNavigationState<AppStackParamList>,
  StackNavigationOptions,
  StackNavigationEventMap
>;

// mocking the screen components for the sake of example
const Home = () => <View />;
const Notifications = () => <View />;
const Profile = () => <View />;
const Settings = () => <View />;

// strictly typed array of app stack routes
const appStackRoutes: Array<AppStackRoutesType> = [
  {
    name: "Home",
    component: Home,
  },
  {
    name: "Notifications",
    component: Notifications,
  },
  {
    name: "Profile",
    component: Profile,
  },
  {
    name: "Settings",
    component: Settings,
  },
];

const Stack = createStackNavigator<AppStackParamList>();

function AppStack() {
  return (
    <Stack.Navigator>
      {/** mapping the app stack routes */}
      {appStackRoutes.map((stackRoute) => (
        <Stack.Screen key={stackRoute.name} {...stackRoute} />
      ))}
    </Stack.Navigator>
  );
}
哎呀,这里东西有点多…… 我们把代码拆成几个部分来看。
import type { RouteConfig, StackNavigationState } from "@react-navigation/core";
import {
  createStackNavigator,
  StackNavigationEventMap,
  StackNavigationOptions,
} from "@react-navigation/stack";
import * as React from "react";
import { View } from "react-native";
在代码片段的最上方,我们导入了需要的模块,包括类型、函数和其他必需的东西。它们不有趣,但必不可少 :)
// mocking the screen components for the sake of example
const Home = () => <View />;
const Notifications = () => <View />;
const Profile = () => <View />;
const Settings = () => <View />;
上面我们从 react-native 导入了 View 组件,这样示例演示起来更简单。
// type of the single route in app stack
type AppStackRoutesType = RouteConfig<
  AppStackParamList,
  keyof AppStackParamList,
  StackNavigationState<AppStackParamList>,
  StackNavigationOptions,
  StackNavigationEventMap
>;
现在到了有意思的部分。从 @react-navigation/core 导入的 RouteConfig 正好接受五个泛型类型。react-navigation 官网上并没有记录这个类型定义,不过只要用上面提到的跳转到类型定义的方法,你就能弄清楚它。
虽然在一个典型的 react-native typescript 项目里,这么做看起来可能有些多余,但它带来了几个好处,下面一节会讲到。
IntelliSense
由于我们有一个严格类型化的 stack 路由数组(也就是应用路由),数组里的每个元素现在都必须遵守数组的类型定义。这意味着往数组里添加新元素时,智能提示开箱即用。
此外,应用这个类型会强制我们在每次要往应用路由里加新元素时更新 AppStackRoutesType。否则,我们就无法添加一个在 AppStackRoutesType(AppStackParamList)中不存在的新元素。
映射路由
到了最后一部分,我们用 createStackNavigator 创建 stack navigator。接下来只需要对上面创建的数组及其严格类型做映射即可。
我们终于可以信任数组里的每个元素了,它们的类型都是正确的,因此可以放心使用展开语法。
const Stack = createStackNavigator<AppStackParamList>();

function AppStack() {
  return (
    <Stack.Navigator>
      {/** mapping the app stack routes */}
      {appStackRoutes.map((stackRoute) => (
        <Stack.Screen key={stackRoute.name} {...stackRoute} />
      ))}
    </Stack.Navigator>
  );
}
这真的是最后一部分了吗?
嗯…… 不是!
我们还可以继续改进前面示例中的类型定义。
// generic stack routes type
export type StackRoutesType<ParamList extends ParamListBase> = Array<
  RouteConfig<
    ParamList,
    keyof ParamList,
    StackNavigationState<ParamList>,
    StackNavigationOptions,
    StackNavigationEventMap
  >
>;

type AppStackRoutesType = StackRoutesType<AppStackParamList>;

// mocking the screen components for the sake of example
const Home = () => <View />;
const Notifications = () => <View />;
const Profile = () => <View />;
const Settings = () => <View />;

// strictly typed array of app stack routes
const appStackRoutes: AppStackRoutesType = [
  {
    name: "Home",
    component: Home,
  },
  {
    name: "Notifications",
    component: Notifications,
  },
  {
    name: "Profile",
    component: Profile,
  },
  {
    name: "Settings",
    component: Settings,
  },
];
你可能注意到了,区别在于我们有了一个 StackRoutesType,它接受一个泛型类型,等同于我们之前见过的那个类型。你可能会问,这样做有什么好处?最好用直观的方式来回答这个问题。
// too much duplicated code...

type AppStackRoutesType = RouteConfig<
  AppStackParamList,
  keyof AppStackParamList,
  StackNavigationState<AppStackParamList>,
  StackNavigationOptions,
  StackNavigationEventMap
>;

type OtherStackRoutesType = RouteConfig<
  OtherStackParamList,
  keyof OtherStackParamList,
  StackNavigationState<OtherStackParamList>,
  StackNavigationOptions,
  StackNavigationEventMap
>;

type AnotherStackRoutesType = RouteConfig<
  AnotherStackParamList,
  keyof AnotherStackParamList,
  StackNavigationState<AnotherStackParamList>,
  StackNavigationOptions,
  StackNavigationEventMap
>;
如果我们不选择使用泛型的 StackRoutesType,就得为应用里的每个 stack 重复编写类型定义。
随着应用越来越大,这会变成一场噩梦。(这里的意思是,应用中 stack 的数量和应用的复杂度成正比。实际上这个假设并不总是百分之百成立,但用在这个例子里是合适的)
// generic stack routes type
export type StackRoutesType<ParamList extends ParamListBase> = Array<
  RouteConfig<
    ParamList,
    keyof ParamList,
    StackNavigationState<ParamList>,
    StackNavigationOptions,
    StackNavigationEventMap
  >
>;

// becomes one line typings for each stack
type AppStackRoutesType = StackRoutesType<AppStackParamList>;
type OtherStackRoutesType = StackRoutesType<OtherStackParamList>;
type AnotherStackRoutesType = StackRoutesType<AnotherStackParamList>;
另一方面,看看上面使用泛型类型之后,代码变得多么简单、干净。
最终对比
我们来对比一下典型的 Stack 函数在两种不同情况下的样子:
图 1:在 JSX 中逐个渲染所有 stack 页面。
// ...imports, components

function AppStack() {
  return (
    <Stack.Navigator>
      <Stack.Screen name="Home" component={Home} />
      <Stack.Screen name="Notifications" component={Notifications} />
      <Stack.Screen name="Profile" component={Profile} />
      <Stack.Screen name="Settings" component={Settings} />
      {/** n more screens... */}
    </Stack.Navigator>
  );
}
图 2:使用严格类型化的 typescript 创建的 stack 路由数组来渲染页面。🎉
function AppStack() {
  return (
    <Stack.Navigator>
      {appStackRoutes.map((stackRoute) => (
        <Stack.Screen key={stackRoute.name} {...stackRoute} />
      ))}
    </Stack.Navigator>
  );
}
还有一件事…… Navigator 的 props 呢
我们可能还剩一件事需要考虑,那就是 stack navigator 的 props。看看下面的 StackNavigator,一个 navigator 就有一大块配置。为什么不把这些配置从 JSX 中解耦出来呢?
import type {
  DefaultNavigatorOptions,
  ParamListBase,
  StackNavigationState,
} from "@react-navigation/core";
import {
  StackNavigationEventMap,
  StackNavigationOptions,
} from "@react-navigation/stack";
// other necessary imports for screens...

// generic typing for stack navigator options
type StackNavigatorOptions<ParamList extends ParamListBase> =
  DefaultNavigatorOptions<
    ParamList,
    StackNavigationState<ParamList>,
    StackNavigationOptions,
    StackNavigationEventMap
  >;

// omit the children as it corresponds to stack screen
const appStackNavigatorProps: Omit<
  StackNavigatorOptions<AppStackParamList>,
  "children"
> = {
  initialRouteName: "Home",
  screenOptions: {
    headerShown: false,
    cardOverlayEnabled: true,
    gestureEnabled: false,
    cardStyle: {
      backgroundColor: "royalblue",
    },
    headerLeftContainerStyle: {
      backgroundColor: "firebrick",
    },
    presentation: "modal",
    headerTitleStyle: {
      fontSize: 24,
      color: "olivedrab",
    },
  },
  // ...rest
};

// screen components and stack routes...

function AppStack() {
  return (
    <Stack.Navigator {...appStackNavigatorProps}>
      {appStackRoutes.map((stackRoute) => (
        <Stack.Screen key={stackRoute.name} {...stackRoute} />
      ))}
    </Stack.Navigator>
  );
}
从第 13 行开始,我们应该已经熟悉为什么要使用泛型类型了。这里和 stack 路由在类型上唯一的区别,可能就是从 @react-navigation/core 导入的 DefaultNavigatorOptions 类型。这个类型的名字本身就说明了一切,它就是 navigator 的选项。
和上面提到的 RouteConfig 类型类似,它也接受多个泛型类型。此外要注意,我们显式地省略了 children 这个 key,因为我们已经在渲染 Stack.Navigator 的子元素了,也就是对应的 Stack.Screen。
在第 22 行,我们创建了一个全新的对象(也可以是一个函数,只要它返回的对象满足 navigator 选项的类型即可),用来表示 navigator 的选项。
于是在第 50 行,只要这个对象满足给定的类型,就可以放心地用展开语法使用它。
JSX 干净多了…… 我是这么觉得的……
最终对比:Navigator 的 props
我们再来对比一下典型的 Stack 函数在两种不同情况下的样子:
图 1:stack navigator 的配置写在 JSX 中。
function AppStack() {
  return (
    <Stack.Navigator
      initialRouteName="Home"
      screenOptions={{
        headerShown: false,
        cardOverlayEnabled: true,
        gestureEnabled: false,
        cardStyle: {
          backgroundColor: "royalblue",
        },
        headerLeftContainerStyle: {
          backgroundColor: "firebrick",
        },
        presentation: "modal",
        headerTitleStyle: {
          fontSize: 24,
          color: "olivedrab",
        },
      }}
      // rest...
    >
      {appStackRoutes.map((stackRoute) => (
        <Stack.Screen key={stackRoute.name} {...stackRoute} />
      ))}
    </Stack.Navigator>
  );
}
图 2:stack navigator 的配置从 JSX 中解耦出来。
// ...

function AppStack() {
  return (
    <Stack.Navigator {...appStackNavigatorProps}>
      {appStackRoutes.map((stackRoute) => (
        <Stack.Screen key={stackRoute.name} {...stackRoute} />
      ))}
    </Stack.Navigator>
  );
}
总结
本文介绍了如何真正利用 TypeScript,用更简洁的方式组织 react-native 的 navigator。
祝大家今天零 bug。
发布平台
本文同时发布于: