React Native став популярним вибором для створення мобільних застосунків завдяки швидкому циклу розробки та кросплатформності. Щоб отримати від розробки на React Native максимум, розробники часто беруть сторонні бібліотеки, як-от React-Query та Zustand, для завантаження даних і керування станом. React-Query дає гнучкий та ефективний спосіб завантажувати, кешувати й керувати даними, а Zustand робить керування станом простим і потужним завдяки своєму мінімалістичному підходу.
У цій статті ми розберемо, як ефективно тестувати застосунки на React Native, що використовують ці дві бібліотеки. Як приклад візьмемо простий застосунок магазину, і я покажу вичерпні та детальні приклади, щоб вам було зрозуміло, як проходить тестування. Наприкінці статті ви добре розумітимете, як використовувати й тестувати React-Query та Zustand у своїх застосунках на React Native
1. Налаштування середовища
Ми ініціалізуємо наш застосунок магазину на React Native версії 0.71.2, а для завантаження даних і керування станом візьмемо React-Query(Tanstack query) версії 3.39.3 та Zustand версії 4.3.2. Повний вихідний код готового застосунку я виклав на GitHub, тож якщо хочете одразу побачити все в дії, можете перейти за посиланням, яке є наприкінці статті. Так ви зможете йти разом із прикладами й бачити повний код застосунку.
1.1. Налаштування API магазину
Щоб показати ефективні техніки тестування в React Native, ми використаємо https://fakestoreapi.com як наш API. Застосунок магазину завантажуватиме з цього API набір товарів і показуватиме детальний перегляд кожного товару. FakeStoreProduct має й інші REST API, які можна було б задіяти, але це ускладнило б приклад і відволікло б від головної мети статті.
Щоб звертатися до API в усьому застосунку, створимо екземпляр axios.
1.2. Налаштування екземпляра axios
import axios from "axios";

export const BASE_URL = "https://fakestoreapi.com";

export const api = axios.create({
  baseURL: BASE_URL,
});
Далі створимо налаштування react-query для нашого API.
1.3. Створюємо key-factory для керування кешуванням запитів
Що таке key-factory?
Хоча наш простий застосунок не дуже потребує кешування, ми все одно скористаємося потужними можливостями кешування React-Query. Тому створимо просту key factory, яку показано нижче.
export const productKeyFactory = {
  products: ["all-products"],
  productById: (id: number) => [...productKeyFactory.products, id],
} as const;
1.4. Завантажуємо товари за допомогою react-query
import { AxiosError } from "axios";
import { useQuery, UseQueryOptions } from "react-query";
import { api } from "../axios.instance";
import { productKeyFactory } from "./key-factory";
import { Product } from "./types";

export const getAllProducts = async () => {
  return (await api.get<Array<Product>>("/products")).data;
};

export const useGetAllProducts = (
  options?: UseQueryOptions<
    Array<Product>,
    AxiosError,
    Array<Product>,
    readonly [string]
  >
) => {
  return useQuery({
    queryKey: [...productKeyFactory.products],
    queryFn: getAllProducts,
    ...options,
  });
};
Вище ми створили хук useGetAllProducts для завантаження товарів і використали query-key, який створили в попередньому розділі.
1.5. Завантажуємо деталі товару за допомогою react-query
import { AxiosError } from "axios";
import { useQuery, UseQueryOptions } from "react-query";
import { api } from "../axios.instance";
import { productKeyFactory } from "./key-factory";
import { Product } from "./types";

export const getProductById = async (productId: number) => {
  return (await api.get<Product>(`/products/${productId}`)).data;
};

export const useGetProductById = (
  productId: number,
  options?: UseQueryOptions<
    Product,
    AxiosError,
    Product,
    readonly (string | number)[]
  >
) => {
  return useQuery({
    queryFn: () => getProductById(productId),
    queryKey: [...productKeyFactory.productById(productId)],
    ...options,
  });
};
Майже те саме, що й попередній хук, тільки цього разу хук useGetProductById завантажує деталі товару за його id.
1.6. Тип товару
Не пропускаймо цей крок і подивімося, який вигляд має об’єкт товару.
export interface Product {
  id: number;
  title: string;
  price: number;
  description: string;
  category: string;
  image: string;
  rating: Rating;
}

export interface Rating {
  rate: number;
  count: number;
}
1.7. На сцену виходить zustand: керуємо товарами в кошику
Застосунок матиме базові функції: користувачі можуть додавати товари до кошика чи прибирати їх звідти, а також змінювати кількість окремих товарів. Крім того, можна повністю очистити кошик. Усім цим керуватиме Zustand. Нижче розглянемо реалізацію.
import { create } from "zustand";
import { shallow } from "zustand/shallow";
import { Product } from "../api/product";

export type ProductInBasket = {
  product: Product;
  quantity: number;
};

export const updateProductQuantity = (
  productsInBasket: Array<ProductInBasket>,
  productId: number,
  updateType: "increase" | "decrease"
) => {
  return productsInBasket.map((productInBasket) => {
    if (productInBasket.product.id === productId) {
      return {
        ...productInBasket,
        quantity:
          updateType === "increase"
            ? productInBasket.quantity + 1
            : productInBasket.quantity - 1,
      };
    }
    return productInBasket;
  });
};

export const increaseProductQuantityInBasket = (
  productsInBasket: Array<ProductInBasket>,
  productId: number
) => {
  return updateProductQuantity(productsInBasket, productId, "increase");
};

export const decreaseProductQuantityInBasket = (
  productsInBasket: Array<ProductInBasket>,
  productId: number
) => {
  return updateProductQuantity(productsInBasket, productId, "decrease");
};

export interface ProductStore {
  productsInBasket: Array<ProductInBasket>;
  actions: {
    addProductToBasket: (val: Product) => void;
    removeProductFromBasket: (productId: number) => void;
    increaseProductQuantityInBasket: (productId: number) => void;
    decreaseProductQuantityInBasket: (productId: number) => void;
    resetAllProductsInBasket: () => void;
  };
}

export const useProductStore = create<ProductStore>((set, get) => ({
  productsInBasket: [],
  actions: {
    addProductToBasket: (product) =>
      set({
        productsInBasket: [
          ...get().productsInBasket,
          { product: product, quantity: 1 },
        ],
      }),
    removeProductFromBasket: (productId) =>
      set({
        productsInBasket: [
          ...get().productsInBasket.filter(
            (productInBasket) => productInBasket.product.id !== productId
          ),
        ],
      }),
    increaseProductQuantityInBasket: (productId) => {
      set({
        productsInBasket: increaseProductQuantityInBasket(
          get().productsInBasket,
          productId
        ),
      });
    },
    resetAllProductsInBasket: () => set({ productsInBasket: [] }),
    decreaseProductQuantityInBasket: (productId) => {
      set({
        productsInBasket: decreaseProductQuantityInBasket(
          get().productsInBasket,
          productId
        ),
      });
    },
  },
}));

export const useProductActions = () =>
  useProductStore((state) => state.actions);

export const useProductsInBasket = () =>
  useProductStore((state) => state.productsInBasket, shallow);
export const useProductsInBasketCount = () =>
  useProductStore((state) => state.productsInBasket.length);
export const useProductInBasketQuantityById = (productId: number | undefined) =>
  useProductStore(
    (state) =>
      state.productsInBasket.find(
        (productInBasket) => productInBasket.product.id === productId
      )?.quantity
  );
Перша частина коду визначає три функції, updateProductQuantity, increaseProductQuantityInBasket та decreaseProductQuantityInBasket, це допоміжні методи для оновлення кількості товару в кошику. Функція updateProductQuantity приймає на вході масив об’єктів, що відповідає productsInBasket, ID товару та тип оновлення (increase чи decrease), і повертає новий масив productsInBasket з оновленою кількістю для цього товару.
Інтерфейс ProductStore описує схему сховища товарів. Він має дві властивості:
-
productsInBasket це масив об’єктів ProductInBasket, які представляють товари в кошику.
-
actions це об’єкт із функціями для керування товарами в кошику: додати товар, прибрати товар, збільшити чи зменшити його кількість і очистити кошик.
Хук useProductStore створено функцією create із Zustand. Він повертає сховище товарів з його станом і діями.
Решта хуків, useProductActions, useProductsInBasket, useProductsInBasketCount та useProductInBasketQuantityById, це селектори, похідні від хука useProductStore. Вони дають доступ до окремих частин сховища товарів, як-от до дій чи кількості обраних товарів.
Також варто згадати, що в useProductsInBasket ми використали shallow із zustand. Річ у тім, що масив об’єктів, який повертає useProductsInBasket, спричинятиме повторний рендер, бо це не примітивні типи*, тож ми просто кажемо zustand, що хочемо порівнювати об’єкт поверхнево, передаючи функцію поверхневого порівняння.
1.8. Встановлюємо потрібні пакети для тестування
Тепер можна перейти до частини, яка нас цікавить найбільше: тестування. Ми використаємо такі пакети:
Щоб не розтягувати статтю, ми пропустимо деякі кроки налаштування тестового середовища, як-от jest.config.js та ts-jest .
Як ми зрештою налаштували тестове середовище, можна подивитися в повному вихідному коді, посилання на який є наприкінці статті.
1.9. Мокаємо дані API за допомогою MSW
Щоб ефективно тестувати застосунок із react-query, нам потрібно замокати API. Для цього скористаємося mock service worker (MSW).
import { rest } from "msw";
import { setupServer } from "msw/node";
import { BASE_URL } from "../../src/api/axios.instance";
import {
  GET_ALL_PRODUCTS_MOCK_RESPONSE,
  GET_PRODUCT_BY_ID_MOCK_RESPONSE,
} from "./mock-data";

const getAllProductsUrl = BASE_URL + "/products";
const getProductByIdUrl = BASE_URL + `/products/:id`;

const getAllProductsHandler = rest.get(getAllProductsUrl, (_req, res, ctx) => {
  return res(ctx.status(200), ctx.json(GET_ALL_PRODUCTS_MOCK_RESPONSE));
});

const getProductByIdHandler = rest.get(getProductByIdUrl, (_req, res, ctx) => {
  return res(ctx.status(200), ctx.json(GET_PRODUCT_BY_ID_MOCK_RESPONSE));
});

const handlers = [getAllProductsHandler, getProductByIdHandler];

export const mswServer = setupServer(...handlers);

const getAllProductsFailedHandler = rest.get(
  getAllProductsUrl,
  (_req, res, ctx) => {
    return res(ctx.status(500));
  }
);

const getProductByIdFailedHandler = rest.get(
  getProductByIdUrl,
  (_req, res, ctx) => {
    return res(ctx.status(500));
  }
);

export const setupGetAllProductsFailedHandler = () =>
  mswServer.use(getAllProductsFailedHandler);

export const setupGetProductByIdFailedHandler = () =>
  mswServer.use(getProductByIdFailedHandler);
У коді вище ми імпортуємо потрібні модулі й налаштовуємо обробники MSW. Створюємо два мок-ендпоїнти: один для завантаження всіх товарів, інший для завантаження товару за id, і обидва повертають успішну відповідь. Щоб тестування було ретельним, ми також створюємо обробники з помилкою для цих двох ендпоїнтів, щоб імітувати й перевіряти сценарії збою.
Щоб завершити налаштування моків, потрібно використати об’єкт mswServer у нашому jest.setup.js . Ми просто ініціалізуємо mswServer перед усіма тестами, скидаємо обробники після кожного тесту, а наприкінці вимикаємо його.
import "react-native-gesture-handler/jestSetup";
import { mswServer } from "./__mocks__/msw/handlers";

jest.useFakeTimers();

// https://mswjs.io/docs/getting-started/integrate/node#setup

// Establish API mocking before all tests.
beforeAll(() => mswServer.listen());
// Reset any request handlers that we may add during the tests,
// so they don't affect other tests.
afterEach(() => mswServer.resetHandlers());
// Clean up after the tests are finished.
afterAll(() => mswServer.close());

// Silence the warning: Animated: `useNativeDriver` is not supported because the native animated module is missing
jest.mock("react-native/Libraries/Animated/NativeAnimatedHelper");
Тепер ми замокали API і можемо використовувати його в тестах. Але це ще не все. Потрібно також налаштувати тестування для zustand, користуючись документацією, яку вони надають. Це дозволить скидати стан між тестами, коли ми використовуємо zustand у тестах.
1.10. Налаштовуємо zustand для тестування
// https://docs.pmnd.rs/zustand/guides/testing#resetting-state-between-tests-in-react-dom
const { create: actualCreate } = jest.requireActual("zustand"); // if using jest
import { act } from "@testing-library/react-native";

// a variable to hold reset functions for all stores declared in the app
const storeResetFns = new Set();

// when creating a store, we get its initial state, create a reset function and add it in the set
export const create = (createState) => {
  const store = actualCreate(createState);
  const initialState = store.getState();
  storeResetFns.add(() => store.setState(initialState, true));
  return store;
};

// Reset all stores after each test run
beforeEach(() => {
  act(() => storeResetFns.forEach((resetFn) => resetFn()));
});
Найважливіше тут: покласти файл вище в правильну директорію залежно від тестового середовища. Оскільки ми використовуємо jest, цей файл слід розмістити в mocks/zustand.js, як описано в документації.
Можливо, ви вже втомилися від налаштування (тестового) середовища, але мені все одно треба було це розібрати, бо це кістяк нашого середовища.
А тепер перейдімо до розділу, де ми створюємо екран для показу товарів.
2. Огляд екрана списку товарів
Як ми вже казали, у нас буде екран для показу товарів. Подивімося на повний код екрана списку товарів:
import { DefaultTheme } from "@react-navigation/native";
import * as React from "react";
import {
  FlatList,
  ListRenderItemInfo,
  RefreshControl,
  StyleSheet,
  Text,
  View,
} from "react-native";
import { SafeAreaView } from "react-native-safe-area-context";
import { Product, useGetAllProducts } from "../api/product";
import ProductListCard from "../components/product-list-card";
import ScreenLoading from "../components/screen-loading";
import Spacing from "../components/spacing";
import useRefreshByUser from "../hooks/useRefreshByUser";
import { RouteNames } from "../navigation/route-names";
import { ProductListScreenProps } from "../navigation/types";
import { useProductActions, useProductsInBasket } from "../store/product";
import { COMMON_STYLES } from "../theme/common-styles";

type Props = ProductListScreenProps;

const ProductListScreen: React.FC<Props> = ({ navigation }) => {
  const { data, isLoading, refetch, isError, isSuccess } = useGetAllProducts();

  const { isRefetchingByUser, refetchByUser } = useRefreshByUser(refetch);

  const { addProductToBasket, removeProductFromBasket } = useProductActions();
  const productsInBasket = useProductsInBasket();

  const onAddToBasketPress = React.useCallback(
    (product: Product) => () => {
      if (
        productsInBasket.find(
          (productInBasket) => productInBasket.product.id === product.id
        )
      ) {
        removeProductFromBasket(product.id);
      } else {
        addProductToBasket(product);
      }
    },
    [addProductToBasket, productsInBasket, removeProductFromBasket]
  );

  const onProductCardPress = React.useCallback(
    (productId: number) => () => {
      navigation.navigate(RouteNames.productDetail, { id: productId });
    },
    [navigation]
  );

  const renderItemSeparator = () => (
    <Spacing
      backgroundColor={DefaultTheme.colors.background}
      height={COMMON_STYLES.screenPadding}
    />
  );

  const getKeyExtractor = (item: Product) => item.id.toString();

  const renderItem = ({ item: product }: ListRenderItemInfo<Product>) => {
    return (
      <ProductListCard
        {...product}
        testID={`product-list-card-${product.id}`}
        basketButtonTestID={`basket-button-${product.id}`}
        isInBasket={
          typeof productsInBasket.find(
            (productInBasket) => productInBasket.product.id === product.id
          ) !== "undefined"
        }
        onAddToBasketPress={onAddToBasketPress(product)}
        onPress={onProductCardPress(product.id)}
      />
    );
  };

  if (isLoading) {
    return <ScreenLoading />;
  }

  return (
    <SafeAreaView style={COMMON_STYLES.flex} edges={["bottom"]}>
      {isError && (
        <View style={COMMON_STYLES.flexCenter}>
          <Text>An error occurred</Text>
        </View>
      )}

      {isSuccess && (
        <FlatList<Product>
          data={data}
          testID="product-list-flat-list"
          refreshControl={
            <RefreshControl
              refreshing={isRefetchingByUser}
              onRefresh={refetchByUser}
            />
          }
          renderItem={renderItem}
          numColumns={2}
          ItemSeparatorComponent={renderItemSeparator}
          columnWrapperStyle={styles.columnWrapper}
          contentContainerStyle={styles.contentContainerStyle}
          showsVerticalScrollIndicator={false}
          keyExtractor={getKeyExtractor}
          style={COMMON_STYLES.flex}
        />
      )}
    </SafeAreaView>
  );
};

export default ProductListScreen;

const styles = StyleSheet.create({
  contentContainerStyle: {
    flexGrow: 1,
    padding: COMMON_STYLES.screenPadding,
  },
  columnWrapper: {
    justifyContent: "space-between",
  },
});
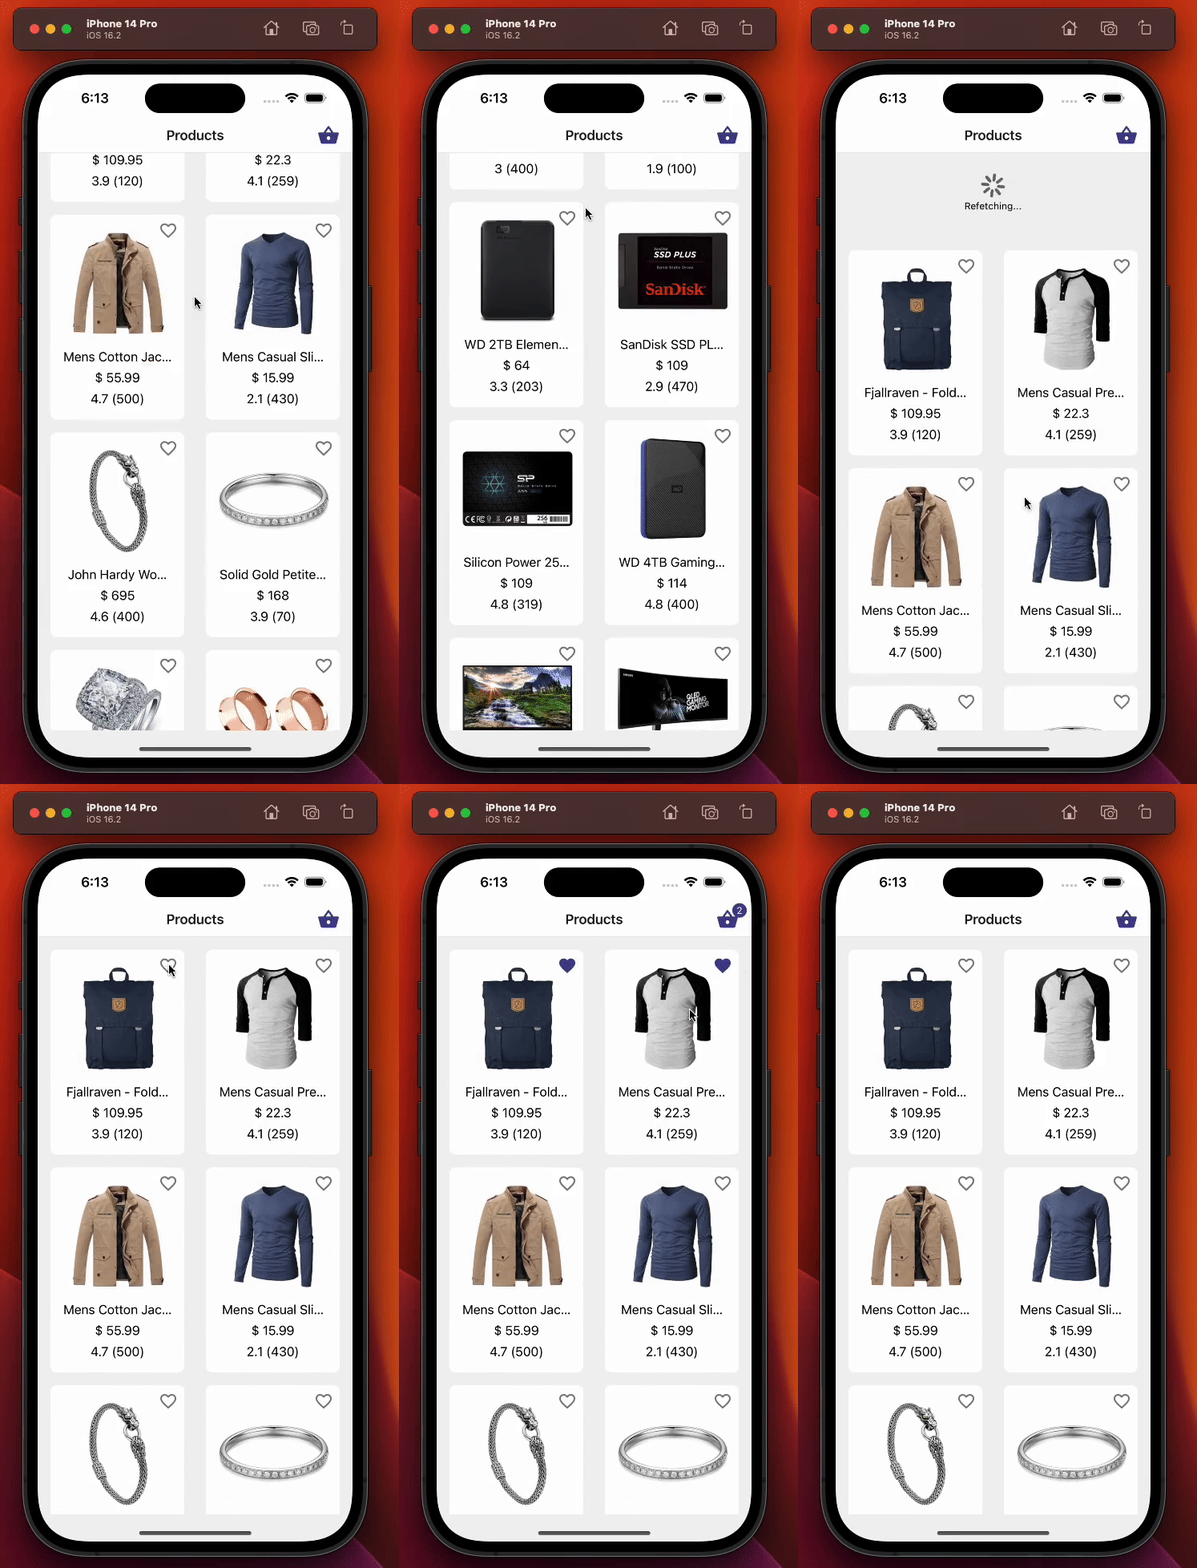
Цей екран відповідає за таке:
-
Показує товари за допомогою власного хука react query useGetAllProducts , який ми створили в розділі 1.4. Завантажуємо товари за допомогою react-query.
-
Дає користувачам змогу додавати товари до кошика чи прибирати їх за допомогою власного хука zustand useProductActions, який ми розібрали в розділі 1.7. На сцену виходить zustand: керуємо товарами в кошику.
-
Повторно завантажує товари жестом pull-to-refresh.
-
Оновлює текст із кількістю на іконці кошика праворуч у хедері.
Нижче показано, як працює екран списку товарів:
2.1. Тестуємо екран списку товарів
У цьому розділі ми протестуємо екран списку товарів. Ось перші тести, які ми виконаємо:
-
Спочатку має показуватися індикатор завантаження, хоча дані в нас замокані. Прапорець isLoading у react-query все одно протягом короткого часу матиме значення true. Після завантаження даних isLoading стане false, і лоадер зникне.
-
Після завантаження даних список товарів має відображатися правильно. Щоб це перевірити, використаємо проп testID компонента ProductListCard.
-
Якщо запит на отримання всіх товарів завершився помилкою, екран має показати повідомлення про помилку. Тут знадобиться допоміжна функція setupGetAllProductsFailedHandler, яку ми створили в розділі 1.9. Мокаємо дані API за допомогою MSW
2.1.1. Тест: спочатку має показуватися індикатор завантаження
import { renderHook } from "@testing-library/react-hooks";
import { render, screen } from "@testing-library/react-native";
import React from "react";
import { useGetAllProducts } from "../../api/product";
import { createReactQueryWrapper } from "../../utils/testing";
import ProductListScreen from "../product-list";

const navigateMock = jest.fn();
const navigation = { navigate: navigateMock } as any;
const route = jest.fn() as any;

const component = <ProductListScreen navigation={navigation} route={route} />;

describe("Product list screen", () => {
  it("should display loading indicator initially", async () => {
    // We render the component and expect to see a loading indicator
    render(component, { wrapper: createReactQueryWrapper });
    expect(screen.queryByTestId(`screen-loader`)).toBeTruthy();

    // We render the product list using useGetAllProducts hook and wait until the products are loaded
    const { result, waitFor } = renderHook(() => useGetAllProducts(), {
      wrapper: createReactQueryWrapper,
    });
    await waitFor(() => result.current.isSuccess);

    // We expect the loading indicator to disappear after the products are loaded
    expect(screen.queryByTestId(`screen-loader`)).not.toBeTruthy();
  });
});
На початку файлу ми імпортували модулі, потрібні для запуску тестів. Потім створили змінну component, щоб зберігати в ній екран списку товарів і використовувати її в усіх тестах. Крім того, оскільки це екран, а пропси екрана ми оголосили в розділі 2. Огляд екрана списку товарів, у рядку 22 нам також треба передати обов’язкові пропси екрана, navigation та route. Чому ми деструктурували об’єкт navigation вище, пояснимо в наступних тестах.
Короткий огляд термінів, які варто знати, щоб розуміти тести:
-
render: Повністю рендерить переданий React-елемент і повертає допоміжні функції для запитів до структури вихідних компонентів.
-
screen: Зберігає результат останнього виклику render, щоб було простіше звертатися до запитів та інших функцій, які повертає render.
-
renderHook : Рендерить тестовий компонент, який під час кожного рендеру викликає переданий колбек разом з усіма хуками, які той викликає.
Оскільки головна мета статті показати, як проводити тестування, а не познайомити з тестовими бібліотеками та їхніми функціями, ми не заглиблюватимемося в деталі. Прикладів їхнього використання в статті й так буде достатньо.
Тест вище перевіряє, чи спочатку на екрані показується компонент лоадера. Функція render рендерить компонент ProductListScreen, обгорнутий функцією createReactQueryWrapper, простою утилітою для створення QueryClientProvider . Функція screen.queryByTestId() перевіряє, чи лоадер показується на екрані.
Функцію renderHook використано для тестування хука useGetAllProducts, яким компонент ProductListScreen завантажує дані товарів. У renderHook передаємо опцію wrapper, щоб обгорнути хук useGetAllProducts функцією createReactQueryWrapper. Змінна result містить значення, яке повертає хук useGetAllProducts. Тим часом функція waitFor чекає, доки властивість isSuccess об’єкта result не стане true, тобто доки дані товарів не будуть успішно завантажені.
Друга частина перевіряє, що після успішного завантаження даних товарів компонент лоадера більше не показується.
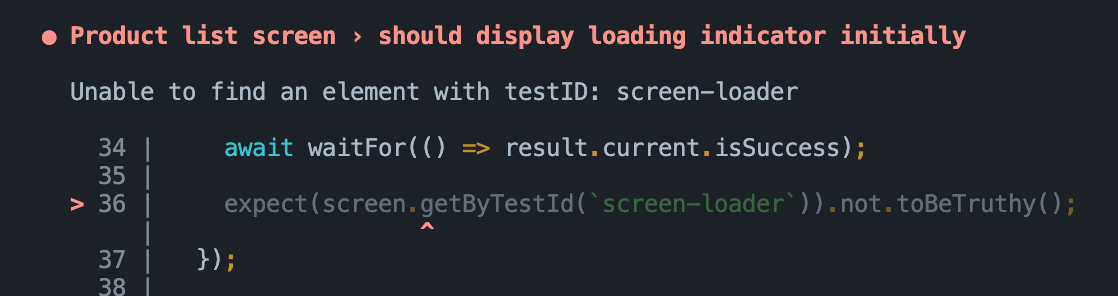
Ми використали queryByTestId замість getByTestId, бо знаємо, що компонент лоадера не буде видно після завантаження даних, і getByTestId кинув би помилку.
Якби ми використали getByTestId, то могли б отримати таку помилку:
2.1.2. Тест: дані списку товарів мають відображатися правильно
import { renderHook } from "@testing-library/react-hooks";
import { render, screen } from "@testing-library/react-native";
import React from "react";
import { useGetAllProducts } from "../../api/product";
import { createReactQueryWrapper } from "../../utils/testing";
import ProductListScreen from "../product-list";

const navigateMock = jest.fn();
const navigation = { navigate: navigateMock } as any;
const route = jest.fn() as any;

const component = <ProductListScreen navigation={navigation} route={route} />;

describe("Product list screen", () => {
  it("should display product list data correctly", async () => {
    // Render the component and wait for it to load
    render(component, { wrapper: createReactQueryWrapper });

    // Check that no product card is rendered before fetching data
    expect(screen.queryByTestId(`product-list-card-1`)).not.toBeTruthy();

    // Fetch the product data
    const { result, waitFor } = renderHook(() => useGetAllProducts(), {
      wrapper: createReactQueryWrapper,
    });

    // Wait for the data to be fetched successfully
    await waitFor(() => result.current.isSuccess);

    // Check that each product card is rendered for each product in the data
    for (const { id } of result.current.data!) {
      expect(screen.queryByTestId(`product-list-card-${id}`)).toBeTruthy();
    }
  });
});
Цей тест перевіряє, чи екран списку товарів правильно показує завантажені дані товарів.
Ми знову чекаємо успішного завантаження даних, а потім переконуємося, що список товарів відображається правильно: проходимо циклом по завантажених даних і очікуємо, що для кожного товару існує картка з testID product-list-card-${id}. Властивість id генерується динамічно на основі ID товару. Якщо тест падає, отже елементи списку товарів показують дані неправильно.
Зверніть увагу, як ми використовували функцію renderItem для рендеру елементів списку нижче. Ми беремо product.id і поєднуємо його з рядком product-list-card, щоб отримати динамічний testID для компонента ProductListCard. Так ми зможемо протестувати всі товари разом з їхнім пропом testID.
const renderItem = ({ item: product }: ListRenderItemInfo<Product>) => {
  return (
    <ProductListCard
      {...product}
      testID={`product-list-card-${product.id}`}
      basketButtonTestID={`basket-button-${product.id}`}
      isInBasket={
        typeof productsInBasket.find(
          (productInBasket) => productInBasket.product.id === product.id
        ) !== "undefined"
      }
      onAddToBasketPress={onAddToBasketPress(product)}
      onPress={onProductCardPress(product.id)}
    />
  );
};
2.1.3. Тест: якщо запит на всі товари падає, має показуватися текст помилки
У цьому тесті ми перевіряємо сценарій, коли виклик API для завантаження всіх товарів завершується помилкою.
import { renderHook } from "@testing-library/react-hooks";
import { render, screen } from "@testing-library/react-native";
import React from "react";
import { setupGetAllProductsFailedHandler } from "../../../__mocks__/msw/handlers";
import { useGetAllProducts } from "../../api/product";
import { createReactQueryWrapper } from "../../utils/testing";
import ProductListScreen from "../product-list";

const navigateMock = jest.fn();
const navigation = { navigate: navigateMock } as any;
const route = jest.fn() as any;

const component = <ProductListScreen navigation={navigation} route={route} />;

describe("Product list screen", () => {
  it("should display error text in case get all products query fails", async () => {
    // Set up the mock handler for GET requests to the /products endpoint that returns an error response
    setupGetAllProductsFailedHandler();

    // Render the ProductListScreen component wrapped in the React Query wrapper
    render(component, { wrapper: createReactQueryWrapper });

    // Set up a mock React hook that calls the useGetAllProducts hook from the API module
    const { result, waitFor } = renderHook(() => useGetAllProducts(), {
      wrapper: createReactQueryWrapper,
    });

    // Wait for the useGetAllProducts hook to throw an error
    await waitFor(() => result.current.isError);

    // Assert that the "An error occurred" text is displayed on the screen
    expect(screen.getByText(`An error occurred`)).toBeTruthy();
  });
});
Щоб імітувати збій API, ми використовуємо функцію setupGetAllProductsFailedHandler із mock server worker (msw), яку реалізували в розділі 1.9. Мокаємо дані API за допомогою MSW у рядку 38. Потім рендеримо компонент ProductListScreen функцією render і викликаємо хук useGetAllProducts, що завантажує дані, за допомогою функції renderHook.
Функцією waitFor із @testing-library/react-hooks ми чекаємо, доки властивість isError об’єкта result.current не стане true. Так ми переконуємося, що хук завершив роботу, а виклик API провалився. Наостанок перевіряємо, що на екрані з’явиться повідомлення про помилку “An error occurred” (його можна побачити у вихідному коді екрана списку товарів): за допомогою функції getByText із @testing-library/react-native перевіряємо, чи є цей текст.
2.1.4. Тест: натискання на перший товар має викликати дію навігації
Ми протестуємо фрагмент коду нижче, взятий з нашого екрана списку товарів. Цей код обробляє натискання користувача на будь-яку картку в списку товарів.
const onProductCardPress = React.useCallback(
  (productId: number) => () => {
    navigation.navigate(RouteNames.productDetail, { id: productId });
  },
  [navigation]
);

const renderItem = ({ item: product }: ListRenderItemInfo<Product>) => {
  return (
    <ProductListCard
      {...product}
      testID={`product-list-card-${product.id}`}
      basketButtonTestID={`basket-button-${product.id}`}
      isInBasket={
        typeof productsInBasket.find(
          (productInBasket) => productInBasket.product.id === product.id
        ) !== "undefined"
      }
      onAddToBasketPress={onAddToBasketPress(product)}
      onPress={onProductCardPress(product.id)}
    />
  );
};
Подивімося, як можна це протестувати:
import { renderHook } from "@testing-library/react-hooks";
import { fireEvent, render, screen } from "@testing-library/react-native";
import React from "react";
import { useGetAllProducts } from "../../api/product";
import { RouteNames } from "../../navigation/route-names";
import { createReactQueryWrapper } from "../../utils/testing";
import ProductListScreen from "../product-list";

const navigateMock = jest.fn();
const navigation = { navigate: navigateMock } as any;
const route = jest.fn() as any;

const component = <ProductListScreen navigation={navigation} route={route} />;

describe("Product list screen", () => {
  it("should call navigation action on pressing the first product item", async () => {
    // render ProductListScreen component with createReactQueryWrapper as a wrapper
    render(component, { wrapper: createReactQueryWrapper });

    // render hook for useGetAllProducts with createReactQueryWrapper as a wrapper
    const { result, waitFor } = renderHook(() => useGetAllProducts(), {
      wrapper: createReactQueryWrapper,
    });

    // wait for useGetAllProducts to succeed
    await waitFor(() => result.current.isSuccess);

    // find first product item and simulate a press event on it
    const firstProductItem = screen.getByTestId(`product-list-card-1`);
    fireEvent.press(firstProductItem);

    // assert that navigation action was called with correct route name and params
    expect(navigateMock).toHaveBeenCalledWith(RouteNames.productDetail, {
      id: 1,
    });
  });
});
У цьому фрагменті тесту ми перевіряємо, чи викликається дія навігації після натискання на товар. Спочатку рендеримо компонент ProductListScreen і чекаємо успішного завантаження даних, як і в попередніх тестах. Потім беремо перший товар зі списку й імітуємо натискання на нього за допомогою fireEvent.press. Наприкінці очікуємо, що функцію navigate об’єкта navigation було викликано з очікуваними параметрами RouteName та productId.
2.1.5. Тест: натискання на іконку кошика на товарі має правильно додавати й прибирати товар
Тест нижче перевіряє сценарій, коли користувач додає товар до кошика й прибирає його, натискаючи іконку кошика на картці товару на екрані Product List.
import { NavigationContainer } from "@react-navigation/native";
import { renderHook } from "@testing-library/react-hooks";
import { fireEvent, render, screen } from "@testing-library/react-native";
import React from "react";
import { useGetAllProducts } from "../../api/product";
import ProductStack from "../../navigation/product-stack";
import { useProductStore } from "../../store/product";
import { createReactQueryWrapper } from "../../utils/testing";

// We render the whole app stack instead of rendering just the screen
// because we need access to the react-navigation's header, which wouldn't
// be possible if we just rendered the screen.
const rootAppComponent = (
  <NavigationContainer>
    <ProductStack />
  </NavigationContainer>
);

describe("Product list screen", () => {
  it("should add/remove product item correctly on pressing product items basket icon", async () => {
    // We render the entire app stack and use the createReactQueryWrapper as a
    // wrapper for the render function to set up the React Query Provider.
    render(rootAppComponent, {
      wrapper: createReactQueryWrapper,
    });

    // We use the renderHook function to invoke the useGetAllProducts hook which
    // fetches the data.
    const { result, waitFor } = renderHook(() => useGetAllProducts(), {
      wrapper: createReactQueryWrapper,
    });

    // We use the renderHook function to get access to the useProductStore hook
    // which we will use to check that the products in the basket were added/removed correctly.
    const { result: productStore } = renderHook(() => useProductStore(), {
      wrapper: createReactQueryWrapper,
    });

    // We wait for the useGetAllProducts hook to complete fetching the data before proceeding
    // with the test.
    await waitFor(() => result.current.isSuccess);

    // We get the basket button for the first product item using the getByTestId function.
    const firstProductItemBasketButton = screen.getByTestId(`basket-button-1`);

    // We click the basket button for the first product item.
    fireEvent.press(firstProductItemBasketButton);

    // We check that the basket icon quantity text is present using the getByTestId function.
    expect(screen.getByTestId("basket-icon-quantity-text-1")).toBeTruthy();

    // We check that the products in the basket have been added correctly using the productStore.
    expect(productStore.current.productsInBasket).toHaveLength(1);
    expect(productStore.current.productsInBasket[0].quantity).toBe(1);
    expect(productStore.current.productsInBasket[0].product).toMatchObject(
      result.current.data![0]
    );

    // We click the basket button for the first product item again to remove it from the basket.
    fireEvent.press(firstProductItemBasketButton);

    // We check that the basket icon quantity text is not present.
    expect(
      screen.queryByTestId("basket-icon-quantity-text-1")
    ).not.toBeTruthy();

    // We check that the products in the basket have been removed correctly using the productStore.
    expect(productStore.current.productsInBasket).toHaveLength(0);
  });
});
Щоб перевірити роботу іконки кошика в хедері, нам потрібно відрендерити не лише ProductListScreen, а й увесь ProductStack. Річ у тім, що нам потрібен доступ до хедера екрана Product List, щоб знайти іконку кошика за її test ID. Для цього має бути відрендерений увесь ProductStack разом із NavigationContainer .
Після успішного завантаження товарів тест за допомогою fireEvent.press імітує натискання на іконку кошика першого товару, і товар додається до кошика. Потім ми перевіряємо, що іконка кошика показує правильну кількість, а товар додано до масиву productsInBasket у сховищі товарів із правильною кількістю та об’єктом товару.
Після цього ми знову імітуємо натискання на іконку кошика, щоб прибрати товар, і перевіряємо, що іконка більше не показує кількість, а масив productsInBasket у сховищі товарів порожній.
Отже, цей тест перевіряє додавання й видалення товару з кошика, а також зміну кількості через натискання іконки кошика на картці товару на екрані Product List, і підтверджує, що сховище товарів правильно керує товарами та їхньою кількістю в кошику.
2.1.6. Повний тестовий сценарій екрана списку товарів
Повний тестовий сценарій екрана списку товарів виглядає так:
import { NavigationContainer } from "@react-navigation/native";
import { renderHook } from "@testing-library/react-hooks";
import { fireEvent, render, screen } from "@testing-library/react-native";
import React from "react";
import { setupGetAllProductsFailedHandler } from "../../../__mocks__/msw/handlers";
import { useGetAllProducts } from "../../api/product";
import ProductStack from "../../navigation/product-stack";
import { RouteNames } from "../../navigation/route-names";
import { useProductStore } from "../../store/product";
import { createReactQueryWrapper } from "../../utils/testing";
import ProductListScreen from "../product-list";

// We render the whole app stack instead of rendering just the screen
// because we need access to the react-navigation's header, which wouldn't
// be possible if we just rendered the screen.
const rootAppComponent = (
  <NavigationContainer>
    <ProductStack />
  </NavigationContainer>
);
const navigateMock = jest.fn();
const navigation = { navigate: navigateMock } as any;
const route = jest.fn() as any;

const component = <ProductListScreen navigation={navigation} route={route} />;

describe("Product list screen", () => {
  it("should display loading indicator initially", async () => {
    // We render the component and expect to see a loading indicator
    render(component, { wrapper: createReactQueryWrapper });
    expect(screen.queryByTestId(`screen-loader`)).toBeTruthy();

    // We render the product list using useGetAllProducts hook and wait until the products are loaded
    const { result, waitFor } = renderHook(() => useGetAllProducts(), {
      wrapper: createReactQueryWrapper,
    });
    await waitFor(() => result.current.isSuccess);

    // We expect the loading indicator to disappear after the products are loaded
    expect(screen.queryByTestId(`screen-loader`)).not.toBeTruthy();
  });

  it("should display product list data correctly", async () => {
    // Render the component and wait for it to load
    render(component, { wrapper: createReactQueryWrapper });

    // Check that no product card is rendered before fetching data
    expect(screen.queryByTestId(`product-list-card-1`)).not.toBeTruthy();

    // Fetch the product data
    const { result, waitFor } = renderHook(() => useGetAllProducts(), {
      wrapper: createReactQueryWrapper,
    });

    // Wait for the data to be fetched successfully
    await waitFor(() => result.current.isSuccess);

    // Check that each product card is rendered for each product in the data
    for (const { id } of result.current.data!) {
      expect(screen.queryByTestId(`product-list-card-${id}`)).toBeTruthy();
    }
  });

  it("should display error text in case get all products query fails", async () => {
    // Set up the mock handler for GET requests to the /products endpoint that returns an error response
    setupGetAllProductsFailedHandler();

    // Render the ProductListScreen component wrapped in the React Query wrapper
    render(component, { wrapper: createReactQueryWrapper });

    // Set up a mock React hook that calls the useGetAllProducts hook from the API module
    const { result, waitFor } = renderHook(() => useGetAllProducts(), {
      wrapper: createReactQueryWrapper,
    });

    // Wait for the useGetAllProducts hook to throw an error
    await waitFor(() => result.current.isError);

    // Assert that the "An error occurred" text is displayed on the screen
    expect(screen.getByText(`An error occurred`)).toBeTruthy();
  });

  it("should call navigation action on pressing the first product item", async () => {
    // Render the ProductListScreen component along with react-query wrapper
    render(component, { wrapper: createReactQueryWrapper });

    // Render the useGetAllProducts hook with react-query wrapper to fetch data
    const { result, waitFor } = renderHook(() => useGetAllProducts(), {
      wrapper: createReactQueryWrapper,
    });

    // Wait for the data to be fetched
    await waitFor(() => result.current.isSuccess);

    // Find the first product card in the list and simulate a press event on it
    const firstProductItem = screen.getByTestId(`product-list-card-1`);
    fireEvent.press(firstProductItem);

    // Expect that the navigation function is called with the correct route name and params
    expect(navigateMock).toHaveBeenCalledWith(RouteNames.productDetail, {
      id: 1,
    });
  });

  it("should add/remove product item correctly on pressing product items basket icon", async () => {
    // We render the entire app stack and use the createReactQueryWrapper as a
    // wrapper for the render function to set up the React Query Provider.
    render(rootAppComponent, {
      wrapper: createReactQueryWrapper,
    });

    // We use the renderHook function to invoke the useGetAllProducts hook which
    // fetches the data.
    const { result, waitFor } = renderHook(() => useGetAllProducts(), {
      wrapper: createReactQueryWrapper,
    });

    // We use the renderHook function to get access to the useProductStore hook
    // which we will use to check that the products in the basket were added/removed correctly.
    const { result: productStore } = renderHook(() => useProductStore(), {
      wrapper: createReactQueryWrapper,
    });

    // We wait for the useGetAllProducts hook to complete fetching the data before proceeding
    // with the test.
    await waitFor(() => result.current.isSuccess);

    // We get the basket button for the first product item using the getByTestId function.
    const firstProductItemBasketButton = screen.getByTestId(`basket-button-1`);

    // We click the basket button for the first product item.
    fireEvent.press(firstProductItemBasketButton);

    // We check that the basket icon quantity text is present using the getByTestId function.
    expect(screen.getByTestId("basket-icon-quantity-text-1")).toBeTruthy();

    // We check that the products in the basket have been added correctly using the productStore.
    expect(productStore.current.productsInBasket).toHaveLength(1);
    expect(productStore.current.productsInBasket[0].quantity).toBe(1);
    expect(productStore.current.productsInBasket[0].product).toMatchObject(
      result.current.data![0]
    );

    // We click the basket button for the first product item again to remove it from the basket.
    fireEvent.press(firstProductItemBasketButton);

    // We check that the basket icon quantity text is not present.
    expect(
      screen.queryByTestId("basket-icon-quantity-text-1")
    ).not.toBeTruthy();

    // We check that the products in the basket have been removed correctly using the productStore.
    expect(productStore.current.productsInBasket).toHaveLength(0);
  });
});
Підсумок
Отже, у цій статті ми розглянули ефективні стратегії тестування застосунків на React Native, що використовують бібліотеки React-Query та Zustand, які сьогодні дуже популярні в застосунках на React і React Native. На прикладі простого застосунку магазину та з вичерпними й детальними прикладами ми пройшли процес тестування і побачили, як тести допомагають підтримувати якість коду. Повний вихідний код можна переглянути за посиланням нижче. Гарного дня!
Посилання на повний вихідний код
Опубліковано
Ця стаття також опублікована тут: