React Native는 빠른 개발 주기와 크로스 플랫폼 호환성 덕분에 모바일 앱을 만드는 인기 있는 선택지가 되었습니다. React Native 개발을 최대한 활용하기 위해 개발자들은 데이터 페칭과 상태 관리에 React-Query와 Zustand 같은 서드파티 라이브러리를 자주 씁니다. React-Query는 데이터를 가져오고, 캐싱하고, 관리하는 유연하고 효율적인 방법을 제공하고, Zustand는 미니멀한 접근 방식으로 상태 관리를 단순하면서도 강력하게 만들어 줍니다.
이 글에서는 이 두 라이브러리를 쓰는 React Native 앱을 효과적으로 테스트하는 방법을 살펴봅니다. 간단한 쇼핑 앱을 예로 들어, 테스트 과정을 이해하는 데 도움이 되도록 자세하고 충실한 예제를 제공하겠습니다. 이 글을 다 읽고 나면 React Native 앱에서 React-Query와 Zustand를 쓰고 테스트하는 방법을 잘 이해하게 될 겁니다
1. 환경 설정하기
쇼핑 앱은 React Native 0.71.2 버전으로 초기화하고, 데이터 페칭과 상태 관리에는 React-Query(Tanstack query) 3.39.3 버전과 Zustand 4.3.2 버전을 쓰겠습니다. 완성된 앱의 전체 소스 코드는 GitHub에 공개할 테니, 바로 뛰어들어 동작하는 모습을 보고 싶다면 글 마지막에 공유한 링크로 들어가 보세요. 예제를 따라 하면서 앱의 전체 코드를 볼 수 있습니다.
1.1. 쇼핑 API 설정하기
React Native의 효과적인 테스트 기법을 보여 주기 위해 https://fakestoreapi.com을 API로 쓰겠습니다. 쇼핑 앱은 이 API에서 상품 목록을 가져오고 각 상품의 상세 화면을 보여 줍니다. FakeStoreProduct에는 활용할 수 있는 다른 REST API도 있지만, 그것까지 쓰면 복잡도가 높아지고 이 글의 주된 목적에서 벗어나게 됩니다.
앱 전반에서 API와 통신하기 위해 axios 인스턴스를 만들겠습니다.
1.2. axios 인스턴스 설정
import axios from "axios";

export const BASE_URL = "https://fakestoreapi.com";

export const api = axios.create({
  baseURL: BASE_URL,
});
다음 단계는 API를 위한 react-query 설정을 만드는 것입니다.
1.3. 쿼리 캐싱을 관리하는 key-factory 만들기
key-factory란 무엇일까요?
앱이 단순해서 꼭 캐싱이 필요하지는 않지만, 그래도 React-Query의 강력한 캐싱 기능을 활용하겠습니다. 그래서 아래처럼 간단한 key factory를 만들겠습니다.
export const productKeyFactory = {
  products: ["all-products"],
  productById: (id: number) => [...productKeyFactory.products, id],
} as const;
1.4. react-query로 상품 가져오기
import { AxiosError } from "axios";
import { useQuery, UseQueryOptions } from "react-query";
import { api } from "../axios.instance";
import { productKeyFactory } from "./key-factory";
import { Product } from "./types";

export const getAllProducts = async () => {
  return (await api.get<Array<Product>>("/products")).data;
};

export const useGetAllProducts = (
  options?: UseQueryOptions<
    Array<Product>,
    AxiosError,
    Array<Product>,
    readonly [string]
  >
) => {
  return useQuery({
    queryKey: [...productKeyFactory.products],
    queryFn: getAllProducts,
    ...options,
  });
};
위에서는 상품을 가져오는 useGetAllProducts 훅을 만들었고, 이전 섹션에서 만든 query-key도 활용했습니다.
1.5. react-query로 상품 상세 가져오기
import { AxiosError } from "axios";
import { useQuery, UseQueryOptions } from "react-query";
import { api } from "../axios.instance";
import { productKeyFactory } from "./key-factory";
import { Product } from "./types";

export const getProductById = async (productId: number) => {
  return (await api.get<Product>(`/products/${productId}`)).data;
};

export const useGetProductById = (
  productId: number,
  options?: UseQueryOptions<
    Product,
    AxiosError,
    Product,
    readonly (string | number)[]
  >
) => {
  return useQuery({
    queryFn: () => getProductById(productId),
    queryKey: [...productKeyFactory.productById(productId)],
    ...options,
  });
};
이전 훅과 거의 같지만, 이번에는 useGetProductById 훅으로 id를 이용해 상품의 상세 정보를 가져옵니다.
1.6. 상품 타입
상품 객체가 어떻게 생겼는지도 빼놓지 말고 살펴봅시다.
export interface Product {
  id: number;
  title: string;
  price: number;
  description: string;
  category: string;
  image: string;
  rating: Rating;
}

export interface Rating {
  rate: number;
  count: number;
}
1.7. 이제 zustand 차례: 장바구니의 상품 관리하기
앱에는 사용자가 장바구니에 상품을 추가하거나 제거하고, 개별 상품의 수량을 조절하는 기본 기능이 있습니다. 또한 장바구니 전체를 비울 수도 있습니다. 이런 기능은 Zustand로 관리합니다. 아래에서 구현을 살펴보겠습니다.
import { create } from "zustand";
import { shallow } from "zustand/shallow";
import { Product } from "../api/product";

export type ProductInBasket = {
  product: Product;
  quantity: number;
};

export const updateProductQuantity = (
  productsInBasket: Array<ProductInBasket>,
  productId: number,
  updateType: "increase" | "decrease"
) => {
  return productsInBasket.map((productInBasket) => {
    if (productInBasket.product.id === productId) {
      return {
        ...productInBasket,
        quantity:
          updateType === "increase"
            ? productInBasket.quantity + 1
            : productInBasket.quantity - 1,
      };
    }
    return productInBasket;
  });
};

export const increaseProductQuantityInBasket = (
  productsInBasket: Array<ProductInBasket>,
  productId: number
) => {
  return updateProductQuantity(productsInBasket, productId, "increase");
};

export const decreaseProductQuantityInBasket = (
  productsInBasket: Array<ProductInBasket>,
  productId: number
) => {
  return updateProductQuantity(productsInBasket, productId, "decrease");
};

export interface ProductStore {
  productsInBasket: Array<ProductInBasket>;
  actions: {
    addProductToBasket: (val: Product) => void;
    removeProductFromBasket: (productId: number) => void;
    increaseProductQuantityInBasket: (productId: number) => void;
    decreaseProductQuantityInBasket: (productId: number) => void;
    resetAllProductsInBasket: () => void;
  };
}

export const useProductStore = create<ProductStore>((set, get) => ({
  productsInBasket: [],
  actions: {
    addProductToBasket: (product) =>
      set({
        productsInBasket: [
          ...get().productsInBasket,
          { product: product, quantity: 1 },
        ],
      }),
    removeProductFromBasket: (productId) =>
      set({
        productsInBasket: [
          ...get().productsInBasket.filter(
            (productInBasket) => productInBasket.product.id !== productId
          ),
        ],
      }),
    increaseProductQuantityInBasket: (productId) => {
      set({
        productsInBasket: increaseProductQuantityInBasket(
          get().productsInBasket,
          productId
        ),
      });
    },
    resetAllProductsInBasket: () => set({ productsInBasket: [] }),
    decreaseProductQuantityInBasket: (productId) => {
      set({
        productsInBasket: decreaseProductQuantityInBasket(
          get().productsInBasket,
          productId
        ),
      });
    },
  },
}));

export const useProductActions = () =>
  useProductStore((state) => state.actions);

export const useProductsInBasket = () =>
  useProductStore((state) => state.productsInBasket, shallow);
export const useProductsInBasketCount = () =>
  useProductStore((state) => state.productsInBasket.length);
export const useProductInBasketQuantityById = (productId: number | undefined) =>
  useProductStore(
    (state) =>
      state.productsInBasket.find(
        (productInBasket) => productInBasket.product.id === productId
      )?.quantity
  );
코드의 첫 부분은 updateProductQuantity, increaseProductQuantityInBasket, decreaseProductQuantityInBasket 세 함수를 정의합니다. 장바구니에 든 상품의 수량을 업데이트하는 헬퍼 메서드입니다. updateProductQuantity 함수는 productsInBasket에 해당하는 객체 배열, 상품 ID, 업데이트 타입(증가 또는 감소)을 입력으로 받아, 해당 상품의 수량이 업데이트된 새 productsInBasket 배열을 반환합니다.
ProductStore 인터페이스는 상품 스토어의 스키마를 정의합니다. 프로퍼티는 두 개입니다.
-
productsInBasket은 장바구니에 든 상품을 나타내는 ProductInBasket 객체 배열입니다.
-
actions는 장바구니의 상품을 관리하는 함수들을 담은 객체입니다. 상품 추가, 상품 제거, 수량 증가/감소, 장바구니 비우기가 포함됩니다.
useProductStore 훅은 Zustand의 create 함수로 만듭니다. 상태와 액션을 갖춘 상품 스토어를 반환합니다.
나머지 훅인 useProductActions, useProductsInBasket, useProductsInBasketCount, useProductInBasketQuantityById는 useProductStore 훅에서 파생된 selector입니다. 액션이나 즐겨찾기한 상품 수처럼 상품 스토어의 특정 부분에 접근할 수 있게 해 줍니다.
한편 useProductsInBasket에서 zustand의 shallow를 썼다는 점도 짚고 넘어갈 만합니다. useProductsInBasket이 반환하는 객체 배열은 원시 타입*이 아니어서 리렌더링을 일으키기 때문입니다. 그래서 shallow 동등성 함수를 넘겨서 객체를 얕게 비교하고 싶다고 zustand에 알려 줍니다.
1.8. 테스트에 필요한 패키지 설치하기
이제 우리가 더 관심 있는 부분인 테스트로 넘어갈 수 있습니다. 아래 패키지들을 쓰겠습니다.
글을 간결하게 하고 너무 길어지지 않도록 jest.config.js와 ts-jest 같은 테스트 환경 설정 과정 일부는 생략하겠습니다.
테스트 환경을 최종적으로 어떻게 설정했는지는 글 마지막에 있는 전체 소스 코드 링크에서 자유롭게 확인해 보세요.
1.9. MSW로 API 데이터 모킹하기
react-query를 쓰는 앱을 효과적으로 테스트하려면 API를 모킹해야 합니다. 이를 위해 mock service worker(MSW)를 활용하겠습니다.
import { rest } from "msw";
import { setupServer } from "msw/node";
import { BASE_URL } from "../../src/api/axios.instance";
import {
  GET_ALL_PRODUCTS_MOCK_RESPONSE,
  GET_PRODUCT_BY_ID_MOCK_RESPONSE,
} from "./mock-data";

const getAllProductsUrl = BASE_URL + "/products";
const getProductByIdUrl = BASE_URL + `/products/:id`;

const getAllProductsHandler = rest.get(getAllProductsUrl, (_req, res, ctx) => {
  return res(ctx.status(200), ctx.json(GET_ALL_PRODUCTS_MOCK_RESPONSE));
});

const getProductByIdHandler = rest.get(getProductByIdUrl, (_req, res, ctx) => {
  return res(ctx.status(200), ctx.json(GET_PRODUCT_BY_ID_MOCK_RESPONSE));
});

const handlers = [getAllProductsHandler, getProductByIdHandler];

export const mswServer = setupServer(...handlers);

const getAllProductsFailedHandler = rest.get(
  getAllProductsUrl,
  (_req, res, ctx) => {
    return res(ctx.status(500));
  }
);

const getProductByIdFailedHandler = rest.get(
  getProductByIdUrl,
  (_req, res, ctx) => {
    return res(ctx.status(500));
  }
);

export const setupGetAllProductsFailedHandler = () =>
  mswServer.use(getAllProductsFailedHandler);

export const setupGetProductByIdFailedHandler = () =>
  mswServer.use(getProductByIdFailedHandler);
위 코드에서는 필요한 모듈을 import하고 MSW 핸들러를 설정합니다. 모든 상품을 가져오는 엔드포인트와 id로 상품을 가져오는 엔드포인트, 두 개의 목 엔드포인트를 만들고 둘 다 성공 응답을 반환하게 합니다. 테스트를 철저히 하기 위해 실패 시나리오를 재현하고 테스트할 수 있도록 두 엔드포인트의 실패 핸들러도 만듭니다.
위 모킹 설정을 완성하려면 jest.setup.js에서 mswServer 객체를 써야 합니다. 모든 테스트 케이스 전에 mswServer를 초기화하고, 각 테스트 케이스가 끝날 때마다 핸들러를 초기화하고, 마지막에는 서버를 종료하면 됩니다.
import "react-native-gesture-handler/jestSetup";
import { mswServer } from "./__mocks__/msw/handlers";

jest.useFakeTimers();

// https://mswjs.io/docs/getting-started/integrate/node#setup

// Establish API mocking before all tests.
beforeAll(() => mswServer.listen());
// Reset any request handlers that we may add during the tests,
// so they don't affect other tests.
afterEach(() => mswServer.resetHandlers());
// Clean up after the tests are finished.
afterAll(() => mswServer.close());

// Silence the warning: Animated: `useNativeDriver` is not supported because the native animated module is missing
jest.mock("react-native/Libraries/Animated/NativeAnimatedHelper");
이제 테스트에서 쓸 수 있도록 API를 모킹했습니다. 하지만 아직 끝나지 않았습니다. zustand가 제공하는 문서를 이용해 zustand 테스트 설정도 해야 합니다. 그래야 테스트 케이스에서 zustand를 쓸 때 테스트 사이에 상태를 초기화할 수 있습니다.
1.10. 테스트를 위한 zustand 설정
// https://docs.pmnd.rs/zustand/guides/testing#resetting-state-between-tests-in-react-dom
const { create: actualCreate } = jest.requireActual("zustand"); // if using jest
import { act } from "@testing-library/react-native";

// a variable to hold reset functions for all stores declared in the app
const storeResetFns = new Set();

// when creating a store, we get its initial state, create a reset function and add it in the set
export const create = (createState) => {
  const store = actualCreate(createState);
  const initialState = store.getState();
  storeResetFns.add(() => store.setState(initialState, true));
  return store;
};

// Reset all stores after each test run
beforeEach(() => {
  act(() => storeResetFns.forEach((resetFn) => resetFn()));
});
여기서 중요한 건 테스트 환경에 맞는 올바른 디렉터리에 위 파일을 두는 것입니다. jest를 쓰므로 문서에 설명된 대로 이 파일을 mocks/zustand.js에 두어야 합니다.
(테스트) 환경 설정을 다루느라 벌써 버겁게 느껴질 수도 있지만, 환경의 뼈대이기 때문에 어쨌든 다뤄야 했습니다.
그럼 상품을 보여 주는 화면을 만드는 섹션으로 바로 들어가 봅시다.
2. 상품 목록 화면 개요
앞서 말했듯이 상품을 보여 주는 화면이 하나 있습니다. 아래에서 상품 목록 화면의 전체 코드를 봅시다.
import { DefaultTheme } from "@react-navigation/native";
import * as React from "react";
import {
  FlatList,
  ListRenderItemInfo,
  RefreshControl,
  StyleSheet,
  Text,
  View,
} from "react-native";
import { SafeAreaView } from "react-native-safe-area-context";
import { Product, useGetAllProducts } from "../api/product";
import ProductListCard from "../components/product-list-card";
import ScreenLoading from "../components/screen-loading";
import Spacing from "../components/spacing";
import useRefreshByUser from "../hooks/useRefreshByUser";
import { RouteNames } from "../navigation/route-names";
import { ProductListScreenProps } from "../navigation/types";
import { useProductActions, useProductsInBasket } from "../store/product";
import { COMMON_STYLES } from "../theme/common-styles";

type Props = ProductListScreenProps;

const ProductListScreen: React.FC<Props> = ({ navigation }) => {
  const { data, isLoading, refetch, isError, isSuccess } = useGetAllProducts();

  const { isRefetchingByUser, refetchByUser } = useRefreshByUser(refetch);

  const { addProductToBasket, removeProductFromBasket } = useProductActions();
  const productsInBasket = useProductsInBasket();

  const onAddToBasketPress = React.useCallback(
    (product: Product) => () => {
      if (
        productsInBasket.find(
          (productInBasket) => productInBasket.product.id === product.id
        )
      ) {
        removeProductFromBasket(product.id);
      } else {
        addProductToBasket(product);
      }
    },
    [addProductToBasket, productsInBasket, removeProductFromBasket]
  );

  const onProductCardPress = React.useCallback(
    (productId: number) => () => {
      navigation.navigate(RouteNames.productDetail, { id: productId });
    },
    [navigation]
  );

  const renderItemSeparator = () => (
    <Spacing
      backgroundColor={DefaultTheme.colors.background}
      height={COMMON_STYLES.screenPadding}
    />
  );

  const getKeyExtractor = (item: Product) => item.id.toString();

  const renderItem = ({ item: product }: ListRenderItemInfo<Product>) => {
    return (
      <ProductListCard
        {...product}
        testID={`product-list-card-${product.id}`}
        basketButtonTestID={`basket-button-${product.id}`}
        isInBasket={
          typeof productsInBasket.find(
            (productInBasket) => productInBasket.product.id === product.id
          ) !== "undefined"
        }
        onAddToBasketPress={onAddToBasketPress(product)}
        onPress={onProductCardPress(product.id)}
      />
    );
  };

  if (isLoading) {
    return <ScreenLoading />;
  }

  return (
    <SafeAreaView style={COMMON_STYLES.flex} edges={["bottom"]}>
      {isError && (
        <View style={COMMON_STYLES.flexCenter}>
          <Text>An error occurred</Text>
        </View>
      )}

      {isSuccess && (
        <FlatList<Product>
          data={data}
          testID="product-list-flat-list"
          refreshControl={
            <RefreshControl
              refreshing={isRefetchingByUser}
              onRefresh={refetchByUser}
            />
          }
          renderItem={renderItem}
          numColumns={2}
          ItemSeparatorComponent={renderItemSeparator}
          columnWrapperStyle={styles.columnWrapper}
          contentContainerStyle={styles.contentContainerStyle}
          showsVerticalScrollIndicator={false}
          keyExtractor={getKeyExtractor}
          style={COMMON_STYLES.flex}
        />
      )}
    </SafeAreaView>
  );
};

export default ProductListScreen;

const styles = StyleSheet.create({
  contentContainerStyle: {
    flexGrow: 1,
    padding: COMMON_STYLES.screenPadding,
  },
  columnWrapper: {
    justifyContent: "space-between",
  },
});
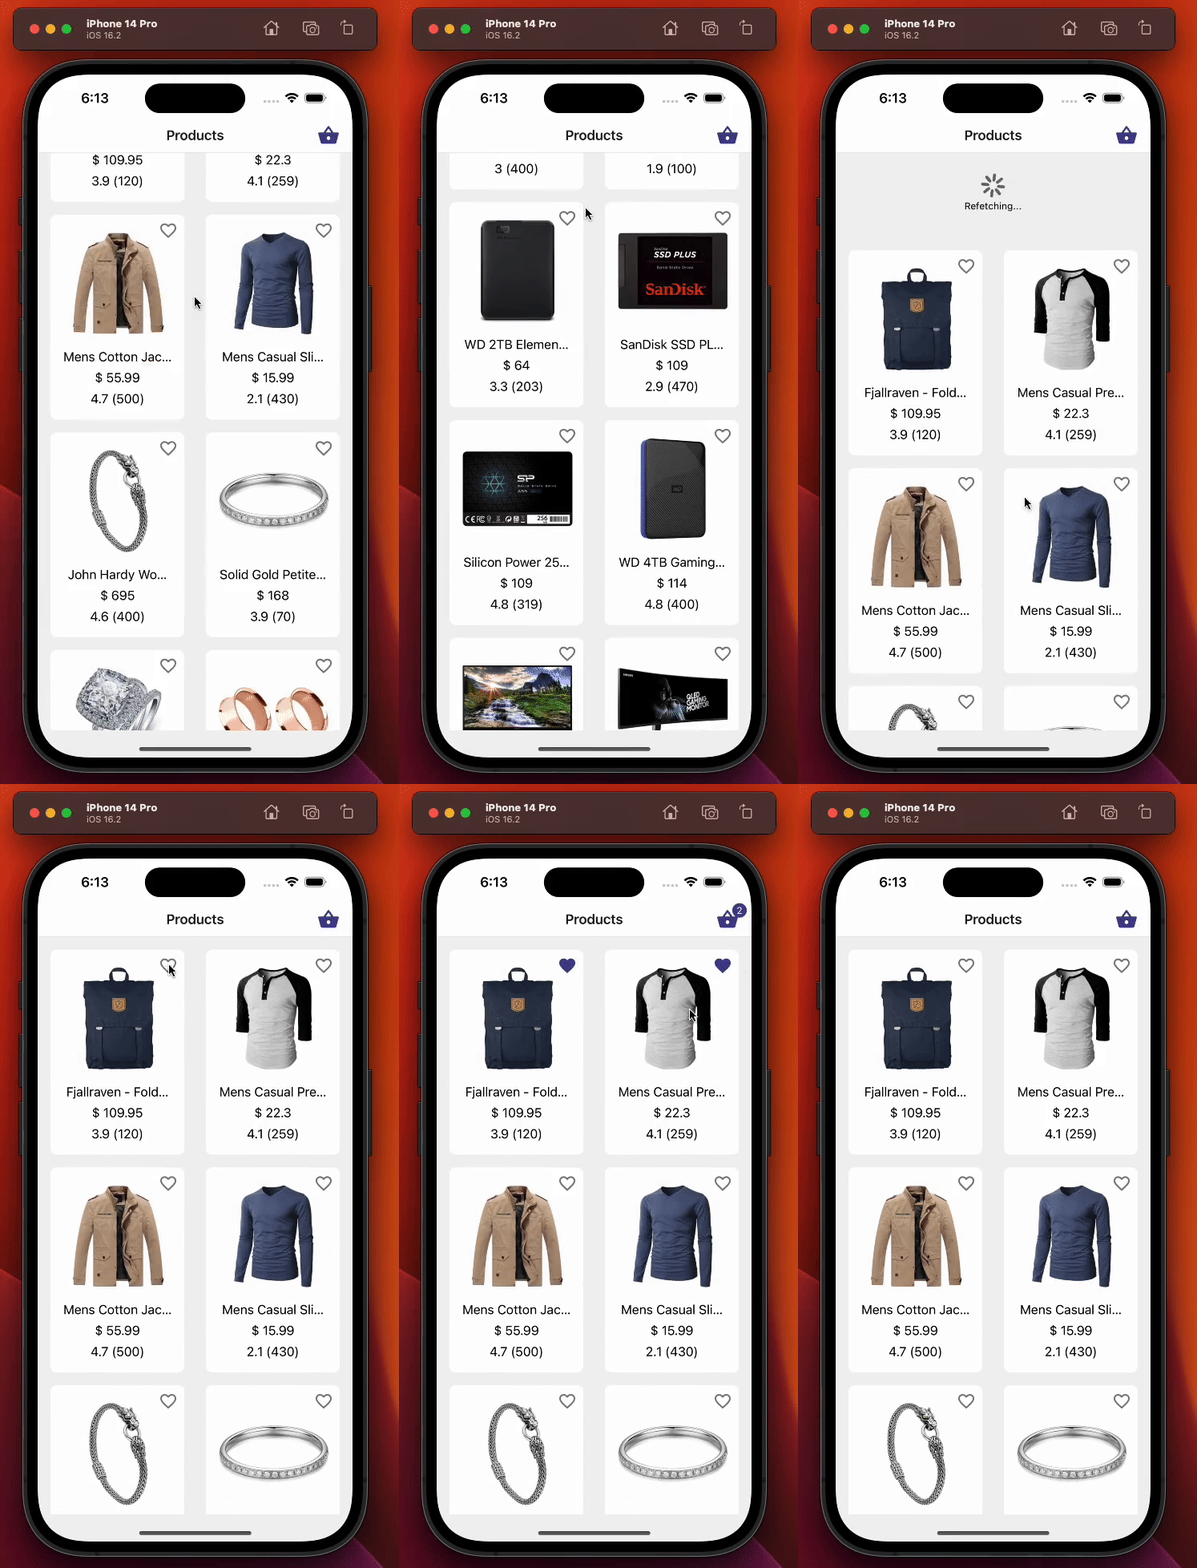
이 화면은 다음을 담당합니다.
-
1.4. react-query로 상품 가져오기 섹션에서 만든 커스텀 react query 훅 useGetAllProducts로 상품을 보여 줍니다.
-
역시 1.7. 이제 zustand 차례: 장바구니의 상품 관리하기 섹션에서 다룬 커스텀 zustand 훅 useProductActions로 사용자가 장바구니에 상품을 추가하거나 제거할 수 있게 합니다.
-
당겨서 새로고침(pull-to-refresh)으로 상품을 다시 가져옵니다.
-
헤더 오른쪽 장바구니 아이콘에 표시되는 수량 텍스트를 업데이트합니다.
아래는 상품 목록 화면의 데모입니다.
2.1. 상품 목록 화면 테스트하기
이 섹션에서는 상품 목록 화면을 테스트합니다. 처음으로 진행할 테스트 케이스는 다음과 같습니다.
-
처음에는 데이터를 모킹했더라도 로딩 인디케이터가 표시되어야 합니다. react-query의 isLoading boolean 플래그는 짧은 시간 동안 여전히 true로 설정됩니다. 데이터를 가져오고 나면 isLoading이 false가 되고 로더는 표시되지 않습니다.
-
데이터를 가져온 뒤에는 상품 목록이 정확하게 표시되어야 합니다. 이 케이스를 검증하는 데 ProductListCard 컴포넌트의 testID prop을 활용합니다.
-
모든 상품을 가져오는 쿼리가 실패하면 화면에 에러 메시지가 표시되어야 합니다. 1.9. MSW로 API 데이터 모킹하기에서 만든 setupGetAllProductsFailedHandler 헬퍼를 활용합니다
2.1.1. 테스트 케이스: 처음에 로딩 인디케이터를 표시해야 한다
import { renderHook } from "@testing-library/react-hooks";
import { render, screen } from "@testing-library/react-native";
import React from "react";
import { useGetAllProducts } from "../../api/product";
import { createReactQueryWrapper } from "../../utils/testing";
import ProductListScreen from "../product-list";

const navigateMock = jest.fn();
const navigation = { navigate: navigateMock } as any;
const route = jest.fn() as any;

const component = <ProductListScreen navigation={navigation} route={route} />;

describe("Product list screen", () => {
  it("should display loading indicator initially", async () => {
    // We render the component and expect to see a loading indicator
    render(component, { wrapper: createReactQueryWrapper });
    expect(screen.queryByTestId(`screen-loader`)).toBeTruthy();

    // We render the product list using useGetAllProducts hook and wait until the products are loaded
    const { result, waitFor } = renderHook(() => useGetAllProducts(), {
      wrapper: createReactQueryWrapper,
    });
    await waitFor(() => result.current.isSuccess);

    // We expect the loading indicator to disappear after the products are loaded
    expect(screen.queryByTestId(`screen-loader`)).not.toBeTruthy();
  });
});
파일 맨 위에서는 테스트를 실행하는 데 필요한 모듈을 import했습니다. 그런 다음 상품 목록 화면을 담을 component라는 변수를 만들어 테스트 케이스 전반에서 재사용할 수 있게 했습니다. 또 이것은 화면이고, 2. 상품 목록 화면 개요 섹션과 22번째 줄에서 화면 props를 선언했으므로, 필요한 화면 props인 navigation과 route도 넘겨야 합니다. 위에서 navigation 객체를 구조 분해한 이유는 다음 테스트 케이스에서 다시 이야기하겠습니다.
테스트 케이스를 이해하기 위해 알아 둘 용어를 간단히 짚어 봅시다.
-
render: 주어진 React 요소를 깊게 렌더링하고, 출력된 컴포넌트 구조를 조회할 수 있는 헬퍼를 반환합니다.
-
screen: 가장 최근 render 호출의 값을 담고 있어서, render가 반환하는 query와 다른 함수에 더 쉽게 접근할 수 있게 해 줍니다.
-
renderHook : 렌더링될 때마다 전달받은 콜백(그 안에서 호출하는 훅 포함)을 호출하는 테스트 컴포넌트를 렌더링합니다.
이 글의 주된 목적은 테스트 라이브러리와 그 함수들을 소개하는 것이 아니라 테스트를 진행하는 방법을 안내하는 것이므로, 이들에 대한 깊은 세부 사항은 건너뛰겠습니다. 어차피 글 전반에서 사용 예시를 충분히 보게 될 겁니다.
위 테스트 케이스는 화면 로더 컴포넌트가 처음에 화면에 표시되는지 확인합니다. render 함수는 createReactQueryWrapper 함수로 감싼 ProductListScreen 컴포넌트를 렌더링하는데, createReactQueryWrapper는 QueryClientProvider를 만드는 간단한 유틸리티 함수입니다. screen.queryByTestId() 함수는 화면 로더가 화면에 표시되는지 확인합니다.
renderHook 함수는 ProductListScreen 컴포넌트에서 상품 데이터를 가져오는 데 쓰는 useGetAllProducts 훅을 테스트하는 데 쓰입니다. renderHook 함수에 wrapper 옵션을 넘겨 useGetAllProducts 훅을 createReactQueryWrapper 함수로 감쌉니다. result 변수에는 useGetAllProducts 훅이 반환한 값이 들어 있습니다. 그리고 waitFor 함수는 result 객체의 isSuccess 프로퍼티가 true가 될 때까지, 즉 상품 데이터를 성공적으로 가져올 때까지 기다립니다.
두 번째 부분은 상품 데이터를 성공적으로 가져온 뒤 화면 로더 컴포넌트가 더 이상 표시되지 않는지 확인합니다.
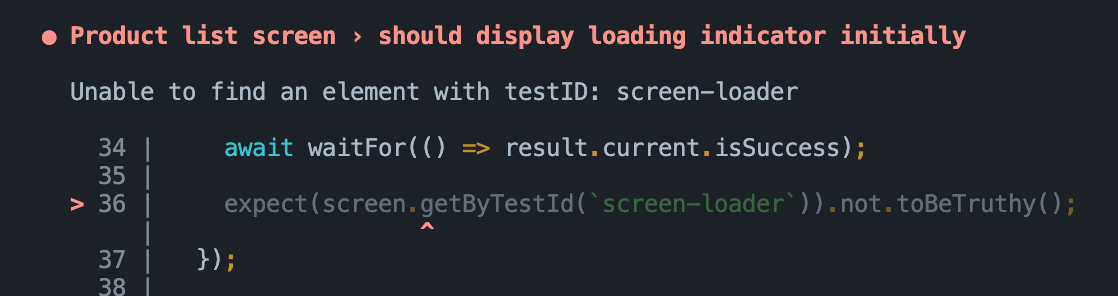
getByTestId 대신 queryByTestId를 쓴 이유는, 데이터를 가져온 뒤에는 화면 로더 컴포넌트가 보이지 않는다는 걸 알고 있기 때문입니다. getByTestId를 쓰면 에러가 발생합니다.
getByTestId를 쓴다면 이런 에러를 만나게 될 수 있습니다.
2.1.2. 테스트 케이스: 상품 목록 데이터를 올바르게 표시해야 한다
import { renderHook } from "@testing-library/react-hooks";
import { render, screen } from "@testing-library/react-native";
import React from "react";
import { useGetAllProducts } from "../../api/product";
import { createReactQueryWrapper } from "../../utils/testing";
import ProductListScreen from "../product-list";

const navigateMock = jest.fn();
const navigation = { navigate: navigateMock } as any;
const route = jest.fn() as any;

const component = <ProductListScreen navigation={navigation} route={route} />;

describe("Product list screen", () => {
  it("should display product list data correctly", async () => {
    // Render the component and wait for it to load
    render(component, { wrapper: createReactQueryWrapper });

    // Check that no product card is rendered before fetching data
    expect(screen.queryByTestId(`product-list-card-1`)).not.toBeTruthy();

    // Fetch the product data
    const { result, waitFor } = renderHook(() => useGetAllProducts(), {
      wrapper: createReactQueryWrapper,
    });

    // Wait for the data to be fetched successfully
    await waitFor(() => result.current.isSuccess);

    // Check that each product card is rendered for each product in the data
    for (const { id } of result.current.data!) {
      expect(screen.queryByTestId(`product-list-card-${id}`)).toBeTruthy();
    }
  });
});
이 테스트 코드는 상품 목록 화면이 가져온 상품 데이터를 올바르게 표시하는지 테스트합니다.
이번에도 데이터를 성공적으로 가져올 때까지 기다린 다음, 가져온 데이터를 순회하면서 데이터의 각 상품마다 testID가 product-list-card-${id}인 상품 목록 카드가 존재하는지 기대하는 방식으로 상품 목록 데이터가 올바르게 표시되는지 확인합니다. id 프로퍼티는 상품 ID를 바탕으로 동적으로 만들어집니다. 테스트가 실패한다면 상품 목록 아이템이 상품 데이터를 올바르게 표시하지 않는다는 뜻입니다.
아래에서 리스트 아이템을 렌더링하려고 renderItem 함수를 어떻게 썼는지 보세요. product.id를 돌면서 문자열 product-list-card와 합쳐 ProductListCard 컴포넌트의 동적 testID를 만듭니다. 이렇게 하면 모든 상품을 각자의 testID prop과 함께 테스트할 수 있습니다.
const renderItem = ({ item: product }: ListRenderItemInfo<Product>) => {
  return (
    <ProductListCard
      {...product}
      testID={`product-list-card-${product.id}`}
      basketButtonTestID={`basket-button-${product.id}`}
      isInBasket={
        typeof productsInBasket.find(
          (productInBasket) => productInBasket.product.id === product.id
        ) !== "undefined"
      }
      onAddToBasketPress={onAddToBasketPress(product)}
      onPress={onProductCardPress(product.id)}
    />
  );
};
2.1.3. 테스트 케이스: 모든 상품 조회 쿼리가 실패하면 에러 텍스트를 표시해야 한다
이 테스트 케이스에서는 모든 상품을 가져오는 API 호출이 실패하는 시나리오를 테스트합니다.
import { renderHook } from "@testing-library/react-hooks";
import { render, screen } from "@testing-library/react-native";
import React from "react";
import { setupGetAllProductsFailedHandler } from "../../../__mocks__/msw/handlers";
import { useGetAllProducts } from "../../api/product";
import { createReactQueryWrapper } from "../../utils/testing";
import ProductListScreen from "../product-list";

const navigateMock = jest.fn();
const navigation = { navigate: navigateMock } as any;
const route = jest.fn() as any;

const component = <ProductListScreen navigation={navigation} route={route} />;

describe("Product list screen", () => {
  it("should display error text in case get all products query fails", async () => {
    // Set up the mock handler for GET requests to the /products endpoint that returns an error response
    setupGetAllProductsFailedHandler();

    // Render the ProductListScreen component wrapped in the React Query wrapper
    render(component, { wrapper: createReactQueryWrapper });

    // Set up a mock React hook that calls the useGetAllProducts hook from the API module
    const { result, waitFor } = renderHook(() => useGetAllProducts(), {
      wrapper: createReactQueryWrapper,
    });

    // Wait for the useGetAllProducts hook to throw an error
    await waitFor(() => result.current.isError);

    // Assert that the "An error occurred" text is displayed on the screen
    expect(screen.getByText(`An error occurred`)).toBeTruthy();
  });
});
API 실패를 재현하기 위해 1.9. MSW로 API 데이터 모킹하기 섹션의 38번째 줄에서 구현한, mock service worker(msw)의 setupGetAllProductsFailedHandler 함수를 씁니다. 그런 다음 render 함수로 ProductListScreen 컴포넌트를 렌더링하고, renderHook 함수로 데이터를 가져오는 useGetAllProducts 훅을 호출합니다.
@testing-library/react-hooks의 waitFor 함수로 result.current 객체의 isError 프로퍼티가 true가 될 때까지 기다립니다. 이렇게 하면 훅 실행이 끝나고 API 호출이 실패했다는 걸 보장할 수 있습니다. 마지막으로 @testing-library/react-native의 getByText 함수로 텍스트가 있는지 확인해, 에러 메시지 "An error occurred"가 화면에 표시되는지 단언합니다. 이 메시지는 상품 목록 화면의 소스 코드에서 다시 확인할 수 있습니다.
2.1.4. 테스트 케이스: 첫 번째 상품 아이템을 누르면 내비게이션 액션을 호출해야 한다
상품 목록 화면에서 가져온 아래 코드를 테스트하겠습니다. 이 코드는 사용자가 리스트의 상품 목록 카드 중 하나를 누르는 동작을 처리합니다.
const onProductCardPress = React.useCallback(
  (productId: number) => () => {
    navigation.navigate(RouteNames.productDetail, { id: productId });
  },
  [navigation]
);

const renderItem = ({ item: product }: ListRenderItemInfo<Product>) => {
  return (
    <ProductListCard
      {...product}
      testID={`product-list-card-${product.id}`}
      basketButtonTestID={`basket-button-${product.id}`}
      isInBasket={
        typeof productsInBasket.find(
          (productInBasket) => productInBasket.product.id === product.id
        ) !== "undefined"
      }
      onAddToBasketPress={onAddToBasketPress(product)}
      onPress={onProductCardPress(product.id)}
    />
  );
};
어떻게 테스트할 수 있는지 아래에서 봅시다.
import { renderHook } from "@testing-library/react-hooks";
import { fireEvent, render, screen } from "@testing-library/react-native";
import React from "react";
import { useGetAllProducts } from "../../api/product";
import { RouteNames } from "../../navigation/route-names";
import { createReactQueryWrapper } from "../../utils/testing";
import ProductListScreen from "../product-list";

const navigateMock = jest.fn();
const navigation = { navigate: navigateMock } as any;
const route = jest.fn() as any;

const component = <ProductListScreen navigation={navigation} route={route} />;

describe("Product list screen", () => {
  it("should call navigation action on pressing the first product item", async () => {
    // render ProductListScreen component with createReactQueryWrapper as a wrapper
    render(component, { wrapper: createReactQueryWrapper });

    // render hook for useGetAllProducts with createReactQueryWrapper as a wrapper
    const { result, waitFor } = renderHook(() => useGetAllProducts(), {
      wrapper: createReactQueryWrapper,
    });

    // wait for useGetAllProducts to succeed
    await waitFor(() => result.current.isSuccess);

    // find first product item and simulate a press event on it
    const firstProductItem = screen.getByTestId(`product-list-card-1`);
    fireEvent.press(firstProductItem);

    // assert that navigation action was called with correct route name and params
    expect(navigateMock).toHaveBeenCalledWith(RouteNames.productDetail, {
      id: 1,
    });
  });
});
이 테스트 코드에서는 상품 아이템을 눌렀을 때 내비게이션 액션이 호출되는지 테스트합니다. 먼저 이전 테스트 케이스들처럼 ProductListScreen 컴포넌트를 렌더링하고 데이터를 성공적으로 가져올 때까지 기다립니다. 그런 다음 리스트에서 첫 번째 상품 아이템을 가져와 fireEvent.press로 누르는 이벤트를 재현합니다. 마지막으로 navigation 객체의 navigate 함수가 기대한 RouteName과 productId 파라미터로 호출되었는지 기대합니다.
2.1.5. 테스트 케이스: 상품 아이템의 장바구니 아이콘을 누르면 상품을 올바르게 추가/제거해야 한다
아래 테스트 케이스는 사용자가 상품 목록 화면의 상품 카드에 있는 장바구니 아이콘을 눌러 장바구니에 상품을 추가하고 제거하는 시나리오를 테스트합니다.
import { NavigationContainer } from "@react-navigation/native";
import { renderHook } from "@testing-library/react-hooks";
import { fireEvent, render, screen } from "@testing-library/react-native";
import React from "react";
import { useGetAllProducts } from "../../api/product";
import ProductStack from "../../navigation/product-stack";
import { useProductStore } from "../../store/product";
import { createReactQueryWrapper } from "../../utils/testing";

// We render the whole app stack instead of rendering just the screen
// because we need access to the react-navigation's header, which wouldn't
// be possible if we just rendered the screen.
const rootAppComponent = (
  <NavigationContainer>
    <ProductStack />
  </NavigationContainer>
);

describe("Product list screen", () => {
  it("should add/remove product item correctly on pressing product items basket icon", async () => {
    // We render the entire app stack and use the createReactQueryWrapper as a
    // wrapper for the render function to set up the React Query Provider.
    render(rootAppComponent, {
      wrapper: createReactQueryWrapper,
    });

    // We use the renderHook function to invoke the useGetAllProducts hook which
    // fetches the data.
    const { result, waitFor } = renderHook(() => useGetAllProducts(), {
      wrapper: createReactQueryWrapper,
    });

    // We use the renderHook function to get access to the useProductStore hook
    // which we will use to check that the products in the basket were added/removed correctly.
    const { result: productStore } = renderHook(() => useProductStore(), {
      wrapper: createReactQueryWrapper,
    });

    // We wait for the useGetAllProducts hook to complete fetching the data before proceeding
    // with the test.
    await waitFor(() => result.current.isSuccess);

    // We get the basket button for the first product item using the getByTestId function.
    const firstProductItemBasketButton = screen.getByTestId(`basket-button-1`);

    // We click the basket button for the first product item.
    fireEvent.press(firstProductItemBasketButton);

    // We check that the basket icon quantity text is present using the getByTestId function.
    expect(screen.getByTestId("basket-icon-quantity-text-1")).toBeTruthy();

    // We check that the products in the basket have been added correctly using the productStore.
    expect(productStore.current.productsInBasket).toHaveLength(1);
    expect(productStore.current.productsInBasket[0].quantity).toBe(1);
    expect(productStore.current.productsInBasket[0].product).toMatchObject(
      result.current.data![0]
    );

    // We click the basket button for the first product item again to remove it from the basket.
    fireEvent.press(firstProductItemBasketButton);

    // We check that the basket icon quantity text is not present.
    expect(
      screen.queryByTestId("basket-icon-quantity-text-1")
    ).not.toBeTruthy();

    // We check that the products in the basket have been removed correctly using the productStore.
    expect(productStore.current.productsInBasket).toHaveLength(0);
  });
});
헤더에 있는 장바구니 아이콘의 기능을 테스트하려면 ProductListScreen뿐 아니라 ProductStack 전체를 렌더링해야 합니다. 테스트 ID로 장바구니 아이콘을 가져오려면 상품 목록 화면의 헤더에 접근해야 하기 때문입니다. 그러려면 NavigationContainer와 함께 ProductStack 전체가 렌더링되어 있어야 합니다.
상품을 성공적으로 가져오고 나면 fireEvent.press로 첫 번째 상품 아이템의 장바구니 아이콘을 누르는 동작을 재현해 상품을 장바구니에 추가합니다. 그런 다음 장바구니 아이콘에 올바른 수량이 표시되는지, 그리고 상품 스토어의 productsInBasket 배열에 상품이 올바른 수량과 상품 객체로 추가되었는지 확인합니다.
그 뒤 장바구니 아이콘을 다시 누르는 동작을 재현해 장바구니에서 상품을 제거하고, 장바구니 아이콘에 더 이상 수량이 표시되지 않는지, 상품 스토어의 productsInBasket 배열이 비었는지 확인합니다.
정리하면 이 테스트 케이스는 상품 목록 화면의 상품 카드에 있는 장바구니 아이콘을 눌러 장바구니에 상품을 추가하고 제거하며 수량을 조절하는 기능을 테스트하고, 상품 스토어가 장바구니의 상품과 수량을 올바르게 관리하는지 확인합니다.
2.1.6. 상품 목록 화면의 전체 테스트 흐름
상품 목록 화면의 전체 테스트 흐름은 다음과 같습니다.
import { NavigationContainer } from "@react-navigation/native";
import { renderHook } from "@testing-library/react-hooks";
import { fireEvent, render, screen } from "@testing-library/react-native";
import React from "react";
import { setupGetAllProductsFailedHandler } from "../../../__mocks__/msw/handlers";
import { useGetAllProducts } from "../../api/product";
import ProductStack from "../../navigation/product-stack";
import { RouteNames } from "../../navigation/route-names";
import { useProductStore } from "../../store/product";
import { createReactQueryWrapper } from "../../utils/testing";
import ProductListScreen from "../product-list";

// We render the whole app stack instead of rendering just the screen
// because we need access to the react-navigation's header, which wouldn't
// be possible if we just rendered the screen.
const rootAppComponent = (
  <NavigationContainer>
    <ProductStack />
  </NavigationContainer>
);
const navigateMock = jest.fn();
const navigation = { navigate: navigateMock } as any;
const route = jest.fn() as any;

const component = <ProductListScreen navigation={navigation} route={route} />;

describe("Product list screen", () => {
  it("should display loading indicator initially", async () => {
    // We render the component and expect to see a loading indicator
    render(component, { wrapper: createReactQueryWrapper });
    expect(screen.queryByTestId(`screen-loader`)).toBeTruthy();

    // We render the product list using useGetAllProducts hook and wait until the products are loaded
    const { result, waitFor } = renderHook(() => useGetAllProducts(), {
      wrapper: createReactQueryWrapper,
    });
    await waitFor(() => result.current.isSuccess);

    // We expect the loading indicator to disappear after the products are loaded
    expect(screen.queryByTestId(`screen-loader`)).not.toBeTruthy();
  });

  it("should display product list data correctly", async () => {
    // Render the component and wait for it to load
    render(component, { wrapper: createReactQueryWrapper });

    // Check that no product card is rendered before fetching data
    expect(screen.queryByTestId(`product-list-card-1`)).not.toBeTruthy();

    // Fetch the product data
    const { result, waitFor } = renderHook(() => useGetAllProducts(), {
      wrapper: createReactQueryWrapper,
    });

    // Wait for the data to be fetched successfully
    await waitFor(() => result.current.isSuccess);

    // Check that each product card is rendered for each product in the data
    for (const { id } of result.current.data!) {
      expect(screen.queryByTestId(`product-list-card-${id}`)).toBeTruthy();
    }
  });

  it("should display error text in case get all products query fails", async () => {
    // Set up the mock handler for GET requests to the /products endpoint that returns an error response
    setupGetAllProductsFailedHandler();

    // Render the ProductListScreen component wrapped in the React Query wrapper
    render(component, { wrapper: createReactQueryWrapper });

    // Set up a mock React hook that calls the useGetAllProducts hook from the API module
    const { result, waitFor } = renderHook(() => useGetAllProducts(), {
      wrapper: createReactQueryWrapper,
    });

    // Wait for the useGetAllProducts hook to throw an error
    await waitFor(() => result.current.isError);

    // Assert that the "An error occurred" text is displayed on the screen
    expect(screen.getByText(`An error occurred`)).toBeTruthy();
  });

  it("should call navigation action on pressing the first product item", async () => {
    // Render the ProductListScreen component along with react-query wrapper
    render(component, { wrapper: createReactQueryWrapper });

    // Render the useGetAllProducts hook with react-query wrapper to fetch data
    const { result, waitFor } = renderHook(() => useGetAllProducts(), {
      wrapper: createReactQueryWrapper,
    });

    // Wait for the data to be fetched
    await waitFor(() => result.current.isSuccess);

    // Find the first product card in the list and simulate a press event on it
    const firstProductItem = screen.getByTestId(`product-list-card-1`);
    fireEvent.press(firstProductItem);

    // Expect that the navigation function is called with the correct route name and params
    expect(navigateMock).toHaveBeenCalledWith(RouteNames.productDetail, {
      id: 1,
    });
  });

  it("should add/remove product item correctly on pressing product items basket icon", async () => {
    // We render the entire app stack and use the createReactQueryWrapper as a
    // wrapper for the render function to set up the React Query Provider.
    render(rootAppComponent, {
      wrapper: createReactQueryWrapper,
    });

    // We use the renderHook function to invoke the useGetAllProducts hook which
    // fetches the data.
    const { result, waitFor } = renderHook(() => useGetAllProducts(), {
      wrapper: createReactQueryWrapper,
    });

    // We use the renderHook function to get access to the useProductStore hook
    // which we will use to check that the products in the basket were added/removed correctly.
    const { result: productStore } = renderHook(() => useProductStore(), {
      wrapper: createReactQueryWrapper,
    });

    // We wait for the useGetAllProducts hook to complete fetching the data before proceeding
    // with the test.
    await waitFor(() => result.current.isSuccess);

    // We get the basket button for the first product item using the getByTestId function.
    const firstProductItemBasketButton = screen.getByTestId(`basket-button-1`);

    // We click the basket button for the first product item.
    fireEvent.press(firstProductItemBasketButton);

    // We check that the basket icon quantity text is present using the getByTestId function.
    expect(screen.getByTestId("basket-icon-quantity-text-1")).toBeTruthy();

    // We check that the products in the basket have been added correctly using the productStore.
    expect(productStore.current.productsInBasket).toHaveLength(1);
    expect(productStore.current.productsInBasket[0].quantity).toBe(1);
    expect(productStore.current.productsInBasket[0].product).toMatchObject(
      result.current.data![0]
    );

    // We click the basket button for the first product item again to remove it from the basket.
    fireEvent.press(firstProductItemBasketButton);

    // We check that the basket icon quantity text is not present.
    expect(
      screen.queryByTestId("basket-icon-quantity-text-1")
    ).not.toBeTruthy();

    // We check that the products in the basket have been removed correctly using the productStore.
    expect(productStore.current.productsInBasket).toHaveLength(0);
  });
});
마치며
정리하면, 이 글에서는 요즘 React/React Native 앱에서 꽤 인기 있는 React-Query와 Zustand 라이브러리를 쓰는 React Native 앱을 위한 효과적인 테스트 전략을 살펴봤습니다. 간단한 쇼핑 앱을 예로 들고 자세하고 충실한 예제를 제공하면서, 테스트 과정과 테스트 구현을 통해 코드 품질을 보장하는 방법을 다뤘습니다. 아래 링크에서 전체 소스 코드를 자유롭게 확인해 보세요. 좋은 하루 보내세요!
게시처
이 글은 다음 곳에도 게시되어 있습니다.