# TypeScript로 React Native 내비게이션 구조 잡기
By Tarik Pinarci (https://tarikpinarci.com). Published 2022-09-24. Canonical: https://tarikpinarci.com/ko/blog/react-navigation-with-typescript
React Navigation: 타입을 제대로 활용하기
요즘 내비게이션은 어떤 모바일 앱에서든 가장 기본적인 기능입니다. React Native 세계에서는 [React Navigation](https://reactnavigation.org/)이 손안에 있습니다.
이 글에서는 일반적인 React Navigation을 TypeScript로 구현하는 방법을 살펴보면서, TypeScript를 쓰는 여러 전략을 비교해 보겠습니다.
그리고 더 중요한 것은, TypeScript의 기능을 최대한 활용해 내비게이션을 더 확장 가능한 아키텍처로 만드는 방법도 다룬다는 점입니다.
> 주의: 이 글의 예제는 @react-navigation@6.x 버전을 기준으로 작성되었습니다.
> 주의: 이 글에서 다룰 방법과 전략은 반드시 그대로 따라야 하는 것이 아니라, 제가 선호하는 방식이며 독자 여러분과 나누면 유용하겠다고 생각한 것들입니다. [React Navigation에는 이미 TypeScript 사용법에 관한 훌륭한 문서가 있습니다.](https://reactnavigation.org/docs/typescript) 그러니 [이 문서](https://reactnavigation.org/docs/typescript/)만 따라 해도 이미 멋진 React Navigation TypeScript 구조를 만들 수 있습니다.
### Stack Navigator 만들기
[React Navigation](https://reactnavigation.org/) 패키지로 [stack navigator](https://reactnavigation.org/docs/stack-navigator/)를 만드는 방법을 살펴봅시다.
[React Navigation](https://reactnavigation.org/docs/stack-navigator/#api-definition)에서 가져온 아래 예제를 보세요.
```tsx
import { createStackNavigator } from "@react-navigation/stack";
import * as React from "react";
import { View } from "react-native";
const Stack = createStackNavigator();
const Home = () => ;
const Notifications = () => ;
const Profile = () => ;
const Settings = () => ;
function AppStack() {
return (
);
}
```
보시다시피 여기에는 TypeScript와 관련된 것이 전혀 없으니, 이 코드에 TypeScript를 조금 더해 봅시다.
```tsx
import { createStackNavigator } from "@react-navigation/stack";
import * as React from "react";
import { View } from "react-native";
type AppStackParamList = {
Home: undefined;
Notifications: undefined;
Profile: undefined;
Settings: undefined;
};
const Home = () => ;
const Notifications = () => ;
const Profile = () => ;
const Settings = () => ;
const Stack = createStackNavigator();
function AppStack() {
return (
);
}
```
위에서는 createStackNavigator에 ParamList 타입을 추가했습니다. 그런데 createStackNavigator가 제네릭 타입을 받는다는 걸 어떻게 알 수 있을까요? 알아내는 방법은 몇 가지가 있습니다. 먼저 [문서](https://reactnavigation.org/docs/typescript/#type-checking-the-navigator)를 확인하는 것은 언제나 좋은 습관입니다. 이 예제의 경우 문서에 이미 해당 섹션이 있다는 걸 알 수 있습니다.
반대로 createStackNavigator의 이 타입이 웹사이트에 문서화되어 있지 않다고 가정해 봅시다. 그럴 때 함수가 타입을 받는지 알아내는 방법은 함수의 타입 정의로 바로 이동해 보는 것입니다. 타입, 인터페이스, 제네릭이 잔뜩 날아다니니 처음에는 겁이 날 수 있지만, 타입 정의로 이동하는 습관이 들수록 훨씬 덜 버겁게 느껴질 겁니다.
### **업데이트!**
TypeScript로 복잡함을 더 감수하고 싶고, React 팀이 만든 훌륭한 TS 유틸리티(React.ComponentProps)를 외면하고 싶다면 이 글을 끝까지 계속 읽으셔도 됩니다.
하지만 아마 이 섹션이 끝이 될지도 모르겠습니다!
React.ComponentProps으로 각 스택 화면의 타입과 설정을 가져올 수 있습니다. 결과는 그야말로 훌륭합니다.
전체 예제는 아래를 보세요.
```tsx
import { createStackNavigator } from "@react-navigation/stack";
import * as React from "react";
import { View } from "react-native";
type AppStackParamList = {
Home: undefined;
Notifications: undefined;
Profile: undefined;
Settings: undefined;
};
const Home = () => ;
const Notifications = () => ;
const Profile = () => ;
const Settings = () => ;
const Stack = createStackNavigator();
const routes: Array> = [
{
name: "Home",
component: Home,
},
{
name: "Notifications",
component: Notifications,
},
{
name: "Profile",
component: Profile,
},
{
name: "Settings",
component: Settings,
},
];
function AppStack() {
return (
{routes.map((routeConfig) => (
))}
);
}
```
그리고 네, 여전히 인텔리센스가 동작하고, 스택에 관련 없는 화면*(예: 스택 타입 선언에 없는 화면)*을 넣으면 여전히 이렇게 경고해 줍니다.
_유효하지 않은 화면_
인텔리센스도 그대로 있습니다.
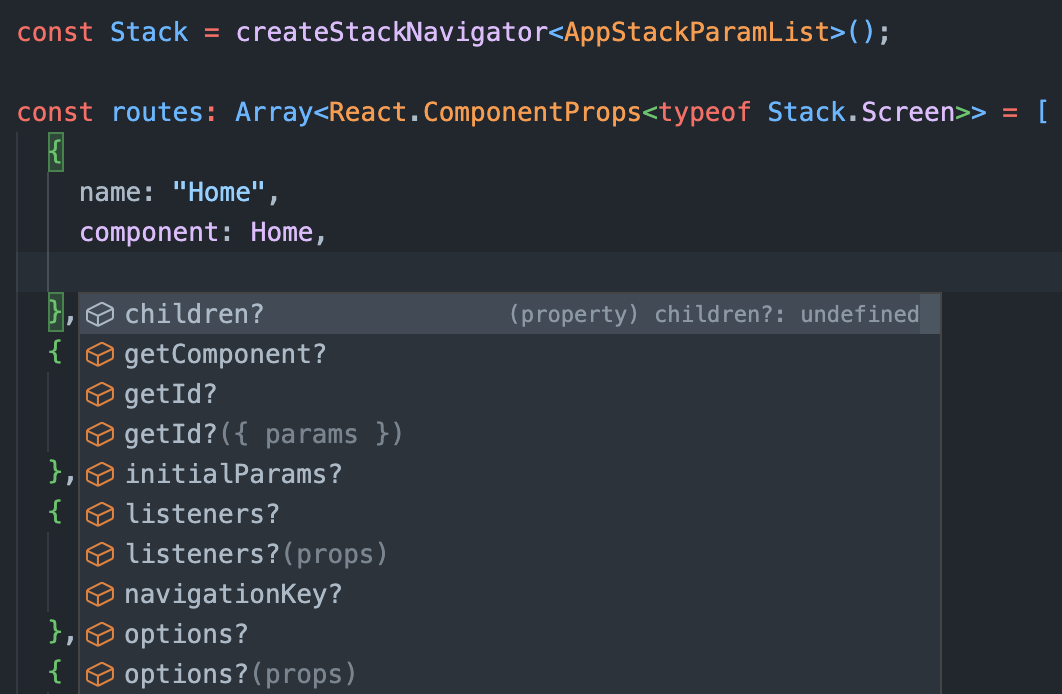
게다가 더 깔끔하고, 설정하기 쉽고, 동적입니다.
```tsx
const getAuthStackRoutes = (
// other parameters...
theme: ThemeType
): Array> => {
// more business logic...
return [
{
name: "Home",
component: Home,
options: {
headerStyle: {
backgroundColor: theme.colors.primary,
// other theme stylings...
},
},
},
];
};
```
결론적으로 이 방식을 쓰면 복잡한 내비게이션 구조를 쉽게 관리할 수 있습니다*(적어도 이 글의 다른 방식들과 비교하면 그렇습니다)*. JSX가 더 깔끔해지는 동시에 라우트를 더 동적이고 모듈화된 방식으로 설정할 수 있기 때문입니다.
### TypeScript 활용을 한 단계 더
createStackNavigator의 제네릭 타입만 선언하는 데서 끝나지 않습니다. Stack.Navigator가 가질 자식 요소의 타입은 어떨까요? [이 개념은 공식 문서에 이미 꽤 잘 정의되어 있지만](https://reactnavigation.org/docs/typescript/#type-checking-screens), 구조를 더 분리된 방식으로 만들기 위해 이걸 어떻게 가지고 놀 수 있는지 아래에서 살펴봅시다.
```tsx
import type { RouteConfig, StackNavigationState } from "@react-navigation/core";
import {
createStackNavigator,
StackNavigationEventMap,
StackNavigationOptions,
} from "@react-navigation/stack";
import * as React from "react";
import { View } from "react-native";
// stack param list type
type AppStackParamList = {
Home: undefined;
Notifications: undefined;
Profile: undefined;
Settings: undefined;
};
// type of the single route in app stack
type AppStackRoutesType = RouteConfig<
AppStackParamList,
keyof AppStackParamList,
StackNavigationState,
StackNavigationOptions,
StackNavigationEventMap
>;
// mocking the screen components for the sake of example
const Home = () => ;
const Notifications = () => ;
const Profile = () => ;
const Settings = () => ;
// strictly typed array of app stack routes
const appStackRoutes: Array = [
{
name: "Home",
component: Home,
},
{
name: "Notifications",
component: Notifications,
},
{
name: "Profile",
component: Profile,
},
{
name: "Settings",
component: Settings,
},
];
const Stack = createStackNavigator();
function AppStack() {
return (
{/** mapping the app stack routes */}
{appStackRoutes.map((stackRoute) => (
))}
);
}
```
이런, 여기서 많은 일이 일어나고 있네요… 코드 블록을 부분별로 나눠 봅시다.
```tsx
import type { RouteConfig, StackNavigationState } from "@react-navigation/core";
import {
createStackNavigator,
StackNavigationEventMap,
StackNavigationOptions,
} from "@react-navigation/stack";
import * as React from "react";
import { View } from "react-native";
```
코드 맨 위에서는 필요한 모듈을 import합니다. 타입, 함수, 그 밖에 필요한 것들입니다. 재미는 없지만 필요합니다 :)
```tsx
// mocking the screen components for the sake of example
const Home = () => ;
const Notifications = () => ;
const Profile = () => ;
const Settings = () => ;
```
위에서는 예제를 더 단순하게 보여 주기 위해 react-native에서 [View](https://reactnative.dev/docs/view) 컴포넌트를 import합니다.
```tsx
// type of the single route in app stack
type AppStackRoutesType = RouteConfig<
AppStackParamList,
keyof AppStackParamList,
StackNavigationState,
StackNavigationOptions,
StackNavigationEventMap
>;
```
이제 재미있는 부분입니다. @react-navigation/core에서 import한 RouteConfig는 [제네릭 타입](https://www.typescriptlang.org/docs/handbook/2/generics.html)으로 정확히 다섯 개의 타입을 받습니다. 이 타입 정의는 공식 React Navigation 웹사이트에 문서화되어 있지 않지만, 앞서 말한 타입 정의로 이동하는 방법만으로도 알아낼 수 있습니다.
일반적인 React Native TypeScript 프로젝트에서는 굳이 필요 없어 보일 수도 있지만, 여러 가지 이점이 있습니다. 아래 섹션에서 다루겠습니다.
### [IntelliSense](https://code.visualstudio.com/docs/editor/intellisense)
스택 라우트(앱 라우트) 배열에 엄격한 타입을 지정했으므로, 이제 배열의 모든 요소는 배열의 타입 정의를 반드시 따라야 합니다. 즉, 배열에 새 요소를 추가할 때 인텔리센스가 바로 동작합니다.
게다가 이 타입을 적용하면 앱 라우트에 새 요소를 추가할 때마다 AppStackRoutesType\*을 _업데이트하도록 강제됩니다. 그렇지 않으면 AppStackRoutesType(AppStackParamList)에 없는 새 요소는 추가할 수 없습니다_.\*
### 라우트 매핑하기
마지막 부분입니다. createStackNavigator로 stack navigator를 만듭니다. 그다음은 앞에서 만든 배열을 엄격한 타입과 함께 매핑하기만 하면 됩니다.
결국 배열의 모든 요소를 믿을 수 있습니다. 모든 요소가 올바른 타입을 가지므로 [spread 문법](https://developer.mozilla.org/en-US/docs/Web/JavaScript/Reference/Operators/Spread_syntax)을 써도 안전합니다.
```tsx
const Stack = createStackNavigator();
function AppStack() {
return (
{/** mapping the app stack routes */}
{appStackRoutes.map((stackRoute) => (
))}
);
}
```
### 정말 마지막 부분이었을까요?
음… 아닙니다!
다룬 예제에서 타입을 더 개선할 수 있습니다.
```tsx
// generic stack routes type
export type StackRoutesType = Array<
RouteConfig<
ParamList,
keyof ParamList,
StackNavigationState,
StackNavigationOptions,
StackNavigationEventMap
>
>;
type AppStackRoutesType = StackRoutesType;
// mocking the screen components for the sake of example
const Home = () => ;
const Notifications = () => ;
const Profile = () => ;
const Settings = () => ;
// strictly typed array of app stack routes
const appStackRoutes: AppStackRoutesType = [
{
name: "Home",
component: Home,
},
{
name: "Notifications",
component: Notifications,
},
{
name: "Profile",
component: Profile,
},
{
name: "Settings",
component: Settings,
},
];
```
눈치채셨을 차이점은 제네릭 타입을 받아서 앞에서 본 타입과 같아지는 StackRoutesType이 생겼다는 것입니다. 그런데 이게 무슨 이점이 있냐고 물으실 수 있습니다. 이 질문에는 눈으로 보여 드리는 게 낫겠습니다.
```tsx
// too much duplicated code...
type AppStackRoutesType = RouteConfig<
AppStackParamList,
keyof AppStackParamList,
StackNavigationState,
StackNavigationOptions,
StackNavigationEventMap
>;
type OtherStackRoutesType = RouteConfig<
OtherStackParamList,
keyof OtherStackParamList,
StackNavigationState,
StackNavigationOptions,
StackNavigationEventMap
>;
type AnotherStackRoutesType = RouteConfig<
AnotherStackParamList,
keyof AnotherStackParamList,
StackNavigationState,
StackNavigationOptions,
StackNavigationEventMap
>;
```
제네릭 StackRoutesType을 쓰지 않기로 했다면, 앱의 모든 스택마다 타입을 중복해서 작성해야 했을 겁니다.
그러면 앱이 커질수록 악몽이 됩니다. _(여기서의 전제는 앱의 스택 수와 앱의 복잡도가 정비례한다는 것입니다. 사실 항상 100% 맞는 가정은 아니지만, 이 예제에는 적합합니다)_
```tsx
// generic stack routes type
export type StackRoutesType = Array<
RouteConfig<
ParamList,
keyof ParamList,
StackNavigationState,
StackNavigationOptions,
StackNavigationEventMap
>
>;
// becomes one line typings for each stack
type AppStackRoutesType = StackRoutesType;
type OtherStackRoutesType = StackRoutesType;
type AnotherStackRoutesType = StackRoutesType;
```
반면 제네릭 타입을 쓰면 위처럼 훨씬 단순하고 깔끔해집니다.
## 최종 모습
일반적인 Stack 함수가 두 가지 시나리오에서 어떻게 보이는지 비교해 봅시다.
_그림 1: JSX에서 스택 화면을 하나하나 전부 렌더링하기._
```tsx
// ...imports, components
function AppStack() {
return (
{/** n more screens... */}
);
}
```
_그림 2: 엄격한 TypeScript 타입으로 만든 스택 라우트 배열을 사용해 화면 렌더링하기. 🎉_
```tsx
function AppStack() {
return (
{appStackRoutes.map((stackRoute) => (
))}
);
}
```
### 하나 더… Navigator props는요?
고려할 것이 하나 더 남아 있을 수 있습니다. 바로 stack navigator의 props입니다. 아래 StackNavigator를 보면 navigator 하나에 설정이 한 덩어리 있습니다. 이 설정들도 JSX에서 분리하면 어떨까요?
```tsx
import type {
DefaultNavigatorOptions,
ParamListBase,
StackNavigationState,
} from "@react-navigation/core";
import {
StackNavigationEventMap,
StackNavigationOptions,
} from "@react-navigation/stack";
// other necessary imports for screens...
// generic typing for stack navigator options
type StackNavigatorOptions =
DefaultNavigatorOptions<
ParamList,
StackNavigationState,
StackNavigationOptions,
StackNavigationEventMap
>;
// omit the children as it corresponds to stack screen
const appStackNavigatorProps: Omit<
StackNavigatorOptions,
"children"
> = {
initialRouteName: "Home",
screenOptions: {
headerShown: false,
cardOverlayEnabled: true,
gestureEnabled: false,
cardStyle: {
backgroundColor: "royalblue",
},
headerLeftContainerStyle: {
backgroundColor: "firebrick",
},
presentation: "modal",
headerTitleStyle: {
fontSize: 24,
color: "olivedrab",
},
},
// ...rest
};
// screen components and stack routes...
function AppStack() {
return (
{appStackRoutes.map((stackRoute) => (
))}
);
}
```
13번째 줄부터는 왜 제네릭 타입을 쓰는지 이미 익숙하실 겁니다. 스택 라우트와 비교했을 때 타입상 유일한 차이는 @react-navigation/core에서 import한 DefaultNavigatorOptions 타입일 겁니다. 타입 이름 자체가 설명해 주듯이, navigator의 옵션입니다.
앞서 말한 *RouteConfig* 타입과 마찬가지로 여러 개의 제네릭 타입을 받습니다. 그리고 이미 Stack.Screen에 해당하는 Stack.Navigator의 자식을 렌더링하고 있으므로, children 키는 명시적으로 [생략(Omit)](https://www.typescriptlang.org/docs/handbook/utility-types.html#omittype-keys)한다는 점을 기억하세요.
22번째 줄에서는 navigator의 옵션을 나타낼 완전히 새로운 객체를 만듭니다(navigator 옵션 타입을 만족하는 객체를 반환하기만 하면 함수여도 됩니다).
그 결과 50번째 줄에서, 이 객체는 주어진 타입을 만족하는 한 spread 문법으로 안전하게 쓸 수 있습니다.
훨씬 깔끔한 JSX… 제 생각에는요…
### 최종 모습: Navigator props
다시 한번 일반적인 Stack 함수가 두 가지 시나리오에서 어떻게 보이는지 비교해 봅시다.
_그림 1: stack navigator 설정을 JSX 안에 두기._
```tsx
function AppStack() {
return (
{appStackRoutes.map((stackRoute) => (
))}
);
}
```
_그림 2: stack navigator 설정을 JSX에서 분리하기._
```tsx
// ...
function AppStack() {
return (
{appStackRoutes.map((stackRoute) => (
))}
);
}
```
---
### 마치며
이 글에서는 TypeScript를 실제로 활용해 React Native 내비게이터를 더 깔끔하게 구성하는 방법을 다뤘습니다.
모두 버그 없는 하루 보내세요.
### 게시처
이 글은 다음 곳에도 게시되어 있습니다.
- [Medium](https://medium.com/better-programming/react-navigation-with-typescript-fa7805f52ab0)