
React Navigation: 타입을 제대로 활용하기
요즘 내비게이션은 어떤 모바일 앱에서든 가장 기본적인 기능입니다. React Native 세계에서는 React Navigation이 손안에 있습니다.
이 글에서는 일반적인 React Navigation을 TypeScript로 구현하는 방법을 살펴보면서, TypeScript를 쓰는 여러 전략을 비교해 보겠습니다.
그리고 더 중요한 것은, TypeScript의 기능을 최대한 활용해 내비게이션을 더 확장 가능한 아키텍처로 만드는 방법도 다룬다는 점입니다.
주의: 이 글의 예제는 @react-navigation@6.x 버전을 기준으로 작성되었습니다.
주의: 이 글에서 다룰 방법과 전략은 반드시 그대로 따라야 하는 것이 아니라, 제가 선호하는 방식이며 독자 여러분과 나누면 유용하겠다고 생각한 것들입니다. React Navigation에는 이미 TypeScript 사용법에 관한 훌륭한 문서가 있습니다. 그러니 이 문서만 따라 해도 이미 멋진 React Navigation TypeScript 구조를 만들 수 있습니다.
Stack Navigator 만들기
React Navigation 패키지로 stack navigator를 만드는 방법을 살펴봅시다.
React Navigation에서 가져온 아래 예제를 보세요.
import { createStackNavigator } from "@react-navigation/stack";
import * as React from "react";
import { View } from "react-native";

const Stack = createStackNavigator();

const Home = () => <View />;
const Notifications = () => <View />;
const Profile = () => <View />;
const Settings = () => <View />;

function AppStack() {
  return (
    <Stack.Navigator>
      <Stack.Screen name="Home" component={Home} />
      <Stack.Screen name="Notifications" component={Notifications} />
      <Stack.Screen name="Profile" component={Profile} />
      <Stack.Screen name="Settings" component={Settings} />
    </Stack.Navigator>
  );
}
보시다시피 여기에는 TypeScript와 관련된 것이 전혀 없으니, 이 코드에 TypeScript를 조금 더해 봅시다.
import { createStackNavigator } from "@react-navigation/stack";
import * as React from "react";
import { View } from "react-native";

type AppStackParamList = {
  Home: undefined;
  Notifications: undefined;
  Profile: undefined;
  Settings: undefined;
};

const Home = () => <View />;
const Notifications = () => <View />;
const Profile = () => <View />;
const Settings = () => <View />;

const Stack = createStackNavigator<AppStackParamList>();

function AppStack() {
  return (
    <Stack.Navigator>
      <Stack.Screen name="Home" component={Home} />
      <Stack.Screen name="Notifications" component={Notifications} />
      <Stack.Screen name="Profile" component={Profile} />
      <Stack.Screen name="Settings" component={Settings} />
    </Stack.Navigator>
  );
}
위에서는 createStackNavigator에 ParamList 타입을 추가했습니다. 그런데 createStackNavigator가 제네릭 타입을 받는다는 걸 어떻게 알 수 있을까요? 알아내는 방법은 몇 가지가 있습니다. 먼저 문서를 확인하는 것은 언제나 좋은 습관입니다. 이 예제의 경우 문서에 이미 해당 섹션이 있다는 걸 알 수 있습니다.
반대로 createStackNavigator의 이 타입이 웹사이트에 문서화되어 있지 않다고 가정해 봅시다. 그럴 때 함수가 타입을 받는지 알아내는 방법은 함수의 타입 정의로 바로 이동해 보는 것입니다. 타입, 인터페이스, 제네릭이 잔뜩 날아다니니 처음에는 겁이 날 수 있지만, 타입 정의로 이동하는 습관이 들수록 훨씬 덜 버겁게 느껴질 겁니다.
업데이트!
TypeScript로 복잡함을 더 감수하고 싶고, React 팀이 만든 훌륭한 TS 유틸리티(React.ComponentProps)를 외면하고 싶다면 이 글을 끝까지 계속 읽으셔도 됩니다.
하지만 아마 이 섹션이 끝이 될지도 모르겠습니다!
React.ComponentProps
전체 예제는 아래를 보세요.
import { createStackNavigator } from "@react-navigation/stack";
import * as React from "react";
import { View } from "react-native";

type AppStackParamList = {
  Home: undefined;
  Notifications: undefined;
  Profile: undefined;
  Settings: undefined;
};

const Home = () => <View />;
const Notifications = () => <View />;
const Profile = () => <View />;
const Settings = () => <View />;

const Stack = createStackNavigator<AppStackParamList>();

const routes: Array<React.ComponentProps<typeof Stack.Screen>> = [
  {
    name: "Home",
    component: Home,
  },
  {
    name: "Notifications",
    component: Notifications,
  },
  {
    name: "Profile",
    component: Profile,
  },
  {
    name: "Settings",
    component: Settings,
  },
];

function AppStack() {
  return (
    <Stack.Navigator>
      {routes.map((routeConfig) => (
        <Stack.Screen key={routeConfig.name} {...routeConfig} />
      ))}
    </Stack.Navigator>
  );
}
그리고 네, 여전히 인텔리센스가 동작하고, 스택에 관련 없는 화면*(예: 스택 타입 선언에 없는 화면)*을 넣으면 여전히 이렇게 경고해 줍니다.
 유효하지 않은 화면
인텔리센스도 그대로 있습니다.
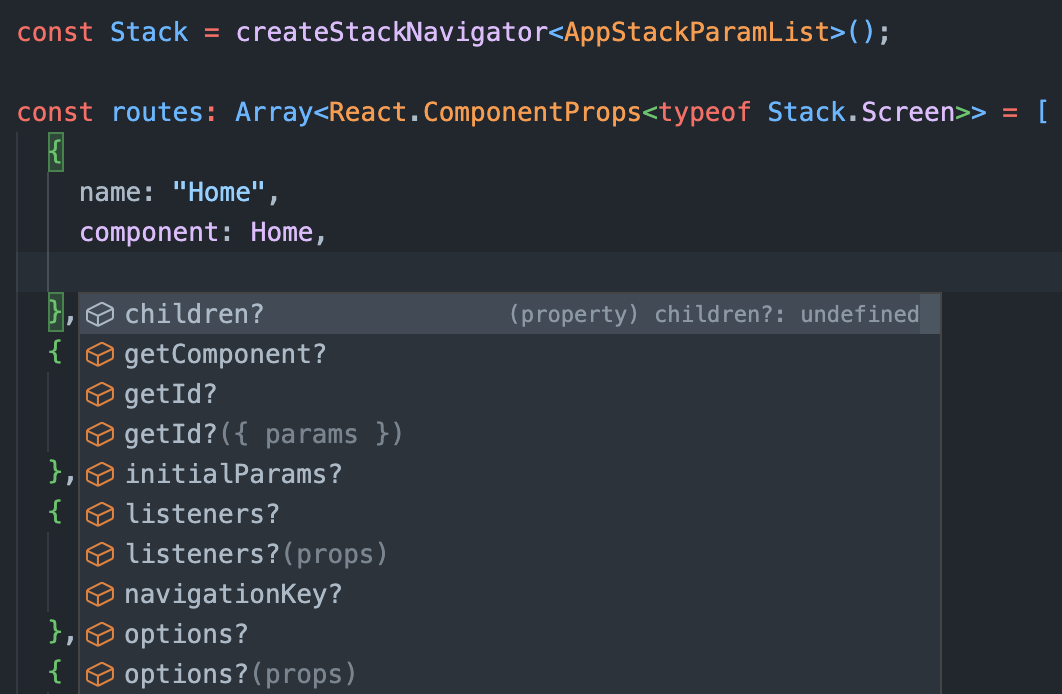
게다가 더 깔끔하고, 설정하기 쉽고, 동적입니다.
const getAuthStackRoutes = (
  // other parameters...
  theme: ThemeType
): Array<React.ComponentProps<typeof Stack.Screen>> => {
  // more business logic...

  return [
    {
      name: "Home",
      component: Home,
      options: {
        headerStyle: {
          backgroundColor: theme.colors.primary,
          // other theme stylings...
        },
      },
    },
  ];
};
결론적으로 이 방식을 쓰면 복잡한 내비게이션 구조를 쉽게 관리할 수 있습니다*(적어도 이 글의 다른 방식들과 비교하면 그렇습니다)*. JSX가 더 깔끔해지는 동시에 라우트를 더 동적이고 모듈화된 방식으로 설정할 수 있기 때문입니다.
TypeScript 활용을 한 단계 더
createStackNavigator의 제네릭 타입만 선언하는 데서 끝나지 않습니다. Stack.Navigator가 가질 자식 요소의 타입은 어떨까요? 이 개념은 공식 문서에 이미 꽤 잘 정의되어 있지만, 구조를 더 분리된 방식으로 만들기 위해 이걸 어떻게 가지고 놀 수 있는지 아래에서 살펴봅시다.
import type { RouteConfig, StackNavigationState } from "@react-navigation/core";
import {
  createStackNavigator,
  StackNavigationEventMap,
  StackNavigationOptions,
} from "@react-navigation/stack";
import * as React from "react";
import { View } from "react-native";

// stack param list type
type AppStackParamList = {
  Home: undefined;
  Notifications: undefined;
  Profile: undefined;
  Settings: undefined;
};

// type of the single route in app stack
type AppStackRoutesType = RouteConfig<
  AppStackParamList,
  keyof AppStackParamList,
  StackNavigationState<AppStackParamList>,
  StackNavigationOptions,
  StackNavigationEventMap
>;

// mocking the screen components for the sake of example
const Home = () => <View />;
const Notifications = () => <View />;
const Profile = () => <View />;
const Settings = () => <View />;

// strictly typed array of app stack routes
const appStackRoutes: Array<AppStackRoutesType> = [
  {
    name: "Home",
    component: Home,
  },
  {
    name: "Notifications",
    component: Notifications,
  },
  {
    name: "Profile",
    component: Profile,
  },
  {
    name: "Settings",
    component: Settings,
  },
];

const Stack = createStackNavigator<AppStackParamList>();

function AppStack() {
  return (
    <Stack.Navigator>
      {/** mapping the app stack routes */}
      {appStackRoutes.map((stackRoute) => (
        <Stack.Screen key={stackRoute.name} {...stackRoute} />
      ))}
    </Stack.Navigator>
  );
}
이런, 여기서 많은 일이 일어나고 있네요… 코드 블록을 부분별로 나눠 봅시다.
import type { RouteConfig, StackNavigationState } from "@react-navigation/core";
import {
  createStackNavigator,
  StackNavigationEventMap,
  StackNavigationOptions,
} from "@react-navigation/stack";
import * as React from "react";
import { View } from "react-native";
코드 맨 위에서는 필요한 모듈을 import합니다. 타입, 함수, 그 밖에 필요한 것들입니다. 재미는 없지만 필요합니다 :)
// mocking the screen components for the sake of example
const Home = () => <View />;
const Notifications = () => <View />;
const Profile = () => <View />;
const Settings = () => <View />;
위에서는 예제를 더 단순하게 보여 주기 위해 react-native에서 View 컴포넌트를 import합니다.
// type of the single route in app stack
type AppStackRoutesType = RouteConfig<
  AppStackParamList,
  keyof AppStackParamList,
  StackNavigationState<AppStackParamList>,
  StackNavigationOptions,
  StackNavigationEventMap
>;
이제 재미있는 부분입니다. @react-navigation/core에서 import한 RouteConfig는 제네릭 타입으로 정확히 다섯 개의 타입을 받습니다. 이 타입 정의는 공식 React Navigation 웹사이트에 문서화되어 있지 않지만, 앞서 말한 타입 정의로 이동하는 방법만으로도 알아낼 수 있습니다.
일반적인 React Native TypeScript 프로젝트에서는 굳이 필요 없어 보일 수도 있지만, 여러 가지 이점이 있습니다. 아래 섹션에서 다루겠습니다.
IntelliSense
스택 라우트(앱 라우트) 배열에 엄격한 타입을 지정했으므로, 이제 배열의 모든 요소는 배열의 타입 정의를 반드시 따라야 합니다. 즉, 배열에 새 요소를 추가할 때 인텔리센스가 바로 동작합니다.
게다가 이 타입을 적용하면 앱 라우트에 새 요소를 추가할 때마다 AppStackRoutesType*을 업데이트하도록 강제됩니다. 그렇지 않으면 AppStackRoutesType(AppStackParamList)에 없는 새 요소는 추가할 수 없습니다.*
라우트 매핑하기
마지막 부분입니다. createStackNavigator로 stack navigator를 만듭니다. 그다음은 앞에서 만든 배열을 엄격한 타입과 함께 매핑하기만 하면 됩니다.
결국 배열의 모든 요소를 믿을 수 있습니다. 모든 요소가 올바른 타입을 가지므로 spread 문법을 써도 안전합니다.
const Stack = createStackNavigator<AppStackParamList>();

function AppStack() {
  return (
    <Stack.Navigator>
      {/** mapping the app stack routes */}
      {appStackRoutes.map((stackRoute) => (
        <Stack.Screen key={stackRoute.name} {...stackRoute} />
      ))}
    </Stack.Navigator>
  );
}
정말 마지막 부분이었을까요?
음… 아닙니다!
다룬 예제에서 타입을 더 개선할 수 있습니다.
// generic stack routes type
export type StackRoutesType<ParamList extends ParamListBase> = Array<
  RouteConfig<
    ParamList,
    keyof ParamList,
    StackNavigationState<ParamList>,
    StackNavigationOptions,
    StackNavigationEventMap
  >
>;

type AppStackRoutesType = StackRoutesType<AppStackParamList>;

// mocking the screen components for the sake of example
const Home = () => <View />;
const Notifications = () => <View />;
const Profile = () => <View />;
const Settings = () => <View />;

// strictly typed array of app stack routes
const appStackRoutes: AppStackRoutesType = [
  {
    name: "Home",
    component: Home,
  },
  {
    name: "Notifications",
    component: Notifications,
  },
  {
    name: "Profile",
    component: Profile,
  },
  {
    name: "Settings",
    component: Settings,
  },
];
눈치채셨을 차이점은 제네릭 타입을 받아서 앞에서 본 타입과 같아지는 StackRoutesType이 생겼다는 것입니다. 그런데 이게 무슨 이점이 있냐고 물으실 수 있습니다. 이 질문에는 눈으로 보여 드리는 게 낫겠습니다.
// too much duplicated code...

type AppStackRoutesType = RouteConfig<
  AppStackParamList,
  keyof AppStackParamList,
  StackNavigationState<AppStackParamList>,
  StackNavigationOptions,
  StackNavigationEventMap
>;

type OtherStackRoutesType = RouteConfig<
  OtherStackParamList,
  keyof OtherStackParamList,
  StackNavigationState<OtherStackParamList>,
  StackNavigationOptions,
  StackNavigationEventMap
>;

type AnotherStackRoutesType = RouteConfig<
  AnotherStackParamList,
  keyof AnotherStackParamList,
  StackNavigationState<AnotherStackParamList>,
  StackNavigationOptions,
  StackNavigationEventMap
>;
제네릭 StackRoutesType을 쓰지 않기로 했다면, 앱의 모든 스택마다 타입을 중복해서 작성해야 했을 겁니다.
그러면 앱이 커질수록 악몽이 됩니다. (여기서의 전제는 앱의 스택 수와 앱의 복잡도가 정비례한다는 것입니다. 사실 항상 100% 맞는 가정은 아니지만, 이 예제에는 적합합니다)
// generic stack routes type
export type StackRoutesType<ParamList extends ParamListBase> = Array<
  RouteConfig<
    ParamList,
    keyof ParamList,
    StackNavigationState<ParamList>,
    StackNavigationOptions,
    StackNavigationEventMap
  >
>;

// becomes one line typings for each stack
type AppStackRoutesType = StackRoutesType<AppStackParamList>;
type OtherStackRoutesType = StackRoutesType<OtherStackParamList>;
type AnotherStackRoutesType = StackRoutesType<AnotherStackParamList>;
반면 제네릭 타입을 쓰면 위처럼 훨씬 단순하고 깔끔해집니다.
최종 모습
일반적인 Stack 함수가 두 가지 시나리오에서 어떻게 보이는지 비교해 봅시다.
그림 1: JSX에서 스택 화면을 하나하나 전부 렌더링하기.
// ...imports, components

function AppStack() {
  return (
    <Stack.Navigator>
      <Stack.Screen name="Home" component={Home} />
      <Stack.Screen name="Notifications" component={Notifications} />
      <Stack.Screen name="Profile" component={Profile} />
      <Stack.Screen name="Settings" component={Settings} />
      {/** n more screens... */}
    </Stack.Navigator>
  );
}
그림 2: 엄격한 TypeScript 타입으로 만든 스택 라우트 배열을 사용해 화면 렌더링하기. 🎉
function AppStack() {
  return (
    <Stack.Navigator>
      {appStackRoutes.map((stackRoute) => (
        <Stack.Screen key={stackRoute.name} {...stackRoute} />
      ))}
    </Stack.Navigator>
  );
}
하나 더… Navigator props는요?
고려할 것이 하나 더 남아 있을 수 있습니다. 바로 stack navigator의 props입니다. 아래 StackNavigator를 보면 navigator 하나에 설정이 한 덩어리 있습니다. 이 설정들도 JSX에서 분리하면 어떨까요?
import type {
  DefaultNavigatorOptions,
  ParamListBase,
  StackNavigationState,
} from "@react-navigation/core";
import {
  StackNavigationEventMap,
  StackNavigationOptions,
} from "@react-navigation/stack";
// other necessary imports for screens...

// generic typing for stack navigator options
type StackNavigatorOptions<ParamList extends ParamListBase> =
  DefaultNavigatorOptions<
    ParamList,
    StackNavigationState<ParamList>,
    StackNavigationOptions,
    StackNavigationEventMap
  >;

// omit the children as it corresponds to stack screen
const appStackNavigatorProps: Omit<
  StackNavigatorOptions<AppStackParamList>,
  "children"
> = {
  initialRouteName: "Home",
  screenOptions: {
    headerShown: false,
    cardOverlayEnabled: true,
    gestureEnabled: false,
    cardStyle: {
      backgroundColor: "royalblue",
    },
    headerLeftContainerStyle: {
      backgroundColor: "firebrick",
    },
    presentation: "modal",
    headerTitleStyle: {
      fontSize: 24,
      color: "olivedrab",
    },
  },
  // ...rest
};

// screen components and stack routes...

function AppStack() {
  return (
    <Stack.Navigator {...appStackNavigatorProps}>
      {appStackRoutes.map((stackRoute) => (
        <Stack.Screen key={stackRoute.name} {...stackRoute} />
      ))}
    </Stack.Navigator>
  );
}
13번째 줄부터는 왜 제네릭 타입을 쓰는지 이미 익숙하실 겁니다. 스택 라우트와 비교했을 때 타입상 유일한 차이는 @react-navigation/core에서 import한 DefaultNavigatorOptions 타입일 겁니다. 타입 이름 자체가 설명해 주듯이, navigator의 옵션입니다.
앞서 말한 RouteConfig 타입과 마찬가지로 여러 개의 제네릭 타입을 받습니다. 그리고 이미 Stack.Screen에 해당하는 Stack.Navigator의 자식을 렌더링하고 있으므로, children 키는 명시적으로 생략(Omit)한다는 점을 기억하세요.
22번째 줄에서는 navigator의 옵션을 나타낼 완전히 새로운 객체를 만듭니다(navigator 옵션 타입을 만족하는 객체를 반환하기만 하면 함수여도 됩니다).
그 결과 50번째 줄에서, 이 객체는 주어진 타입을 만족하는 한 spread 문법으로 안전하게 쓸 수 있습니다.
훨씬 깔끔한 JSX… 제 생각에는요…
최종 모습: Navigator props
다시 한번 일반적인 Stack 함수가 두 가지 시나리오에서 어떻게 보이는지 비교해 봅시다.
그림 1: stack navigator 설정을 JSX 안에 두기.
function AppStack() {
  return (
    <Stack.Navigator
      initialRouteName="Home"
      screenOptions={{
        headerShown: false,
        cardOverlayEnabled: true,
        gestureEnabled: false,
        cardStyle: {
          backgroundColor: "royalblue",
        },
        headerLeftContainerStyle: {
          backgroundColor: "firebrick",
        },
        presentation: "modal",
        headerTitleStyle: {
          fontSize: 24,
          color: "olivedrab",
        },
      }}
      // rest...
    >
      {appStackRoutes.map((stackRoute) => (
        <Stack.Screen key={stackRoute.name} {...stackRoute} />
      ))}
    </Stack.Navigator>
  );
}
그림 2: stack navigator 설정을 JSX에서 분리하기.
// ...

function AppStack() {
  return (
    <Stack.Navigator {...appStackNavigatorProps}>
      {appStackRoutes.map((stackRoute) => (
        <Stack.Screen key={stackRoute.name} {...stackRoute} />
      ))}
    </Stack.Navigator>
  );
}
마치며
이 글에서는 TypeScript를 실제로 활용해 React Native 내비게이터를 더 깔끔하게 구성하는 방법을 다뤘습니다.
모두 버그 없는 하루 보내세요.
게시처
이 글은 다음 곳에도 게시되어 있습니다.