React Nativeは、開発サイクルの速さとクロスプラットフォームの互換性から、モバイルアプリケーションを作るための人気の選択肢になっています。React Nativeでの開発を最大限に活かすために、開発者はデータの取得や状態管理を扱うReact-QueryやZustandのようなサードパーティのライブラリをよく使います。React-Queryはデータを取得し、キャッシュし、管理するための柔軟で効率的な方法を提供し、Zustandはミニマルなアプローチで状態管理をシンプルかつ強力にしてくれます。
この記事では、この2つのライブラリを使うReact Nativeアプリケーションを効果的にテストする方法を見ていきます。シンプルなストアアプリを例にして、テストの流れを理解できるよう、包括的で詳しい例を紹介します。この記事を読み終えるころには、React NativeアプリでReact-QueryとZustandを使い、テストする方法をよく理解できているはずです。
1. 環境のセットアップ
ストアアプリの初期化にはReact Nativeのバージョン0.71.2を使い、データの取得と状態管理にはReact-Query(Tanstack query)のバージョン3.39.3とZustandのバージョン4.3.2を使います。完成したアプリの完全なソースコードはGitHubで公開するので、すぐに飛び込んで動いているところを見たい場合は、記事の最後で共有しているリンクにアクセスしてください。そうすれば、例に沿って進めながら、アプリの完全なコードを確認できます。
1.1. ストアAPIのセットアップ
React Nativeでの効果的なテストの手法を示すために、APIとしてhttps://fakestoreapi.comを使います。ストアアプリは、このAPIから商品の一覧を取得し、各商品の詳細を表示します。FakeStoreProductにはほかにも使えるREST APIがありますが、それを使うと複雑さが増し、この記事の主な目的から外れてしまいます。
アプリ全体でAPIとやり取りするために、axiosのインスタンスを作ります。
1.2. axiosのインスタンスのセットアップ
import axios from "axios";

export const BASE_URL = "https://fakestoreapi.com";

export const api = axios.create({
  baseURL: BASE_URL,
});
次のステップでは、API用のreact-queryのセットアップを作ります。
1.3. クエリのキャッシュを管理するためのkey-factoryを作る
key-factoryとは何でしょうか?
このアプリはシンプルなので、必ずしもキャッシュを使う必要はありませんが、それでもReact-Queryの強力なキャッシュ機能を活用します。そこで、以下に示すようなシンプルなkey factoryを作ります。
export const productKeyFactory = {
  products: ["all-products"],
  productById: (id: number) => [...productKeyFactory.products, id],
} as const;
1.4. react-queryで商品を取得する
import { AxiosError } from "axios";
import { useQuery, UseQueryOptions } from "react-query";
import { api } from "../axios.instance";
import { productKeyFactory } from "./key-factory";
import { Product } from "./types";

export const getAllProducts = async () => {
  return (await api.get<Array<Product>>("/products")).data;
};

export const useGetAllProducts = (
  options?: UseQueryOptions<
    Array<Product>,
    AxiosError,
    Array<Product>,
    readonly [string]
  >
) => {
  return useQuery({
    queryKey: [...productKeyFactory.products],
    queryFn: getAllProducts,
    ...options,
  });
};
上では、商品を取得するためのuseGetAllProducts hookを作り、前のセクションで作ったクエリキーも活用しています。
1.5. react-queryで商品の詳細を取得する
import { AxiosError } from "axios";
import { useQuery, UseQueryOptions } from "react-query";
import { api } from "../axios.instance";
import { productKeyFactory } from "./key-factory";
import { Product } from "./types";

export const getProductById = async (productId: number) => {
  return (await api.get<Product>(`/products/${productId}`)).data;
};

export const useGetProductById = (
  productId: number,
  options?: UseQueryOptions<
    Product,
    AxiosError,
    Product,
    readonly (string | number)[]
  >
) => {
  return useQuery({
    queryFn: () => getProductById(productId),
    queryKey: [...productKeyFactory.productById(productId)],
    ...options,
  });
};
前のhookとほとんど同じですが、今回のuseGetProductById hookは、IDを使って商品の詳細を取得するために使います。
1.6. 商品の型
商品のオブジェクトがどんな形なのかも、飛ばさずに確認しておきましょう。
export interface Product {
  id: number;
  title: string;
  price: number;
  description: string;
  category: string;
  image: string;
  rating: Rating;
}

export interface Rating {
  rate: number;
  count: number;
}
1.7. zustandの登場: バスケットの中の商品を管理する
アプリには、ユーザーがバスケットに商品を追加したり削除したり、個々の商品の数量を調整したりできる基本的な機能があります。さらに、ユーザーはバスケット全体をリセットすることもできます。これらの機能はZustandで管理します。以下で、その実装を見ていきます。
import { create } from "zustand";
import { shallow } from "zustand/shallow";
import { Product } from "../api/product";

export type ProductInBasket = {
  product: Product;
  quantity: number;
};

export const updateProductQuantity = (
  productsInBasket: Array<ProductInBasket>,
  productId: number,
  updateType: "increase" | "decrease"
) => {
  return productsInBasket.map((productInBasket) => {
    if (productInBasket.product.id === productId) {
      return {
        ...productInBasket,
        quantity:
          updateType === "increase"
            ? productInBasket.quantity + 1
            : productInBasket.quantity - 1,
      };
    }
    return productInBasket;
  });
};

export const increaseProductQuantityInBasket = (
  productsInBasket: Array<ProductInBasket>,
  productId: number
) => {
  return updateProductQuantity(productsInBasket, productId, "increase");
};

export const decreaseProductQuantityInBasket = (
  productsInBasket: Array<ProductInBasket>,
  productId: number
) => {
  return updateProductQuantity(productsInBasket, productId, "decrease");
};

export interface ProductStore {
  productsInBasket: Array<ProductInBasket>;
  actions: {
    addProductToBasket: (val: Product) => void;
    removeProductFromBasket: (productId: number) => void;
    increaseProductQuantityInBasket: (productId: number) => void;
    decreaseProductQuantityInBasket: (productId: number) => void;
    resetAllProductsInBasket: () => void;
  };
}

export const useProductStore = create<ProductStore>((set, get) => ({
  productsInBasket: [],
  actions: {
    addProductToBasket: (product) =>
      set({
        productsInBasket: [
          ...get().productsInBasket,
          { product: product, quantity: 1 },
        ],
      }),
    removeProductFromBasket: (productId) =>
      set({
        productsInBasket: [
          ...get().productsInBasket.filter(
            (productInBasket) => productInBasket.product.id !== productId
          ),
        ],
      }),
    increaseProductQuantityInBasket: (productId) => {
      set({
        productsInBasket: increaseProductQuantityInBasket(
          get().productsInBasket,
          productId
        ),
      });
    },
    resetAllProductsInBasket: () => set({ productsInBasket: [] }),
    decreaseProductQuantityInBasket: (productId) => {
      set({
        productsInBasket: decreaseProductQuantityInBasket(
          get().productsInBasket,
          productId
        ),
      });
    },
  },
}));

export const useProductActions = () =>
  useProductStore((state) => state.actions);

export const useProductsInBasket = () =>
  useProductStore((state) => state.productsInBasket, shallow);
export const useProductsInBasketCount = () =>
  useProductStore((state) => state.productsInBasket.length);
export const useProductInBasketQuantityById = (productId: number | undefined) =>
  useProductStore(
    (state) =>
      state.productsInBasket.find(
        (productInBasket) => productInBasket.product.id === productId
      )?.quantity
  );
コードの最初の部分では、updateProductQuantity、increaseProductQuantityInBasket、decreaseProductQuantityInBasketという3つの関数を定義しています。これらはバスケットの中の商品の数量を更新するためのヘルパーメソッドです。updateProductQuantity関数は、productsInBasketに対応するオブジェクトの配列、商品のID、更新の種類(増やすか減らすか)を入力として受け取り、指定された商品の数量を更新した新しいproductsInBasketの配列を返します。
ProductStoreインターフェースは、商品のストアのスキーマを定義しています。2つのプロパティがあります。
-
productsInBasketは、バスケットの中の商品を表すProductInBasketオブジェクトの配列です。
-
actionsは、バスケットの中の商品を管理するための関数を持つオブジェクトです。商品の追加、削除、数量の増減、バスケットのリセットが含まれます。
useProductStore hookは、Zustandのcreate関数を使って作ります。stateとactionsを持つ商品のストアを返します。
残りのhook、useProductActions、useProductsInBasket、useProductsInBasketCount、useProductInBasketQuantityByIdは、useProductStore hookから派生したセレクターです。actionsやお気に入りに入れた商品の数など、商品のストアの特定の部分にアクセスできるようにします。
一方、useProductsInBasketではzustandのshallowを使っていることにも触れておく価値があります。useProductsInBasketから返されるオブジェクトの配列はプリミティブ型*ではないため、再レンダリングを引き起こしてしまうからです。そこで、shallowな等価性の関数を渡して、オブジェクトを浅く比較してほしいとzustandに伝えるだけです。
1.8. テストに必要なパッケージのインストール
さて、私たちがより関心を持っている部分、テストに進みましょう。次のパッケージを使います。
簡潔にするため、そして記事を長くしすぎないために、jest.config.jsやts-jestなど、テスト環境の設定の一部の手順は省略します。
最終的にテスト環境をどうセットアップしたのかは、記事の最後にある完全なソースコードのリンクから気軽に見てみてください。
1.9. MSWでAPIのデータをモックする
react-queryを使ったアプリを効果的にテストするには、APIをモックする必要があります。そのために、mock service worker(MSW)を使います。
import { rest } from "msw";
import { setupServer } from "msw/node";
import { BASE_URL } from "../../src/api/axios.instance";
import {
  GET_ALL_PRODUCTS_MOCK_RESPONSE,
  GET_PRODUCT_BY_ID_MOCK_RESPONSE,
} from "./mock-data";

const getAllProductsUrl = BASE_URL + "/products";
const getProductByIdUrl = BASE_URL + `/products/:id`;

const getAllProductsHandler = rest.get(getAllProductsUrl, (_req, res, ctx) => {
  return res(ctx.status(200), ctx.json(GET_ALL_PRODUCTS_MOCK_RESPONSE));
});

const getProductByIdHandler = rest.get(getProductByIdUrl, (_req, res, ctx) => {
  return res(ctx.status(200), ctx.json(GET_PRODUCT_BY_ID_MOCK_RESPONSE));
});

const handlers = [getAllProductsHandler, getProductByIdHandler];

export const mswServer = setupServer(...handlers);

const getAllProductsFailedHandler = rest.get(
  getAllProductsUrl,
  (_req, res, ctx) => {
    return res(ctx.status(500));
  }
);

const getProductByIdFailedHandler = rest.get(
  getProductByIdUrl,
  (_req, res, ctx) => {
    return res(ctx.status(500));
  }
);

export const setupGetAllProductsFailedHandler = () =>
  mswServer.use(getAllProductsFailedHandler);

export const setupGetProductByIdFailedHandler = () =>
  mswServer.use(getProductByIdFailedHandler);
上のコードでは、必要なモジュールをimportし、MSWのハンドラーをセットアップしています。すべての商品を取得するエンドポイントと、IDで商品を取得するエンドポイントの2つのモックを作り、どちらも成功のレスポンスを返します。テストを徹底するため、失敗のシナリオをシミュレートしてテストできるよう、この2つのエンドポイントの失敗用のハンドラーも作ります。
上のモックのセットアップを完成させるには、jest.setup.jsでmswServerオブジェクトを使う必要があります。すべてのテストケースの前にmswServerを初期化し、各テストケースのあとにハンドラーをリセットし、最後にシャットダウンするだけです。
import "react-native-gesture-handler/jestSetup";
import { mswServer } from "./__mocks__/msw/handlers";

jest.useFakeTimers();

// https://mswjs.io/docs/getting-started/integrate/node#setup

// Establish API mocking before all tests.
beforeAll(() => mswServer.listen());
// Reset any request handlers that we may add during the tests,
// so they don't affect other tests.
afterEach(() => mswServer.resetHandlers());
// Clean up after the tests are finished.
afterAll(() => mswServer.close());

// Silence the warning: Animated: `useNativeDriver` is not supported because the native animated module is missing
jest.mock("react-native/Libraries/Animated/NativeAnimatedHelper");
これで、テストで使えるようにAPIをモックできました。でも、まだ完成ではありません。zustandが提供しているドキュメントを使って、zustandのテストのセットアップもする必要があります。これによって、テストケースでzustandを使うときに、テストの間でstateをリセットできるようになります。
1.10. テストのためにzustandを設定する
// https://docs.pmnd.rs/zustand/guides/testing#resetting-state-between-tests-in-react-dom
const { create: actualCreate } = jest.requireActual("zustand"); // if using jest
import { act } from "@testing-library/react-native";

// a variable to hold reset functions for all stores declared in the app
const storeResetFns = new Set();

// when creating a store, we get its initial state, create a reset function and add it in the set
export const create = (createState) => {
  const store = actualCreate(createState);
  const initialState = store.getState();
  storeResetFns.add(() => store.setState(initialState, true));
  return store;
};

// Reset all stores after each test run
beforeEach(() => {
  act(() => storeResetFns.forEach((resetFn) => resetFn()));
});
ここで大事なのは、テスト環境に応じて、上のファイルを正しいディレクトリに置くことです。jestを使っているので、ドキュメントで説明されているとおり、このファイルはmocks/zustand.jsに置く必要があります。
(テストの)環境のセットアップに、すでに圧倒されているかもしれません。それでも、これらは私たちの環境の骨格なので、扱わないわけにはいきませんでした。
それでは、商品を表示するための画面を作るセクションに入りましょう。
2. 商品一覧画面の概要
前に述べたように、商品を表示するための画面を用意します。商品一覧画面の完全なコードを見てみましょう。
import { DefaultTheme } from "@react-navigation/native";
import * as React from "react";
import {
  FlatList,
  ListRenderItemInfo,
  RefreshControl,
  StyleSheet,
  Text,
  View,
} from "react-native";
import { SafeAreaView } from "react-native-safe-area-context";
import { Product, useGetAllProducts } from "../api/product";
import ProductListCard from "../components/product-list-card";
import ScreenLoading from "../components/screen-loading";
import Spacing from "../components/spacing";
import useRefreshByUser from "../hooks/useRefreshByUser";
import { RouteNames } from "../navigation/route-names";
import { ProductListScreenProps } from "../navigation/types";
import { useProductActions, useProductsInBasket } from "../store/product";
import { COMMON_STYLES } from "../theme/common-styles";

type Props = ProductListScreenProps;

const ProductListScreen: React.FC<Props> = ({ navigation }) => {
  const { data, isLoading, refetch, isError, isSuccess } = useGetAllProducts();

  const { isRefetchingByUser, refetchByUser } = useRefreshByUser(refetch);

  const { addProductToBasket, removeProductFromBasket } = useProductActions();
  const productsInBasket = useProductsInBasket();

  const onAddToBasketPress = React.useCallback(
    (product: Product) => () => {
      if (
        productsInBasket.find(
          (productInBasket) => productInBasket.product.id === product.id
        )
      ) {
        removeProductFromBasket(product.id);
      } else {
        addProductToBasket(product);
      }
    },
    [addProductToBasket, productsInBasket, removeProductFromBasket]
  );

  const onProductCardPress = React.useCallback(
    (productId: number) => () => {
      navigation.navigate(RouteNames.productDetail, { id: productId });
    },
    [navigation]
  );

  const renderItemSeparator = () => (
    <Spacing
      backgroundColor={DefaultTheme.colors.background}
      height={COMMON_STYLES.screenPadding}
    />
  );

  const getKeyExtractor = (item: Product) => item.id.toString();

  const renderItem = ({ item: product }: ListRenderItemInfo<Product>) => {
    return (
      <ProductListCard
        {...product}
        testID={`product-list-card-${product.id}`}
        basketButtonTestID={`basket-button-${product.id}`}
        isInBasket={
          typeof productsInBasket.find(
            (productInBasket) => productInBasket.product.id === product.id
          ) !== "undefined"
        }
        onAddToBasketPress={onAddToBasketPress(product)}
        onPress={onProductCardPress(product.id)}
      />
    );
  };

  if (isLoading) {
    return <ScreenLoading />;
  }

  return (
    <SafeAreaView style={COMMON_STYLES.flex} edges={["bottom"]}>
      {isError && (
        <View style={COMMON_STYLES.flexCenter}>
          <Text>An error occurred</Text>
        </View>
      )}

      {isSuccess && (
        <FlatList<Product>
          data={data}
          testID="product-list-flat-list"
          refreshControl={
            <RefreshControl
              refreshing={isRefetchingByUser}
              onRefresh={refetchByUser}
            />
          }
          renderItem={renderItem}
          numColumns={2}
          ItemSeparatorComponent={renderItemSeparator}
          columnWrapperStyle={styles.columnWrapper}
          contentContainerStyle={styles.contentContainerStyle}
          showsVerticalScrollIndicator={false}
          keyExtractor={getKeyExtractor}
          style={COMMON_STYLES.flex}
        />
      )}
    </SafeAreaView>
  );
};

export default ProductListScreen;

const styles = StyleSheet.create({
  contentContainerStyle: {
    flexGrow: 1,
    padding: COMMON_STYLES.screenPadding,
  },
  columnWrapper: {
    justifyContent: "space-between",
  },
});
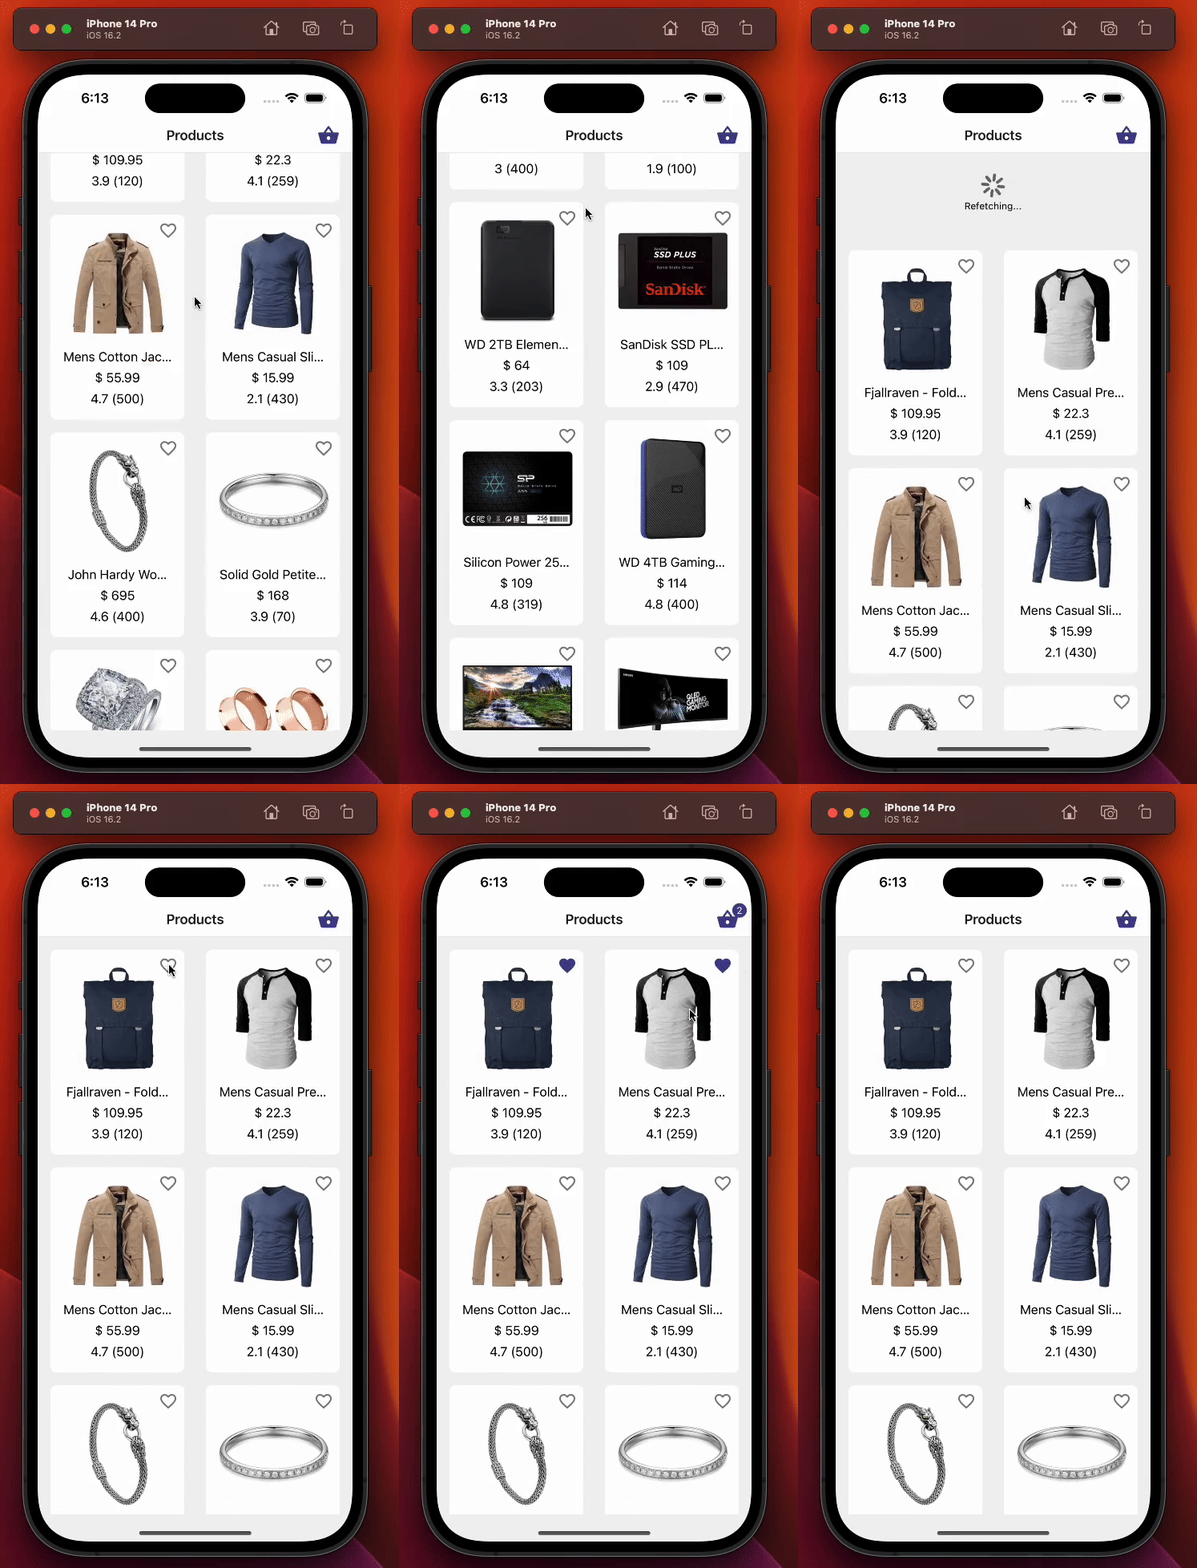
この画面は次のことを担当します。
-
1.4. react-queryで商品を取得するのセクションで作った独自のreact queryのhook、useGetAllProductsを使って商品を表示する。
-
これも1.7. zustandの登場: バスケットの中の商品を管理するのセクションで扱った独自のzustandのhook、useProductActionsを使って、ユーザーがバスケットに商品を追加したり削除したりできるようにする。
-
pull-to-refreshで商品を再取得する。
-
ヘッダー右側のバスケットのアイコンに表示される数量のテキストを更新する。
以下が商品一覧画面のデモです。
2.1. 商品一覧画面のテスト
このセクションでは、商品一覧画面のテストを行います。最初に行うテストケースは次のとおりです。
-
データをモックしていても、最初はローディングインジケーターが表示されるはずです。react-queryのisLoadingというbooleanのフラグは、短い間trueに設定されます。データを取得したあとはisLoadingがfalseになり、ローダーは表示されなくなります。
-
データを取得したあと、商品一覧が正確に表示されるはずです。このケースを確認するには、ProductListCardコンポーネントのtestID propを使います。
-
すべての商品を取得するクエリが失敗した場合、画面にはエラーメッセージが表示されるはずです。1.9. MSWでAPIのデータをモックするで作ったsetupGetAllProductsFailedHandlerヘルパーを使います。
2.1.1. テストケース: 最初にローディングインジケーターを表示すること
import { renderHook } from "@testing-library/react-hooks";
import { render, screen } from "@testing-library/react-native";
import React from "react";
import { useGetAllProducts } from "../../api/product";
import { createReactQueryWrapper } from "../../utils/testing";
import ProductListScreen from "../product-list";

const navigateMock = jest.fn();
const navigation = { navigate: navigateMock } as any;
const route = jest.fn() as any;

const component = <ProductListScreen navigation={navigation} route={route} />;

describe("Product list screen", () => {
  it("should display loading indicator initially", async () => {
    // We render the component and expect to see a loading indicator
    render(component, { wrapper: createReactQueryWrapper });
    expect(screen.queryByTestId(`screen-loader`)).toBeTruthy();

    // We render the product list using useGetAllProducts hook and wait until the products are loaded
    const { result, waitFor } = renderHook(() => useGetAllProducts(), {
      wrapper: createReactQueryWrapper,
    });
    await waitFor(() => result.current.isSuccess);

    // We expect the loading indicator to disappear after the products are loaded
    expect(screen.queryByTestId(`screen-loader`)).not.toBeTruthy();
  });
});
ファイルの冒頭では、テストを実行するために必要なモジュールをimportしています。そしてcomponentという変数を作って商品一覧画面を保存し、テストケース全体でこの変数を再利用できるようにしています。さらに、これは画面であり、2. 商品一覧画面の概要のセクションで画面のpropsを宣言しているので、22行目では、必要な画面のprops、つまりnavigationとrouteも渡す必要があります。上でnavigationオブジェクトを分割代入した理由については、このあとのテストケースで改めて説明します。
テストケースを理解するために押さえておくべき用語の簡単なおさらい:
-
render: 渡されたReact要素を深く描画し、出力されたコンポーネントの構造をクエリするためのヘルパーを返します。
-
screen: 最後のrender呼び出しの値を保持し、renderが返すクエリやそのほかの関数に簡単にアクセスできるようにします。
-
renderHook: テスト用のコンポーネントを描画し、描画のたびに、渡されたコールバックを(その中で呼ばれるhookも含めて)呼び出します。
この記事の主な目的は、テストライブラリやその関数を紹介することではなく、テストの進め方についてのガイドを提供することなので、それらの細かい説明には深入りしません。いずれにしても、記事全体を通して使い方がわかる例は十分に出てきます。
上のテストケースは、最初に画面のローダーコンポーネントが画面に表示されるかを確認しています。render関数は、createReactQueryWrapper関数で包んだProductListScreenコンポーネントを描画します。createReactQueryWrapperは、QueryClientProviderを作るためのシンプルなユーティリティ関数です。screen.queryByTestId()関数は、画面のローダーが画面に表示されているかを確認します。
renderHook関数は、ProductListScreenコンポーネントの中で商品のデータを取得するために使われているuseGetAllProducts hookをテストするために使います。renderHook関数にはwrapperオプションを渡して、useGetAllProducts hookをcreateReactQueryWrapper関数で包みます。result変数には、useGetAllProducts hookが返す値が入ります。そしてwaitFor関数は、resultオブジェクトのisSuccessプロパティがtrueになるまで、つまり商品のデータの取得に成功するまで待ちます。
2つ目の部分は、商品のデータの取得に成功したあと、画面のローダーコンポーネントがもう表示されていないことを確認します。
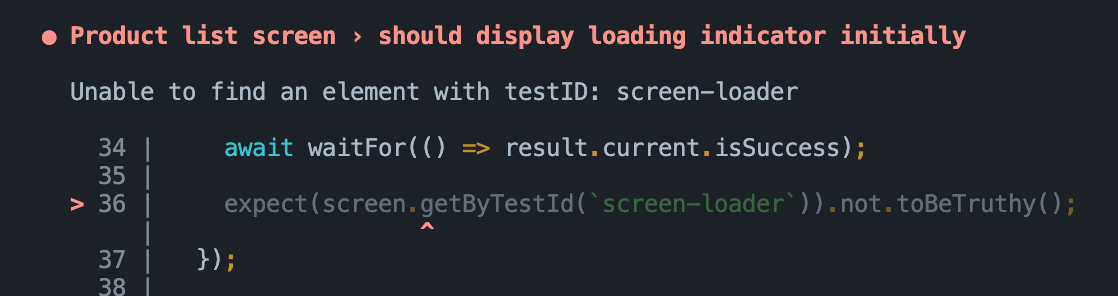
getByTestIdではなくqueryByTestIdを使ったのは、データを取得したあとは画面のローダーコンポーネントが表示されないとわかっているからです。getByTestIdを使うとエラーが投げられてしまいます。
getByTestIdを使った場合に遭遇するエラーは、次のようなものです。
2.1.2. テストケース: 商品一覧のデータを正しく表示すること
import { renderHook } from "@testing-library/react-hooks";
import { render, screen } from "@testing-library/react-native";
import React from "react";
import { useGetAllProducts } from "../../api/product";
import { createReactQueryWrapper } from "../../utils/testing";
import ProductListScreen from "../product-list";

const navigateMock = jest.fn();
const navigation = { navigate: navigateMock } as any;
const route = jest.fn() as any;

const component = <ProductListScreen navigation={navigation} route={route} />;

describe("Product list screen", () => {
  it("should display product list data correctly", async () => {
    // Render the component and wait for it to load
    render(component, { wrapper: createReactQueryWrapper });

    // Check that no product card is rendered before fetching data
    expect(screen.queryByTestId(`product-list-card-1`)).not.toBeTruthy();

    // Fetch the product data
    const { result, waitFor } = renderHook(() => useGetAllProducts(), {
      wrapper: createReactQueryWrapper,
    });

    // Wait for the data to be fetched successfully
    await waitFor(() => result.current.isSuccess);

    // Check that each product card is rendered for each product in the data
    for (const { id } of result.current.data!) {
      expect(screen.queryByTestId(`product-list-card-${id}`)).toBeTruthy();
    }
  });
});
このテストコードは、商品一覧画面が取得した商品のデータを正しく表示するかをテストします。
今回もデータの取得に成功するのを待ち、取得したデータをループして、データの各商品についてproduct-list-card-${id}というtestIDを持つ商品一覧のカードが存在することを期待することで、商品一覧のデータが正しく表示されていることを確かめています。idプロパティは商品のIDに基づいて動的に作られます。テストが失敗した場合、商品一覧のアイテムが商品のデータを正しく表示していないということです。
以下で、リストのアイテムを描画するためにrenderItem関数をどう使っていたかに注目してください。product.idをループし、product-list-cardという文字列と組み合わせて、ProductListCardコンポーネントの動的なtestIDを作っています。こうすることで、すべての商品を、それぞれのtestID propとともにテストできます。
const renderItem = ({ item: product }: ListRenderItemInfo<Product>) => {
  return (
    <ProductListCard
      {...product}
      testID={`product-list-card-${product.id}`}
      basketButtonTestID={`basket-button-${product.id}`}
      isInBasket={
        typeof productsInBasket.find(
          (productInBasket) => productInBasket.product.id === product.id
        ) !== "undefined"
      }
      onAddToBasketPress={onAddToBasketPress(product)}
      onPress={onProductCardPress(product.id)}
    />
  );
};
2.1.3. テストケース: すべての商品を取得するクエリが失敗した場合にエラーのテキストを表示すること
このテストケースでは、すべての商品を取得するAPI呼び出しが失敗するシナリオをテストします。
import { renderHook } from "@testing-library/react-hooks";
import { render, screen } from "@testing-library/react-native";
import React from "react";
import { setupGetAllProductsFailedHandler } from "../../../__mocks__/msw/handlers";
import { useGetAllProducts } from "../../api/product";
import { createReactQueryWrapper } from "../../utils/testing";
import ProductListScreen from "../product-list";

const navigateMock = jest.fn();
const navigation = { navigate: navigateMock } as any;
const route = jest.fn() as any;

const component = <ProductListScreen navigation={navigation} route={route} />;

describe("Product list screen", () => {
  it("should display error text in case get all products query fails", async () => {
    // Set up the mock handler for GET requests to the /products endpoint that returns an error response
    setupGetAllProductsFailedHandler();

    // Render the ProductListScreen component wrapped in the React Query wrapper
    render(component, { wrapper: createReactQueryWrapper });

    // Set up a mock React hook that calls the useGetAllProducts hook from the API module
    const { result, waitFor } = renderHook(() => useGetAllProducts(), {
      wrapper: createReactQueryWrapper,
    });

    // Wait for the useGetAllProducts hook to throw an error
    await waitFor(() => result.current.isError);

    // Assert that the "An error occurred" text is displayed on the screen
    expect(screen.getByText(`An error occurred`)).toBeTruthy();
  });
});
APIの失敗をシミュレートするために、mock server worker(msw)のsetupGetAllProductsFailedHandler関数を使います。これは1.9. MSWでAPIのデータをモックするのセクションの38行目で実装したものです。そしてrender関数を使ってProductListScreenコンポーネントを描画し、renderHook関数を使って、データを取得するuseGetAllProducts hookを呼び出します。
@testing-library/react-hooksのwaitFor関数を使って、result.currentオブジェクトのisErrorプロパティがtrueになるのを待ちます。これで、hookの実行が完了し、API呼び出しが失敗したことが確実になります。最後に、@testing-library/react-nativeのgetByText関数を使ってテキストがあるかを確認し、「An error occurred」というエラーメッセージが画面に表示されることをassertします(このメッセージは、商品一覧画面のソースコードを見て改めて確認できます)。
2.1.4. テストケース: 最初の商品アイテムを押したときにナビゲーションのアクションを呼ぶこと
商品一覧画面から実際に抜き出した、次のコードスニペットをテストします。このコードは、リストの中のいずれかの商品一覧のカードをユーザーが押したときの処理を担当しています。
const onProductCardPress = React.useCallback(
  (productId: number) => () => {
    navigation.navigate(RouteNames.productDetail, { id: productId });
  },
  [navigation]
);

const renderItem = ({ item: product }: ListRenderItemInfo<Product>) => {
  return (
    <ProductListCard
      {...product}
      testID={`product-list-card-${product.id}`}
      basketButtonTestID={`basket-button-${product.id}`}
      isInBasket={
        typeof productsInBasket.find(
          (productInBasket) => productInBasket.product.id === product.id
        ) !== "undefined"
      }
      onAddToBasketPress={onAddToBasketPress(product)}
      onPress={onProductCardPress(product.id)}
    />
  );
};
これをどうテストするか、見てみましょう。
import { renderHook } from "@testing-library/react-hooks";
import { fireEvent, render, screen } from "@testing-library/react-native";
import React from "react";
import { useGetAllProducts } from "../../api/product";
import { RouteNames } from "../../navigation/route-names";
import { createReactQueryWrapper } from "../../utils/testing";
import ProductListScreen from "../product-list";

const navigateMock = jest.fn();
const navigation = { navigate: navigateMock } as any;
const route = jest.fn() as any;

const component = <ProductListScreen navigation={navigation} route={route} />;

describe("Product list screen", () => {
  it("should call navigation action on pressing the first product item", async () => {
    // render ProductListScreen component with createReactQueryWrapper as a wrapper
    render(component, { wrapper: createReactQueryWrapper });

    // render hook for useGetAllProducts with createReactQueryWrapper as a wrapper
    const { result, waitFor } = renderHook(() => useGetAllProducts(), {
      wrapper: createReactQueryWrapper,
    });

    // wait for useGetAllProducts to succeed
    await waitFor(() => result.current.isSuccess);

    // find first product item and simulate a press event on it
    const firstProductItem = screen.getByTestId(`product-list-card-1`);
    fireEvent.press(firstProductItem);

    // assert that navigation action was called with correct route name and params
    expect(navigateMock).toHaveBeenCalledWith(RouteNames.productDetail, {
      id: 1,
    });
  });
});
このテストのコードスニペットでは、商品アイテムを押したときにナビゲーションのアクションが呼ばれるかをテストしています。まず、これまでのテストケースと同じように、ProductListScreenコンポーネントを描画し、データの取得に成功するのを待ちます。そのあと、リストから最初の商品アイテムを取得し、fireEvent.pressを使ってそれを押すイベントをシミュレートします。最後に、navigationオブジェクトのnavigate関数が、期待するRouteNameとproductIdのパラメータで呼ばれたことを期待します。
2.1.5. テストケース: 商品アイテムのバスケットのアイコンを押したときに商品アイテムを正しく追加/削除すること
以下のテストケースは、商品一覧画面の商品カードにあるバスケットのアイコンを押して、ユーザーがバスケットに商品を追加したり削除したりするシナリオをテストしています。
import { NavigationContainer } from "@react-navigation/native";
import { renderHook } from "@testing-library/react-hooks";
import { fireEvent, render, screen } from "@testing-library/react-native";
import React from "react";
import { useGetAllProducts } from "../../api/product";
import ProductStack from "../../navigation/product-stack";
import { useProductStore } from "../../store/product";
import { createReactQueryWrapper } from "../../utils/testing";

// We render the whole app stack instead of rendering just the screen
// because we need access to the react-navigation's header, which wouldn't
// be possible if we just rendered the screen.
const rootAppComponent = (
  <NavigationContainer>
    <ProductStack />
  </NavigationContainer>
);

describe("Product list screen", () => {
  it("should add/remove product item correctly on pressing product items basket icon", async () => {
    // We render the entire app stack and use the createReactQueryWrapper as a
    // wrapper for the render function to set up the React Query Provider.
    render(rootAppComponent, {
      wrapper: createReactQueryWrapper,
    });

    // We use the renderHook function to invoke the useGetAllProducts hook which
    // fetches the data.
    const { result, waitFor } = renderHook(() => useGetAllProducts(), {
      wrapper: createReactQueryWrapper,
    });

    // We use the renderHook function to get access to the useProductStore hook
    // which we will use to check that the products in the basket were added/removed correctly.
    const { result: productStore } = renderHook(() => useProductStore(), {
      wrapper: createReactQueryWrapper,
    });

    // We wait for the useGetAllProducts hook to complete fetching the data before proceeding
    // with the test.
    await waitFor(() => result.current.isSuccess);

    // We get the basket button for the first product item using the getByTestId function.
    const firstProductItemBasketButton = screen.getByTestId(`basket-button-1`);

    // We click the basket button for the first product item.
    fireEvent.press(firstProductItemBasketButton);

    // We check that the basket icon quantity text is present using the getByTestId function.
    expect(screen.getByTestId("basket-icon-quantity-text-1")).toBeTruthy();

    // We check that the products in the basket have been added correctly using the productStore.
    expect(productStore.current.productsInBasket).toHaveLength(1);
    expect(productStore.current.productsInBasket[0].quantity).toBe(1);
    expect(productStore.current.productsInBasket[0].product).toMatchObject(
      result.current.data![0]
    );

    // We click the basket button for the first product item again to remove it from the basket.
    fireEvent.press(firstProductItemBasketButton);

    // We check that the basket icon quantity text is not present.
    expect(
      screen.queryByTestId("basket-icon-quantity-text-1")
    ).not.toBeTruthy();

    // We check that the products in the basket have been removed correctly using the productStore.
    expect(productStore.current.productsInBasket).toHaveLength(0);
  });
});
ヘッダーのバスケットのアイコンの機能をテストするには、ProductListScreenに加えて、ProductStack全体を描画する必要があります。テストIDでバスケットのアイコンを取得するために、商品一覧画面のヘッダーにアクセスする必要があるからです。そのためには、NavigationContainerとともに、ProductStack全体が描画されている必要があります。
商品の取得に成功したら、fireEvent.pressを使って最初の商品アイテムのバスケットのアイコンを押す操作をシミュレートし、商品をバスケットに追加します。そして、バスケットのアイコンに正しい数量が表示されていること、商品のストアのproductsInBasketの配列に、正しい数量と商品のオブジェクトで商品が追加されていることを確認します。
そのあと、もう一度バスケットのアイコンを押す操作をシミュレートして商品をバスケットから削除し、バスケットのアイコンに数量が表示されなくなったこと、商品のストアのproductsInBasketの配列が空になったことを確認します。
まとめると、このテストケースは、商品一覧画面の商品カードにあるバスケットのアイコンを押して、バスケットに商品を追加したり削除したり、数量を調整したりする機能をテストしています。そして、商品のストアがバスケットの中の商品とその数量を正しく管理していることを確認しています。
2.1.6. 商品一覧画面のテストの全体の流れ
商品一覧画面のテストの全体の流れは次のとおりです。
import { NavigationContainer } from "@react-navigation/native";
import { renderHook } from "@testing-library/react-hooks";
import { fireEvent, render, screen } from "@testing-library/react-native";
import React from "react";
import { setupGetAllProductsFailedHandler } from "../../../__mocks__/msw/handlers";
import { useGetAllProducts } from "../../api/product";
import ProductStack from "../../navigation/product-stack";
import { RouteNames } from "../../navigation/route-names";
import { useProductStore } from "../../store/product";
import { createReactQueryWrapper } from "../../utils/testing";
import ProductListScreen from "../product-list";

// We render the whole app stack instead of rendering just the screen
// because we need access to the react-navigation's header, which wouldn't
// be possible if we just rendered the screen.
const rootAppComponent = (
  <NavigationContainer>
    <ProductStack />
  </NavigationContainer>
);
const navigateMock = jest.fn();
const navigation = { navigate: navigateMock } as any;
const route = jest.fn() as any;

const component = <ProductListScreen navigation={navigation} route={route} />;

describe("Product list screen", () => {
  it("should display loading indicator initially", async () => {
    // We render the component and expect to see a loading indicator
    render(component, { wrapper: createReactQueryWrapper });
    expect(screen.queryByTestId(`screen-loader`)).toBeTruthy();

    // We render the product list using useGetAllProducts hook and wait until the products are loaded
    const { result, waitFor } = renderHook(() => useGetAllProducts(), {
      wrapper: createReactQueryWrapper,
    });
    await waitFor(() => result.current.isSuccess);

    // We expect the loading indicator to disappear after the products are loaded
    expect(screen.queryByTestId(`screen-loader`)).not.toBeTruthy();
  });

  it("should display product list data correctly", async () => {
    // Render the component and wait for it to load
    render(component, { wrapper: createReactQueryWrapper });

    // Check that no product card is rendered before fetching data
    expect(screen.queryByTestId(`product-list-card-1`)).not.toBeTruthy();

    // Fetch the product data
    const { result, waitFor } = renderHook(() => useGetAllProducts(), {
      wrapper: createReactQueryWrapper,
    });

    // Wait for the data to be fetched successfully
    await waitFor(() => result.current.isSuccess);

    // Check that each product card is rendered for each product in the data
    for (const { id } of result.current.data!) {
      expect(screen.queryByTestId(`product-list-card-${id}`)).toBeTruthy();
    }
  });

  it("should display error text in case get all products query fails", async () => {
    // Set up the mock handler for GET requests to the /products endpoint that returns an error response
    setupGetAllProductsFailedHandler();

    // Render the ProductListScreen component wrapped in the React Query wrapper
    render(component, { wrapper: createReactQueryWrapper });

    // Set up a mock React hook that calls the useGetAllProducts hook from the API module
    const { result, waitFor } = renderHook(() => useGetAllProducts(), {
      wrapper: createReactQueryWrapper,
    });

    // Wait for the useGetAllProducts hook to throw an error
    await waitFor(() => result.current.isError);

    // Assert that the "An error occurred" text is displayed on the screen
    expect(screen.getByText(`An error occurred`)).toBeTruthy();
  });

  it("should call navigation action on pressing the first product item", async () => {
    // Render the ProductListScreen component along with react-query wrapper
    render(component, { wrapper: createReactQueryWrapper });

    // Render the useGetAllProducts hook with react-query wrapper to fetch data
    const { result, waitFor } = renderHook(() => useGetAllProducts(), {
      wrapper: createReactQueryWrapper,
    });

    // Wait for the data to be fetched
    await waitFor(() => result.current.isSuccess);

    // Find the first product card in the list and simulate a press event on it
    const firstProductItem = screen.getByTestId(`product-list-card-1`);
    fireEvent.press(firstProductItem);

    // Expect that the navigation function is called with the correct route name and params
    expect(navigateMock).toHaveBeenCalledWith(RouteNames.productDetail, {
      id: 1,
    });
  });

  it("should add/remove product item correctly on pressing product items basket icon", async () => {
    // We render the entire app stack and use the createReactQueryWrapper as a
    // wrapper for the render function to set up the React Query Provider.
    render(rootAppComponent, {
      wrapper: createReactQueryWrapper,
    });

    // We use the renderHook function to invoke the useGetAllProducts hook which
    // fetches the data.
    const { result, waitFor } = renderHook(() => useGetAllProducts(), {
      wrapper: createReactQueryWrapper,
    });

    // We use the renderHook function to get access to the useProductStore hook
    // which we will use to check that the products in the basket were added/removed correctly.
    const { result: productStore } = renderHook(() => useProductStore(), {
      wrapper: createReactQueryWrapper,
    });

    // We wait for the useGetAllProducts hook to complete fetching the data before proceeding
    // with the test.
    await waitFor(() => result.current.isSuccess);

    // We get the basket button for the first product item using the getByTestId function.
    const firstProductItemBasketButton = screen.getByTestId(`basket-button-1`);

    // We click the basket button for the first product item.
    fireEvent.press(firstProductItemBasketButton);

    // We check that the basket icon quantity text is present using the getByTestId function.
    expect(screen.getByTestId("basket-icon-quantity-text-1")).toBeTruthy();

    // We check that the products in the basket have been added correctly using the productStore.
    expect(productStore.current.productsInBasket).toHaveLength(1);
    expect(productStore.current.productsInBasket[0].quantity).toBe(1);
    expect(productStore.current.productsInBasket[0].product).toMatchObject(
      result.current.data![0]
    );

    // We click the basket button for the first product item again to remove it from the basket.
    fireEvent.press(firstProductItemBasketButton);

    // We check that the basket icon quantity text is not present.
    expect(
      screen.queryByTestId("basket-icon-quantity-text-1")
    ).not.toBeTruthy();

    // We check that the products in the basket have been removed correctly using the productStore.
    expect(productStore.current.productsInBasket).toHaveLength(0);
  });
});
まとめ
まとめると、この記事では、最近のReact/React Nativeアプリケーションでとても人気のあるReact-QueryとZustandのライブラリを使うReact Nativeアプリケーションのための、効果的なテストの戦略を見てきました。シンプルなストアアプリを例に、包括的で詳しい例を示しながら、テストの流れと、テストを実装してコードの品質を保つ方法を扱いました。完全なソースコードは、下のリンクから気軽に見てみてください。良い一日を!
掲載先
この記事は次の場所でも公開しています。