# TypeScriptでReact Nativeのナビゲーションを構成する方法
By Tarik Pinarci (https://tarikpinarci.com). Published 2022-09-24. Canonical: https://tarikpinarci.com/ja/blog/react-navigation-with-typescript
型を活用する: React Navigation
ナビゲーションの構築は、今やあらゆるモバイルアプリケーションの基本的な機能です。React Nativeの世界では、[React Navigation](https://reactnavigation.org/)という頼れる道具があります。
この記事では、TypeScriptを使った典型的なReact Navigationの実装方法を、TypeScriptの使い方のさまざまな戦略を比較しながら見ていきます。
そしてもっと大事なこととして、TypeScriptの機能を最大限に活用して、よりスケーラブルなナビゲーションのアーキテクチャを作る方法も扱います。
> 注意: この記事の例は、@react-navigation@6.xのバージョンを使って作成しています。
> 注意: この記事で扱う方法や戦略は、厳密に従わなければならない必須のものではありません。あくまで私の好みであり、この記事の読者と共有する価値があると感じたものです。[React Navigationには、TypeScriptの使い方について、すでに素晴らしくよく書かれたドキュメントがあります。](https://reactnavigation.org/docs/typescript) とはいえ、[このドキュメント](https://reactnavigation.org/docs/typescript/)に従うだけでも、素晴らしいreact-navigationのTypeScriptの構成を作れます。
### Stack Navigatorを作る
[React Navigation ](https://reactnavigation.org/)パッケージを使って[stack navigator](https://reactnavigation.org/docs/stack-navigator/)を作る方法を見てみましょう。
[React Navigation](https://reactnavigation.org/docs/stack-navigator/#api-definition)から引用した次の例を見てください。
```tsx
import { createStackNavigator } from "@react-navigation/stack";
import * as React from "react";
import { View } from "react-native";
const Stack = createStackNavigator();
const Home = () => ;
const Notifications = () => ;
const Profile = () => ;
const Settings = () => ;
function AppStack() {
return (
);
}
```
見てのとおり、ここにはTypeScript特有のものは何もないので、このコードスニペットに少しTypeScriptを加えてみましょう。
```tsx
import { createStackNavigator } from "@react-navigation/stack";
import * as React from "react";
import { View } from "react-native";
type AppStackParamList = {
Home: undefined;
Notifications: undefined;
Profile: undefined;
Settings: undefined;
};
const Home = () => ;
const Notifications = () => ;
const Profile = () => ;
const Settings = () => ;
const Stack = createStackNavigator();
function AppStack() {
return (
);
}
```
上では、createStackNavigatorにParamListの型を追加しました。でも、createStackNavigatorがジェネリック型を受け取ることを、どうやって知ればいいのでしょうか? 調べる方法はいくつかあります。まず[ドキュメント](https://reactnavigation.org/docs/typescript/#type-checking-the-navigator)を確認するのは、いつだって良い習慣です。この例では、ドキュメントにすでにそのためのセクションがあることに気づくはずです。
一方、createStackNavigatorのこの型付けがウェブサイトに書かれていないとしたら、関数に型があるかどうかを確かめる方法のひとつは、その関数の型定義にジャンプすることです。最初はたくさんの型、インターフェース、ジェネリクスが飛び交っていて圧倒されるかもしれませんが、型定義にジャンプする習慣がつくほど、ずっと気にならなくなります。
### **アップデート!**
TypeScriptでさらに複雑なことに取り組みたい、そしてReactチームの素晴らしいTSユーティリティ(React.ComponentProps)をあえて使わないという人は、この記事の最後まで読み進めてください。
でも残念ながら、このセクションが終わりになるかもしれません!
React.ComponentPropsを使えば、各stackの画面とその設定の型を取得できます。結果は本当に素晴らしいものになります。
完全な例は次のとおりです。
```tsx
import { createStackNavigator } from "@react-navigation/stack";
import * as React from "react";
import { View } from "react-native";
type AppStackParamList = {
Home: undefined;
Notifications: undefined;
Profile: undefined;
Settings: undefined;
};
const Home = () => ;
const Notifications = () => ;
const Profile = () => ;
const Settings = () => ;
const Stack = createStackNavigator();
const routes: Array> = [
{
name: "Home",
component: Home,
},
{
name: "Notifications",
component: Notifications,
},
{
name: "Profile",
component: Profile,
},
{
name: "Settings",
component: Settings,
},
];
function AppStack() {
return (
{routes.map((routeConfig) => (
))}
);
}
```
そしてもちろん、インテリセンスも効きますし、関係のない画面*(たとえば、stackの型宣言にない画面)*をstackに入れると、次のようにちゃんと警告してくれます。
_無効な画面_
インテリセンスもちゃんと効きます。
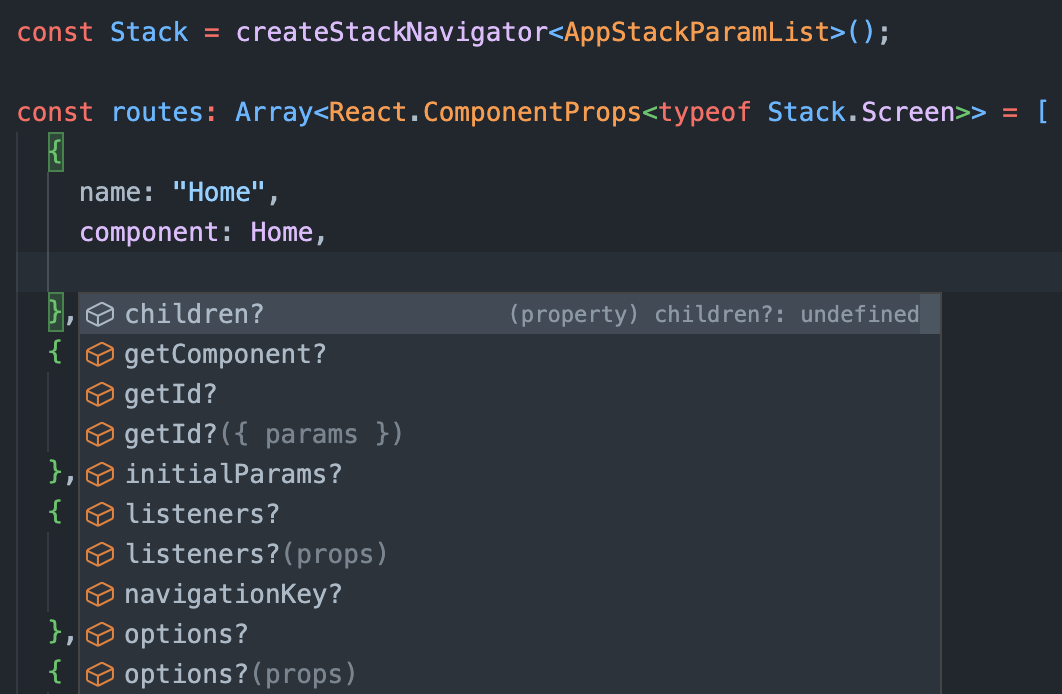
さらに、よりきれいで、設定しやすく、動的です。
```tsx
const getAuthStackRoutes = (
// other parameters...
theme: ThemeType
): Array> => {
// more business logic...
return [
{
name: "Home",
component: Home,
options: {
headerStyle: {
backgroundColor: theme.colors.primary,
// other theme stylings...
},
},
},
];
};
```
結論として、このアプローチを使うと、複雑なナビゲーションの構成を簡単に管理できます*(少なくとも、この記事のほかのアプローチと比べた場合には)*。JSXがきれいになるだけでなく、ルートをより動的でモジュール化された方法で設定できるようになるからです。
### TypeScriptの使い方をさらに一歩進める
できることは、createStackNavigatorのジェネリック型を宣言することだけではありません。Stack.Navigatorが持つ子要素の型はどうでしょうか? [この考え方は公式ドキュメントですでにかなりよく説明されています](https://reactnavigation.org/docs/typescript/#type-checking-screens)が、構成をより疎結合に作るために、これをどう活用できるかを見てみましょう。
```tsx
import type { RouteConfig, StackNavigationState } from "@react-navigation/core";
import {
createStackNavigator,
StackNavigationEventMap,
StackNavigationOptions,
} from "@react-navigation/stack";
import * as React from "react";
import { View } from "react-native";
// stack param list type
type AppStackParamList = {
Home: undefined;
Notifications: undefined;
Profile: undefined;
Settings: undefined;
};
// type of the single route in app stack
type AppStackRoutesType = RouteConfig<
AppStackParamList,
keyof AppStackParamList,
StackNavigationState,
StackNavigationOptions,
StackNavigationEventMap
>;
// mocking the screen components for the sake of example
const Home = () => ;
const Notifications = () => ;
const Profile = () => ;
const Settings = () => ;
// strictly typed array of app stack routes
const appStackRoutes: Array = [
{
name: "Home",
component: Home,
},
{
name: "Notifications",
component: Notifications,
},
{
name: "Profile",
component: Profile,
},
{
name: "Settings",
component: Settings,
},
];
const Stack = createStackNavigator();
function AppStack() {
return (
{/** mapping the app stack routes */}
{appStackRoutes.map((stackRoute) => (
))}
);
}
```
おっと、いろいろなことが起きていますね… 各コードブロックを別々の部分に分けてみましょう。
```tsx
import type { RouteConfig, StackNavigationState } from "@react-navigation/core";
import {
createStackNavigator,
StackNavigationEventMap,
StackNavigationOptions,
} from "@react-navigation/stack";
import * as React from "react";
import { View } from "react-native";
```
コードスニペットの冒頭では、必要なモジュールをimportしています。型、関数、そのほか必要なものです。面白くはありませんが、必要です :)
```tsx
// mocking the screen components for the sake of example
const Home = () => ;
const Notifications = () => ;
const Profile = () => ;
const Settings = () => ;
```
上では、例をよりシンプルに示せるように、react-nativeから[View](https://reactnative.dev/docs/view)コンポーネントをimportしています。
```tsx
// type of the single route in app stack
type AppStackRoutesType = RouteConfig<
AppStackParamList,
keyof AppStackParamList,
StackNavigationState,
StackNavigationOptions,
StackNavigationEventMap
>;
```
さあ、ここからが面白いところです。@react-navigation/coreからimportしているRouteConfigは、[ジェネリック型](https://www.typescriptlang.org/docs/handbook/2/generics.html)としてちょうど5つの型を受け取ります。この型定義は公式のreact-navigationのウェブサイトには書かれていませんが、上で触れた型定義にジャンプする方法を使えば、すぐに突き止められます。
典型的なreact-nativeのTypeScriptのプロジェクトでは冗長、あるいは不要に見えるかもしれませんが、いくつかの利点があり、それを次のセクションで扱います。
### [IntelliSense](https://code.visualstudio.com/docs/editor/intellisense)
stackのルート(つまりアプリのルート)の配列に厳密に型を付けたので、配列のすべての要素は配列の型定義に従わなければならなくなりました。つまり、配列に新しい要素を追加するとき、IntelliSenseが最初から効くということです。
さらに、この型を適用すると、アプリのルートに新しい要素を追加するたびに、AppStackRoutesType\* _を更新することが強制されます。そうしないと、AppStackRoutesType(AppStackParamList)に存在しない新しい要素は追加できません_。\*
### ルートをマッピングする
いよいよ最後の部分です。createStackNavigatorを使ってstack navigatorを作ります。あとは、上で作った配列を、その厳密な型とともにマッピングするだけです。
最終的には配列のすべての要素を信頼できます。どの要素も正しく型付けされているので、[スプレッド構文](https://developer.mozilla.org/en-US/docs/Web/JavaScript/Reference/Operators/Spread_syntax)を安全に使えます。
```tsx
const Stack = createStackNavigator();
function AppStack() {
return (
{/** mapping the app stack routes */}
{appStackRoutes.map((stackRoute) => (
))}
);
}
```
### 本当に最後の部分だった?
いえ… 違います!
ここまで扱った例の型付けは、まだ改善できます。
```tsx
// generic stack routes type
export type StackRoutesType = Array<
RouteConfig<
ParamList,
keyof ParamList,
StackNavigationState,
StackNavigationOptions,
StackNavigationEventMap
>
>;
type AppStackRoutesType = StackRoutesType;
// mocking the screen components for the sake of example
const Home = () => ;
const Notifications = () => ;
const Profile = () => ;
const Settings = () => ;
// strictly typed array of app stack routes
const appStackRoutes: AppStackRoutesType = [
{
name: "Home",
component: Home,
},
{
name: "Notifications",
component: Notifications,
},
{
name: "Profile",
component: Profile,
},
{
name: "Settings",
component: Settings,
},
];
```
気づいたかもしれない違いは、ジェネリック型を受け取り、以前に見た型と同じになるStackRoutesTypeがあることです。でも、ここでの利点は何なのかと思うかもしれません。この問いには、目に見える形で答えるのが一番です。
```tsx
// too much duplicated code...
type AppStackRoutesType = RouteConfig<
AppStackParamList,
keyof AppStackParamList,
StackNavigationState,
StackNavigationOptions,
StackNavigationEventMap
>;
type OtherStackRoutesType = RouteConfig<
OtherStackParamList,
keyof OtherStackParamList,
StackNavigationState,
StackNavigationOptions,
StackNavigationEventMap
>;
type AnotherStackRoutesType = RouteConfig<
AnotherStackParamList,
keyof AnotherStackParamList,
StackNavigationState,
StackNavigationOptions,
StackNavigationEventMap
>;
```
ジェネリックなStackRoutesType*を使わなかったとしたら、*アプリにあるすべてのstackについて型を重複して書かなければなりません。
そうなると、アプリが大きくなるにつれて悪夢になります。_(ここでの考え方は、アプリのstackの数とアプリの複雑さは正比例するというものです。実際には常に100%正しい前提ではありませんが、この例には当てはまります)_
```tsx
// generic stack routes type
export type StackRoutesType = Array<
RouteConfig<
ParamList,
keyof ParamList,
StackNavigationState,
StackNavigationOptions,
StackNavigationEventMap
>
>;
// becomes one line typings for each stack
type AppStackRoutesType = StackRoutesType;
type OtherStackRoutesType = StackRoutesType;
type AnotherStackRoutesType = StackRoutesType;
```
一方、ジェネリック型を使うと、上のようにずっとシンプルできれいになるのがわかります。
## 最終的な姿
典型的なStackの関数が、2つの異なるシナリオでどう見えるかを比べてみましょう。
_図1: JSXの中でstackのすべての画面をひとつずつ描画する。_
```tsx
// ...imports, components
function AppStack() {
return (
{/** n more screens... */}
);
}
```
_図2: 厳密に型付けしたTypeScriptで作ったstackのルートの配列を使って画面を描画する。 🎉_
```tsx
function AppStack() {
return (
{appStackRoutes.map((stackRoute) => (
))}
);
}
```
### もうひとつ… Navigatorのpropsはどうする?
考えるべきことがもうひとつ残っているかもしれません。stack navigatorのpropsです。下のStackNavigator*を見ると、*ひとつのnavigatorに対して設定のかたまりがあります。これらの設定もJSXから切り離してしまいませんか?
```tsx
import type {
DefaultNavigatorOptions,
ParamListBase,
StackNavigationState,
} from "@react-navigation/core";
import {
StackNavigationEventMap,
StackNavigationOptions,
} from "@react-navigation/stack";
// other necessary imports for screens...
// generic typing for stack navigator options
type StackNavigatorOptions =
DefaultNavigatorOptions<
ParamList,
StackNavigationState,
StackNavigationOptions,
StackNavigationEventMap
>;
// omit the children as it corresponds to stack screen
const appStackNavigatorProps: Omit<
StackNavigatorOptions,
"children"
> = {
initialRouteName: "Home",
screenOptions: {
headerShown: false,
cardOverlayEnabled: true,
gestureEnabled: false,
cardStyle: {
backgroundColor: "royalblue",
},
headerLeftContainerStyle: {
backgroundColor: "firebrick",
},
presentation: "modal",
headerTitleStyle: {
fontSize: 24,
color: "olivedrab",
},
},
// ...rest
};
// screen components and stack routes...
function AppStack() {
return (
{appStackRoutes.map((stackRoute) => (
))}
);
}
```
13行目からは、なぜジェネリック型を使うのか、もうおなじみのはずです。ここでstackのルートと型付けが違うのは、@react-navigation/coreからimportしているDefaultNavigatorOptions型くらいでしょう。型の名前そのものが内容を物語っていて、navigatorのためのオプションです。
*上で触れた*RouteConfig *型\* _と同じように_、*これも複数のジェネリック型を受け取ります。加えて、childrenのキーは明示的に[*除外して](https://www.typescriptlang.org/docs/handbook/utility-types.html#omittype-keys) _いることに注意してください。Stack.Screenに対応するStack.Navigator_ _の子要素はすでに描画しているからです_。\*
22行目では、navigatorのオプションを表す新しいオブジェクトを作っています(navigatorのオプションの型を満たすオブジェクトを返すのであれば、関数でもかまいません)。
その結果、50行目では、このオブジェクトが与えられた型を満たしている限り、スプレッド構文で安全に使えます。
JSXがずっときれいになりました… 個人的には…
### 最終的な姿: Navigatorのprops
もう一度、典型的なStackの関数が2つの異なるシナリオでどう見えるかを比べてみましょう。
_図1: stack navigatorの設定をJSXの中に持つ。_
```tsx
function AppStack() {
return (
{appStackRoutes.map((stackRoute) => (
))}
);
}
```
_図2: stack navigatorの設定をJSXから切り離す。_
```tsx
// ...
function AppStack() {
return (
{appStackRoutes.map((stackRoute) => (
))}
);
}
```
---
### まとめ
この記事では、TypeScriptを実際に活用して、react-nativeのnavigatorをよりきれいに構成する方法を扱いました。
みなさん、バグのない一日を。
### 掲載先
この記事は次の場所でも公開しています。
- [Medium](https://medium.com/better-programming/react-navigation-with-typescript-fa7805f52ab0)