
React Native è diventato una scelta molto diffusa per creare applicazioni mobile, grazie al ciclo di sviluppo rapido e alla compatibilità multipiattaforma. Per sfruttare al meglio lo sviluppo con React Native, gli sviluppatori si affidano spesso a librerie di terze parti come React-Query e Zustand per gestire il recupero dei dati e lo state. React-Query offre un modo flessibile ed efficiente per recuperare, mettere in cache e gestire i dati, mentre Zustand rende lo state management semplice e potente con il suo approccio minimalista.
In questo articolo vedremo come testare in modo efficace le applicazioni React Native che usano queste due librerie. Useremo come esempio una semplice app di negozio e forniremo esempi completi e dettagliati per aiutarti a capire il processo di test. Alla fine dell'articolo avrai un'idea chiara di come usare e testare React-Query e Zustand nelle tue app React Native
1. Configurare l'ambiente
Useremo React Native versione 0.71.2 per inizializzare la nostra app di negozio, e React-Query (Tanstack query) versione 3.39.3 e Zustand versione 4.3.2 per gestire il recupero dei dati e lo state management. Metterò su GitHub il codice sorgente completo dell'app, quindi se vuoi buttarti subito e vederla in azione, puoi farlo con il link condiviso alla fine dell'articolo. Così potrai seguire gli esempi e vedere il codice completo dell'app.
1.1 Configurare l'API del negozio
Useremo https://fakestoreapi.com come API per mostrare tecniche di test efficaci in React Native. La nostra app di negozio recupererà un insieme di prodotti da questa API e mostrerà una vista dettagliata di ogni prodotto. FakeStoreProduct ha anche altre API REST che potremmo usare, ma farlo aumenterebbe la complessità e ci allontanerebbe dall'obiettivo principale di questo articolo.
Per comunicare con l'API in tutta l'app, creeremo un'istanza di axios.
1.2 Configurare l'istanza di axios
import axios from "axios";

export const BASE_URL = "https://fakestoreapi.com";

export const api = axios.create({
  baseURL: BASE_URL,
});
Il passo successivo sarà creare la configurazione di react-query per la nostra API.
1.3 Creare la key factory per gestire la cache delle query
Cos'è una key factory?
Anche se la semplicità della nostra app non richiede per forza la cache, useremo comunque le potenti funzioni di caching di React-Query. Creeremo quindi una semplice key factory, che vediamo qui sotto.
export const productKeyFactory = {
  products: ["all-products"],
  productById: (id: number) => [...productKeyFactory.products, id],
} as const;
1.4 Recuperare i prodotti con react-query
import { AxiosError } from "axios";
import { useQuery, UseQueryOptions } from "react-query";
import { api } from "../axios.instance";
import { productKeyFactory } from "./key-factory";
import { Product } from "./types";

export const getAllProducts = async () => {
  return (await api.get<Array<Product>>("/products")).data;
};

export const useGetAllProducts = (
  options?: UseQueryOptions<
    Array<Product>,
    AxiosError,
    Array<Product>,
    readonly [string]
  >
) => {
  return useQuery({
    queryKey: [...productKeyFactory.products],
    queryFn: getAllProducts,
    ...options,
  });
};
Qui sopra abbiamo creato l'hook useGetAllProducts per recuperare i prodotti, usando la query key creata nella sezione precedente.
1.5 Recuperare il dettaglio di un prodotto con react-query
import { AxiosError } from "axios";
import { useQuery, UseQueryOptions } from "react-query";
import { api } from "../axios.instance";
import { productKeyFactory } from "./key-factory";
import { Product } from "./types";

export const getProductById = async (productId: number) => {
  return (await api.get<Product>(`/products/${productId}`)).data;
};

export const useGetProductById = (
  productId: number,
  options?: UseQueryOptions<
    Product,
    AxiosError,
    Product,
    readonly (string | number)[]
  >
) => {
  return useQuery({
    queryFn: () => getProductById(productId),
    queryKey: [...productKeyFactory.productById(productId)],
    ...options,
  });
};
Quasi uguale all'hook precedente, solo che questa volta l'hook useGetProductById serve a recuperare il dettaglio di un prodotto tramite il suo id.
1.6 Il tipo Product
Non saltiamo questo passo e vediamo com'è fatto l'oggetto prodotto.
export interface Product {
  id: number;
  title: string;
  price: number;
  description: string;
  category: string;
  image: string;
  rating: Rating;
}

export interface Rating {
  rate: number;
  count: number;
}
1.7 Ecco zustand: gestire i prodotti nel carrello
L'app includerà funzioni di base che permettono agli utenti di aggiungere o togliere prodotti dal carrello e di modificare la quantità dei singoli prodotti. Inoltre gli utenti possono svuotare l'intero carrello. Queste funzioni saranno gestite con Zustand. Qui sotto ne esaminiamo l'implementazione.
import { create } from "zustand";
import { shallow } from "zustand/shallow";
import { Product } from "../api/product";

export type ProductInBasket = {
  product: Product;
  quantity: number;
};

export const updateProductQuantity = (
  productsInBasket: Array<ProductInBasket>,
  productId: number,
  updateType: "increase" | "decrease"
) => {
  return productsInBasket.map((productInBasket) => {
    if (productInBasket.product.id === productId) {
      return {
        ...productInBasket,
        quantity:
          updateType === "increase"
            ? productInBasket.quantity + 1
            : productInBasket.quantity - 1,
      };
    }
    return productInBasket;
  });
};

export const increaseProductQuantityInBasket = (
  productsInBasket: Array<ProductInBasket>,
  productId: number
) => {
  return updateProductQuantity(productsInBasket, productId, "increase");
};

export const decreaseProductQuantityInBasket = (
  productsInBasket: Array<ProductInBasket>,
  productId: number
) => {
  return updateProductQuantity(productsInBasket, productId, "decrease");
};

export interface ProductStore {
  productsInBasket: Array<ProductInBasket>;
  actions: {
    addProductToBasket: (val: Product) => void;
    removeProductFromBasket: (productId: number) => void;
    increaseProductQuantityInBasket: (productId: number) => void;
    decreaseProductQuantityInBasket: (productId: number) => void;
    resetAllProductsInBasket: () => void;
  };
}

export const useProductStore = create<ProductStore>((set, get) => ({
  productsInBasket: [],
  actions: {
    addProductToBasket: (product) =>
      set({
        productsInBasket: [
          ...get().productsInBasket,
          { product: product, quantity: 1 },
        ],
      }),
    removeProductFromBasket: (productId) =>
      set({
        productsInBasket: [
          ...get().productsInBasket.filter(
            (productInBasket) => productInBasket.product.id !== productId
          ),
        ],
      }),
    increaseProductQuantityInBasket: (productId) => {
      set({
        productsInBasket: increaseProductQuantityInBasket(
          get().productsInBasket,
          productId
        ),
      });
    },
    resetAllProductsInBasket: () => set({ productsInBasket: [] }),
    decreaseProductQuantityInBasket: (productId) => {
      set({
        productsInBasket: decreaseProductQuantityInBasket(
          get().productsInBasket,
          productId
        ),
      });
    },
  },
}));

export const useProductActions = () =>
  useProductStore((state) => state.actions);

export const useProductsInBasket = () =>
  useProductStore((state) => state.productsInBasket, shallow);
export const useProductsInBasketCount = () =>
  useProductStore((state) => state.productsInBasket.length);
export const useProductInBasketQuantityById = (productId: number | undefined) =>
  useProductStore(
    (state) =>
      state.productsInBasket.find(
        (productInBasket) => productInBasket.product.id === productId
      )?.quantity
  );
La prima parte del codice definisce tre funzioni, updateProductQuantity, increaseProductQuantityInBasket e decreaseProductQuantityInBasket, che sono metodi di supporto per aggiornare la quantità di un prodotto nel carrello. La funzione updateProductQuantity riceve come input un array di oggetti che corrisponde a productsInBasket, un ID prodotto e un tipo di aggiornamento (increase o decrease), e restituisce un nuovo array productsInBasket con la quantità aggiornata per il prodotto indicato.
L'interfaccia ProductStore definisce lo schema dello store dei prodotti. Contiene due proprietà:
-
productsInBasket è un array di oggetti ProductInBasket che rappresentano i prodotti nel carrello.
-
actions è un oggetto con le funzioni per gestire i prodotti nel carrello, tra cui aggiungere un prodotto, toglierlo, aumentarne o diminuirne la quantità e svuotare il carrello.
L'hook useProductStore è creato con la funzione create di Zustand. Restituisce lo store dei prodotti con il suo state e le sue azioni.
Gli altri hook, useProductActions, useProductsInBasket, useProductsInBasketCount e useProductInBasketQuantityById, sono selettori derivati dall'hook useProductStore. Permettono di accedere a parti specifiche dello store dei prodotti, come le azioni o il conteggio dei prodotti preferiti.
D'altra parte, vale la pena dire che in useProductsInBasket abbiamo usato shallow di zustand. Il motivo è che l'array di oggetti restituito da useProductsInBasket causerebbe un re-render, perché gli oggetti non sono tipi primitivi*, quindi diciamo semplicemente a zustand che vogliamo confrontare l'oggetto in modo superficiale passando la funzione di uguaglianza shallow.
1.8 Installare i pacchetti necessari per i test
Ora possiamo passare alla parte che ci interessa di più: i test. Useremo i pacchetti seguenti:
Per brevità, e per non allungare troppo l'articolo, salteremo alcuni passaggi della configurazione dell'ambiente di test, come jest.config.js e ts-jest .
Puoi vedere come abbiamo configurato alla fine l'ambiente di test usando il link al codice sorgente completo che trovi alla fine dell'articolo.
1.9 Simulare i dati dell'API con MSW
Per testare in modo efficace la nostra app con react-query, dobbiamo simulare l'API con dei mock. Per farlo useremo mock service worker (MSW).
import { rest } from "msw";
import { setupServer } from "msw/node";
import { BASE_URL } from "../../src/api/axios.instance";
import {
  GET_ALL_PRODUCTS_MOCK_RESPONSE,
  GET_PRODUCT_BY_ID_MOCK_RESPONSE,
} from "./mock-data";

const getAllProductsUrl = BASE_URL + "/products";
const getProductByIdUrl = BASE_URL + `/products/:id`;

const getAllProductsHandler = rest.get(getAllProductsUrl, (_req, res, ctx) => {
  return res(ctx.status(200), ctx.json(GET_ALL_PRODUCTS_MOCK_RESPONSE));
});

const getProductByIdHandler = rest.get(getProductByIdUrl, (_req, res, ctx) => {
  return res(ctx.status(200), ctx.json(GET_PRODUCT_BY_ID_MOCK_RESPONSE));
});

const handlers = [getAllProductsHandler, getProductByIdHandler];

export const mswServer = setupServer(...handlers);

const getAllProductsFailedHandler = rest.get(
  getAllProductsUrl,
  (_req, res, ctx) => {
    return res(ctx.status(500));
  }
);

const getProductByIdFailedHandler = rest.get(
  getProductByIdUrl,
  (_req, res, ctx) => {
    return res(ctx.status(500));
  }
);

export const setupGetAllProductsFailedHandler = () =>
  mswServer.use(getAllProductsFailedHandler);

export const setupGetProductByIdFailedHandler = () =>
  mswServer.use(getProductByIdFailedHandler);
Nel codice qui sopra importiamo i moduli necessari e configuriamo gli handler di MSW. Creiamo due endpoint simulati, uno per recuperare tutti i prodotti e l'altro per recuperare un prodotto tramite il suo id, entrambi con una risposta di successo. Per testare a fondo creiamo anche handler di errore per questi due endpoint, così da simulare e testare gli scenari di fallimento.
Per completare la configurazione dei mock qui sopra, dobbiamo usare l'oggetto mswServer nel nostro jest.setup.js . Vogliamo semplicemente avviare mswServer prima di tutti i casi di test, resettare gli handler dopo ogni caso di test e, alla fine, spegnerlo.
import "react-native-gesture-handler/jestSetup";
import { mswServer } from "./__mocks__/msw/handlers";

jest.useFakeTimers();

// https://mswjs.io/docs/getting-started/integrate/node#setup

// Establish API mocking before all tests.
beforeAll(() => mswServer.listen());
// Reset any request handlers that we may add during the tests,
// so they don't affect other tests.
afterEach(() => mswServer.resetHandlers());
// Clean up after the tests are finished.
afterAll(() => mswServer.close());

// Silence the warning: Animated: `useNativeDriver` is not supported because the native animated module is missing
jest.mock("react-native/Libraries/Animated/NativeAnimatedHelper");
Ora abbiamo simulato l'API per poterla usare nei test. Ma non abbiamo ancora finito. Dobbiamo anche configurare i test per zustand seguendo la documentazione che mette a disposizione. Così potremo resettare lo state tra un test e l'altro quando usiamo zustand nei nostri casi di test.
1.10 Configurare zustand per i test
// https://docs.pmnd.rs/zustand/guides/testing#resetting-state-between-tests-in-react-dom
const { create: actualCreate } = jest.requireActual("zustand"); // if using jest
import { act } from "@testing-library/react-native";

// a variable to hold reset functions for all stores declared in the app
const storeResetFns = new Set();

// when creating a store, we get its initial state, create a reset function and add it in the set
export const create = (createState) => {
  const store = actualCreate(createState);
  const initialState = store.getState();
  storeResetFns.add(() => store.setState(initialState, true));
  return store;
};

// Reset all stores after each test run
beforeEach(() => {
  act(() => storeResetFns.forEach((resetFn) => resetFn()));
});
La cosa fondamentale qui è mettere il file qui sopra nella directory giusta a seconda dell'ambiente di test. Dato che usiamo jest, dobbiamo metterlo in mocks/zustand.js come descritto nella documentazione.
Forse ti senti già sopraffatto da tutta questa configurazione dell'ambiente (di test), ma dovevo comunque trattarla, perché è lo scheletro del nostro ambiente.
Detto questo, passiamo subito alla sezione in cui creiamo la schermata che mostra i prodotti.
2. Panoramica della schermata con la lista dei prodotti
Come abbiamo detto prima, avremo una schermata che mostra i prodotti. Vediamo qui sotto il codice completo della schermata con la lista dei prodotti:
import { DefaultTheme } from "@react-navigation/native";
import * as React from "react";
import {
  FlatList,
  ListRenderItemInfo,
  RefreshControl,
  StyleSheet,
  Text,
  View,
} from "react-native";
import { SafeAreaView } from "react-native-safe-area-context";
import { Product, useGetAllProducts } from "../api/product";
import ProductListCard from "../components/product-list-card";
import ScreenLoading from "../components/screen-loading";
import Spacing from "../components/spacing";
import useRefreshByUser from "../hooks/useRefreshByUser";
import { RouteNames } from "../navigation/route-names";
import { ProductListScreenProps } from "../navigation/types";
import { useProductActions, useProductsInBasket } from "../store/product";
import { COMMON_STYLES } from "../theme/common-styles";

type Props = ProductListScreenProps;

const ProductListScreen: React.FC<Props> = ({ navigation }) => {
  const { data, isLoading, refetch, isError, isSuccess } = useGetAllProducts();

  const { isRefetchingByUser, refetchByUser } = useRefreshByUser(refetch);

  const { addProductToBasket, removeProductFromBasket } = useProductActions();
  const productsInBasket = useProductsInBasket();

  const onAddToBasketPress = React.useCallback(
    (product: Product) => () => {
      if (
        productsInBasket.find(
          (productInBasket) => productInBasket.product.id === product.id
        )
      ) {
        removeProductFromBasket(product.id);
      } else {
        addProductToBasket(product);
      }
    },
    [addProductToBasket, productsInBasket, removeProductFromBasket]
  );

  const onProductCardPress = React.useCallback(
    (productId: number) => () => {
      navigation.navigate(RouteNames.productDetail, { id: productId });
    },
    [navigation]
  );

  const renderItemSeparator = () => (
    <Spacing
      backgroundColor={DefaultTheme.colors.background}
      height={COMMON_STYLES.screenPadding}
    />
  );

  const getKeyExtractor = (item: Product) => item.id.toString();

  const renderItem = ({ item: product }: ListRenderItemInfo<Product>) => {
    return (
      <ProductListCard
        {...product}
        testID={`product-list-card-${product.id}`}
        basketButtonTestID={`basket-button-${product.id}`}
        isInBasket={
          typeof productsInBasket.find(
            (productInBasket) => productInBasket.product.id === product.id
          ) !== "undefined"
        }
        onAddToBasketPress={onAddToBasketPress(product)}
        onPress={onProductCardPress(product.id)}
      />
    );
  };

  if (isLoading) {
    return <ScreenLoading />;
  }

  return (
    <SafeAreaView style={COMMON_STYLES.flex} edges={["bottom"]}>
      {isError && (
        <View style={COMMON_STYLES.flexCenter}>
          <Text>An error occurred</Text>
        </View>
      )}

      {isSuccess && (
        <FlatList<Product>
          data={data}
          testID="product-list-flat-list"
          refreshControl={
            <RefreshControl
              refreshing={isRefetchingByUser}
              onRefresh={refetchByUser}
            />
          }
          renderItem={renderItem}
          numColumns={2}
          ItemSeparatorComponent={renderItemSeparator}
          columnWrapperStyle={styles.columnWrapper}
          contentContainerStyle={styles.contentContainerStyle}
          showsVerticalScrollIndicator={false}
          keyExtractor={getKeyExtractor}
          style={COMMON_STYLES.flex}
        />
      )}
    </SafeAreaView>
  );
};

export default ProductListScreen;

const styles = StyleSheet.create({
  contentContainerStyle: {
    flexGrow: 1,
    padding: COMMON_STYLES.screenPadding,
  },
  columnWrapper: {
    justifyContent: "space-between",
  },
});
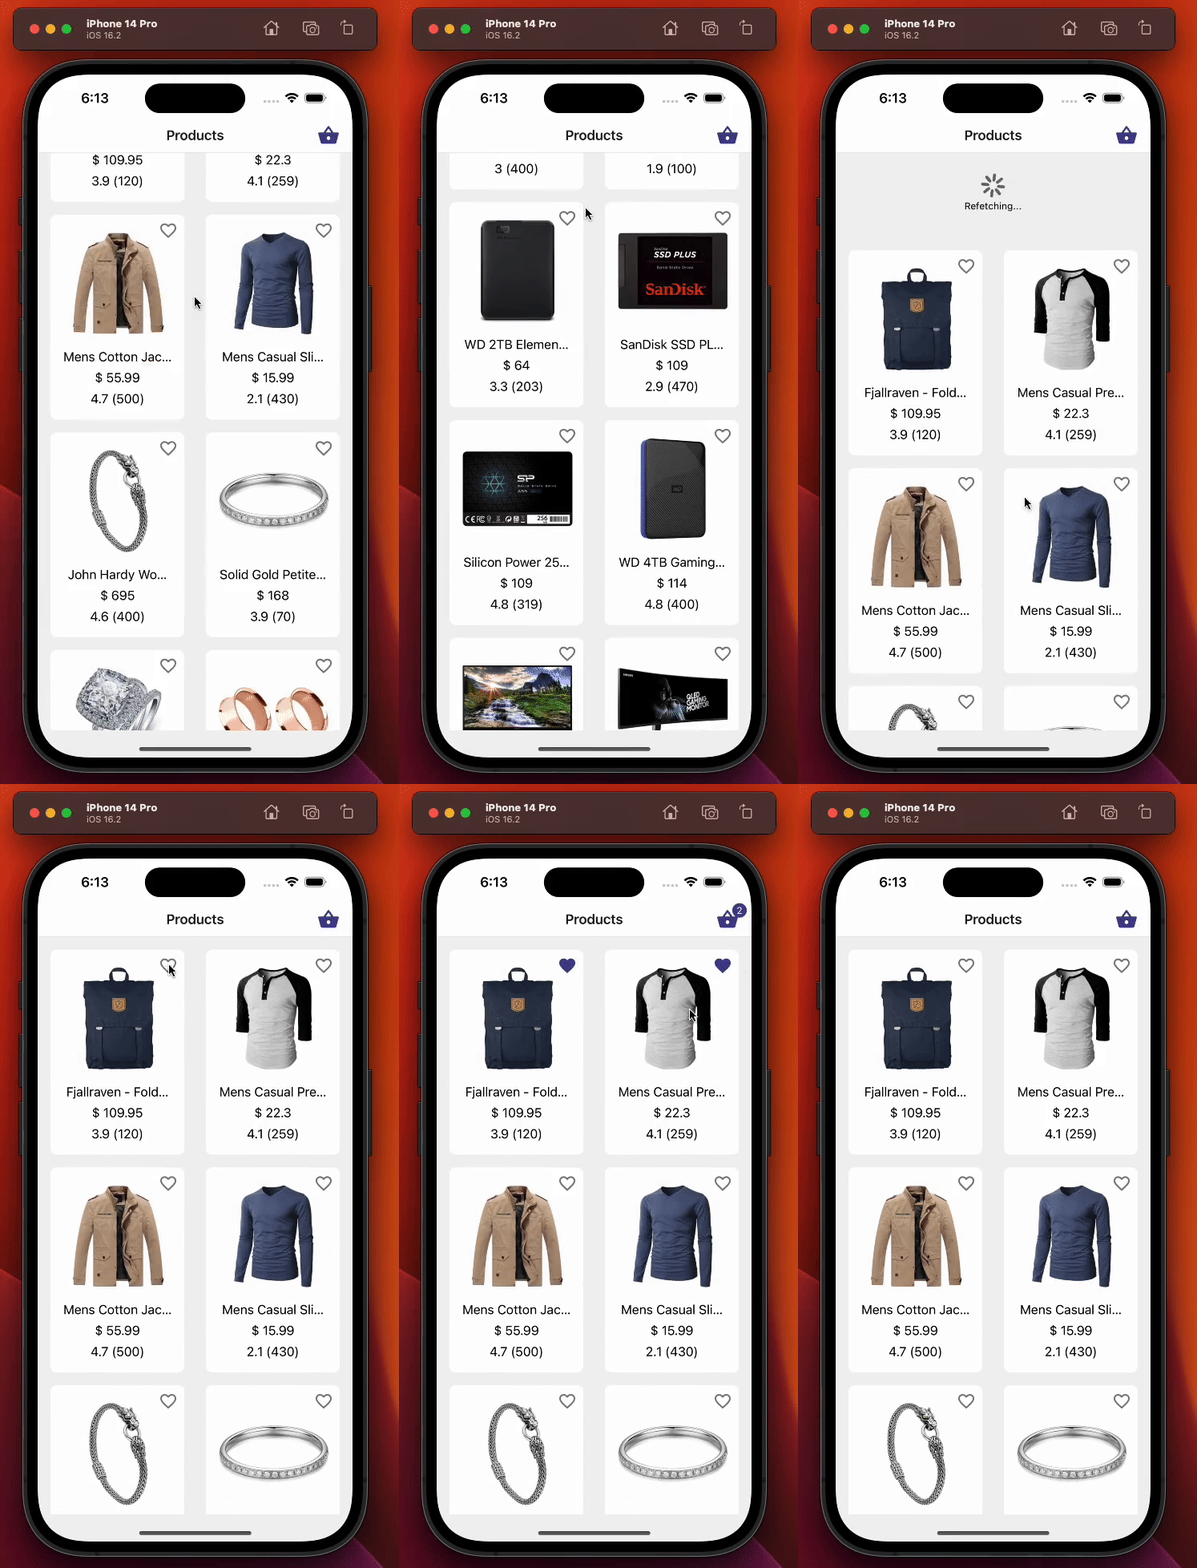
Questa schermata si occupa di:
-
Mostrare i prodotti con l'hook personalizzato di react query useGetAllProducts , creato nella sezione 1.4 Recuperare i prodotti con react-query.
-
Permettere agli utenti di aggiungere o togliere prodotti dal carrello con l'hook personalizzato di zustand useProductActions, che abbiamo visto nella sezione 1.7 Ecco zustand: gestire i prodotti nel carrello.
-
Recuperare di nuovo i prodotti con il pull to refresh.
-
Aggiornare il testo della quantità mostrato sull'icona del carrello in alto a destra nell'header.
Ecco una dimostrazione della schermata con la lista dei prodotti:
2.1 Testare la schermata con la lista dei prodotti
In questa sezione testiamo la schermata con la lista dei prodotti. I primi casi di test che eseguiremo sono questi:
-
All'inizio deve comparire l'indicatore di caricamento, anche se i dati sono simulati. Il flag booleano isLoading di react-query sarà comunque impostato a true per un breve periodo. Dopo il recupero dei dati, isLoading sarà false e il loader non verrà più mostrato.
-
La lista dei prodotti deve essere mostrata correttamente dopo il recupero dei dati. Per verificarlo useremo la prop testID del componente ProductListCard.
-
Se la query per ottenere tutti i prodotti fallisce, la schermata deve mostrare un messaggio di errore. Useremo l'helper setupGetAllProductsFailedHandler creato nella sezione 1.9 Simulare i dati dell'API con MSW
2.1.1 Caso di test: all'inizio deve mostrare l'indicatore di caricamento
import { renderHook } from "@testing-library/react-hooks";
import { render, screen } from "@testing-library/react-native";
import React from "react";
import { useGetAllProducts } from "../../api/product";
import { createReactQueryWrapper } from "../../utils/testing";
import ProductListScreen from "../product-list";

const navigateMock = jest.fn();
const navigation = { navigate: navigateMock } as any;
const route = jest.fn() as any;

const component = <ProductListScreen navigation={navigation} route={route} />;

describe("Product list screen", () => {
  it("should display loading indicator initially", async () => {
    // We render the component and expect to see a loading indicator
    render(component, { wrapper: createReactQueryWrapper });
    expect(screen.queryByTestId(`screen-loader`)).toBeTruthy();

    // We render the product list using useGetAllProducts hook and wait until the products are loaded
    const { result, waitFor } = renderHook(() => useGetAllProducts(), {
      wrapper: createReactQueryWrapper,
    });
    await waitFor(() => result.current.isSuccess);

    // We expect the loading indicator to disappear after the products are loaded
    expect(screen.queryByTestId(`screen-loader`)).not.toBeTruthy();
  });
});
In cima al file abbiamo importato i moduli necessari per eseguire i test. Poi abbiamo creato una variabile chiamata component per contenere la schermata con la lista dei prodotti, così da riutilizzarla in tutti i casi di test. Inoltre, dato che è una schermata e abbiamo dichiarato le sue props nella sezione 2. Panoramica della schermata con la lista dei prodotti e alla riga 22, dobbiamo fornire anche le props richieste dalla schermata, navigation e route. Nei prossimi casi di test vedremo perché qui sopra abbiamo destrutturato l'oggetto navigation.
Un breve ripasso della terminologia da tenere presente per capire i casi di test:
-
render: renderizza in profondità l'elemento React indicato e restituisce degli helper per interrogare la struttura dei componenti in uscita.
-
screen: contiene il valore dell'ultima chiamata a render, per accedere più facilmente alle query e alle altre funzioni restituite da render.
-
renderHook : renderizza un componente di test che chiama la callback fornita, compresi gli hook che chiama, a ogni render.
Dato che l'obiettivo principale di questo articolo è spiegare come fare i test e non presentare le librerie di test e le loro funzioni, non entreremo nei dettagli. In ogni caso, nel corso dell'articolo avremo abbastanza esempi per vederne l'uso.
Il caso di test qui sopra controlla se all'inizio sullo schermo compare un componente di caricamento. La funzione render renderizza il componente ProductListScreen avvolto nella funzione createReactQueryWrapper, una semplice funzione di utilità che serve a creare un QueryClientProvider . La funzione screen.queryByTestId() controlla se il loader è visibile sullo schermo.
La funzione renderHook serve a testare l'hook useGetAllProducts, usato nel componente ProductListScreen per recuperare i dati dei prodotti. L'opzione wrapper viene passata alla funzione renderHook per avvolgere l'hook useGetAllProducts nella funzione createReactQueryWrapper. La variabile result contiene il valore restituito dall'hook useGetAllProducts. Intanto la funzione waitFor aspetta che la proprietà isSuccess dell'oggetto result sia true, il che significa che i dati dei prodotti sono stati recuperati con successo.
La seconda parte controlla che il componente di caricamento non sia più visibile dopo il recupero riuscito dei dati dei prodotti.
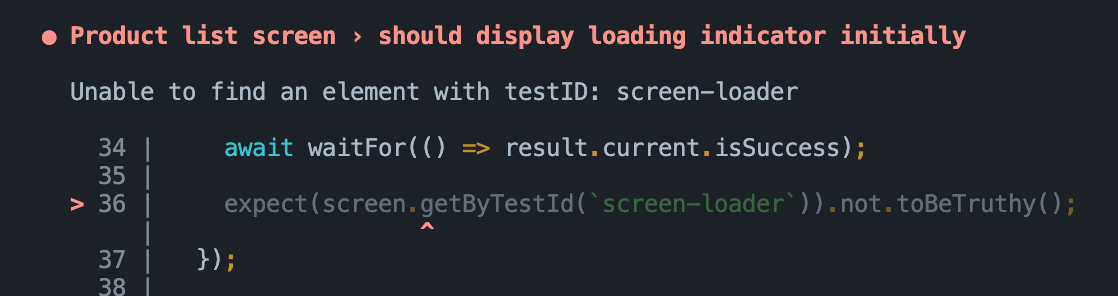
Abbiamo usato queryByTestId invece di getByTestId perché sappiamo che il componente di caricamento non sarà visibile dopo il recupero dei dati, quindi getByTestId lancerebbe un errore.
Usando getByTestId, l'errore che otterremmo potrebbe essere questo:
2.1.2 Caso di test: deve mostrare correttamente i dati della lista dei prodotti
import { renderHook } from "@testing-library/react-hooks";
import { render, screen } from "@testing-library/react-native";
import React from "react";
import { useGetAllProducts } from "../../api/product";
import { createReactQueryWrapper } from "../../utils/testing";
import ProductListScreen from "../product-list";

const navigateMock = jest.fn();
const navigation = { navigate: navigateMock } as any;
const route = jest.fn() as any;

const component = <ProductListScreen navigation={navigation} route={route} />;

describe("Product list screen", () => {
  it("should display product list data correctly", async () => {
    // Render the component and wait for it to load
    render(component, { wrapper: createReactQueryWrapper });

    // Check that no product card is rendered before fetching data
    expect(screen.queryByTestId(`product-list-card-1`)).not.toBeTruthy();

    // Fetch the product data
    const { result, waitFor } = renderHook(() => useGetAllProducts(), {
      wrapper: createReactQueryWrapper,
    });

    // Wait for the data to be fetched successfully
    await waitFor(() => result.current.isSuccess);

    // Check that each product card is rendered for each product in the data
    for (const { id } of result.current.data!) {
      expect(screen.queryByTestId(`product-list-card-${id}`)).toBeTruthy();
    }
  });
});
Questo codice di test verifica se la schermata con la lista dei prodotti mostra correttamente i dati dei prodotti recuperati.
Anche questa volta aspettiamo che i dati vengano recuperati con successo, poi verifichiamo che i dati della lista siano mostrati correttamente scorrendo i dati recuperati e aspettandoci che per ogni prodotto esista una scheda con il testID product-list-card-${id}. La proprietà id è generata dinamicamente in base all'ID del prodotto. Se il test fallisce, significa che gli elementi della lista non mostrano correttamente i dati dei prodotti.
Nota come usavamo la funzione renderItem per renderizzare gli elementi della lista qui sotto. Prendiamo product.id e lo combiniamo con la stringa product-list-card per generare un testID dinamico per il componente ProductListCard. In questo modo possiamo testare tutti i prodotti insieme alla rispettiva prop testID.
const renderItem = ({ item: product }: ListRenderItemInfo<Product>) => {
  return (
    <ProductListCard
      {...product}
      testID={`product-list-card-${product.id}`}
      basketButtonTestID={`basket-button-${product.id}`}
      isInBasket={
        typeof productsInBasket.find(
          (productInBasket) => productInBasket.product.id === product.id
        ) !== "undefined"
      }
      onAddToBasketPress={onAddToBasketPress(product)}
      onPress={onProductCardPress(product.id)}
    />
  );
};
2.1.3 Caso di test: deve mostrare un testo di errore se la query per ottenere tutti i prodotti fallisce
In questo caso di test verifichiamo lo scenario in cui la chiamata API per recuperare tutti i prodotti fallisce.
import { renderHook } from "@testing-library/react-hooks";
import { render, screen } from "@testing-library/react-native";
import React from "react";
import { setupGetAllProductsFailedHandler } from "../../../__mocks__/msw/handlers";
import { useGetAllProducts } from "../../api/product";
import { createReactQueryWrapper } from "../../utils/testing";
import ProductListScreen from "../product-list";

const navigateMock = jest.fn();
const navigation = { navigate: navigateMock } as any;
const route = jest.fn() as any;

const component = <ProductListScreen navigation={navigation} route={route} />;

describe("Product list screen", () => {
  it("should display error text in case get all products query fails", async () => {
    // Set up the mock handler for GET requests to the /products endpoint that returns an error response
    setupGetAllProductsFailedHandler();

    // Render the ProductListScreen component wrapped in the React Query wrapper
    render(component, { wrapper: createReactQueryWrapper });

    // Set up a mock React hook that calls the useGetAllProducts hook from the API module
    const { result, waitFor } = renderHook(() => useGetAllProducts(), {
      wrapper: createReactQueryWrapper,
    });

    // Wait for the useGetAllProducts hook to throw an error
    await waitFor(() => result.current.isError);

    // Assert that the "An error occurred" text is displayed on the screen
    expect(screen.getByText(`An error occurred`)).toBeTruthy();
  });
});
Per simulare il fallimento dell'API usiamo la funzione setupGetAllProductsFailedHandler del mock service worker (msw), che abbiamo implementato nella sezione 1.9 Simulare i dati dell'API con MSW alla riga 38. Poi renderizziamo il componente ProductListScreen con la funzione render e chiamiamo con la funzione renderHook l'hook useGetAllProducts, che recupera i dati.
Usiamo la funzione waitFor di @testing-library/react-hooks per aspettare che la proprietà isError dell'oggetto result.current diventi true. Così siamo sicuri che l'hook ha finito l'esecuzione e che la chiamata API è fallita. Infine verifichiamo che sullo schermo venga mostrato il messaggio di errore "An error occurred" (puoi ricontrollarlo guardando il codice sorgente della schermata con la lista dei prodotti), controllando che il testo sia presente con la funzione getByText di @testing-library/react-native.
2.1.4 Caso di test: deve chiamare l'azione di navigazione premendo il primo prodotto
Testeremo lo snippet seguente, estratto proprio dalla nostra schermata con la lista dei prodotti. Questo codice gestisce la pressione dell'utente su una qualsiasi scheda prodotto della lista.
const onProductCardPress = React.useCallback(
  (productId: number) => () => {
    navigation.navigate(RouteNames.productDetail, { id: productId });
  },
  [navigation]
);

const renderItem = ({ item: product }: ListRenderItemInfo<Product>) => {
  return (
    <ProductListCard
      {...product}
      testID={`product-list-card-${product.id}`}
      basketButtonTestID={`basket-button-${product.id}`}
      isInBasket={
        typeof productsInBasket.find(
          (productInBasket) => productInBasket.product.id === product.id
        ) !== "undefined"
      }
      onAddToBasketPress={onAddToBasketPress(product)}
      onPress={onProductCardPress(product.id)}
    />
  );
};
Vediamo qui sotto come possiamo testarlo:
import { renderHook } from "@testing-library/react-hooks";
import { fireEvent, render, screen } from "@testing-library/react-native";
import React from "react";
import { useGetAllProducts } from "../../api/product";
import { RouteNames } from "../../navigation/route-names";
import { createReactQueryWrapper } from "../../utils/testing";
import ProductListScreen from "../product-list";

const navigateMock = jest.fn();
const navigation = { navigate: navigateMock } as any;
const route = jest.fn() as any;

const component = <ProductListScreen navigation={navigation} route={route} />;

describe("Product list screen", () => {
  it("should call navigation action on pressing the first product item", async () => {
    // render ProductListScreen component with createReactQueryWrapper as a wrapper
    render(component, { wrapper: createReactQueryWrapper });

    // render hook for useGetAllProducts with createReactQueryWrapper as a wrapper
    const { result, waitFor } = renderHook(() => useGetAllProducts(), {
      wrapper: createReactQueryWrapper,
    });

    // wait for useGetAllProducts to succeed
    await waitFor(() => result.current.isSuccess);

    // find first product item and simulate a press event on it
    const firstProductItem = screen.getByTestId(`product-list-card-1`);
    fireEvent.press(firstProductItem);

    // assert that navigation action was called with correct route name and params
    expect(navigateMock).toHaveBeenCalledWith(RouteNames.productDetail, {
      id: 1,
    });
  });
});
In questo snippet di test verifichiamo se l'azione di navigazione viene chiamata quando si preme un prodotto. Prima renderizziamo il componente ProductListScreen e aspettiamo che i dati vengano recuperati con successo, proprio come nei casi di test precedenti. Poi prendiamo il primo prodotto della lista e simuliamo una pressione con fireEvent.press. Infine ci aspettiamo che la funzione navigate dell'oggetto navigation sia stata chiamata con i parametri RouteName e productId attesi.
2.1.5 Caso di test: deve aggiungere e togliere correttamente un prodotto premendo l'icona del carrello del prodotto
Il caso di test qui sotto verifica lo scenario in cui l'utente aggiunge e toglie un prodotto dal carrello premendo l'icona del carrello sulla scheda del prodotto nella schermata Product List.
import { NavigationContainer } from "@react-navigation/native";
import { renderHook } from "@testing-library/react-hooks";
import { fireEvent, render, screen } from "@testing-library/react-native";
import React from "react";
import { useGetAllProducts } from "../../api/product";
import ProductStack from "../../navigation/product-stack";
import { useProductStore } from "../../store/product";
import { createReactQueryWrapper } from "../../utils/testing";

// We render the whole app stack instead of rendering just the screen
// because we need access to the react-navigation's header, which wouldn't
// be possible if we just rendered the screen.
const rootAppComponent = (
  <NavigationContainer>
    <ProductStack />
  </NavigationContainer>
);

describe("Product list screen", () => {
  it("should add/remove product item correctly on pressing product items basket icon", async () => {
    // We render the entire app stack and use the createReactQueryWrapper as a
    // wrapper for the render function to set up the React Query Provider.
    render(rootAppComponent, {
      wrapper: createReactQueryWrapper,
    });

    // We use the renderHook function to invoke the useGetAllProducts hook which
    // fetches the data.
    const { result, waitFor } = renderHook(() => useGetAllProducts(), {
      wrapper: createReactQueryWrapper,
    });

    // We use the renderHook function to get access to the useProductStore hook
    // which we will use to check that the products in the basket were added/removed correctly.
    const { result: productStore } = renderHook(() => useProductStore(), {
      wrapper: createReactQueryWrapper,
    });

    // We wait for the useGetAllProducts hook to complete fetching the data before proceeding
    // with the test.
    await waitFor(() => result.current.isSuccess);

    // We get the basket button for the first product item using the getByTestId function.
    const firstProductItemBasketButton = screen.getByTestId(`basket-button-1`);

    // We click the basket button for the first product item.
    fireEvent.press(firstProductItemBasketButton);

    // We check that the basket icon quantity text is present using the getByTestId function.
    expect(screen.getByTestId("basket-icon-quantity-text-1")).toBeTruthy();

    // We check that the products in the basket have been added correctly using the productStore.
    expect(productStore.current.productsInBasket).toHaveLength(1);
    expect(productStore.current.productsInBasket[0].quantity).toBe(1);
    expect(productStore.current.productsInBasket[0].product).toMatchObject(
      result.current.data![0]
    );

    // We click the basket button for the first product item again to remove it from the basket.
    fireEvent.press(firstProductItemBasketButton);

    // We check that the basket icon quantity text is not present.
    expect(
      screen.queryByTestId("basket-icon-quantity-text-1")
    ).not.toBeTruthy();

    // We check that the products in the basket have been removed correctly using the productStore.
    expect(productStore.current.productsInBasket).toHaveLength(0);
  });
});
Per testare il funzionamento dell'icona del carrello nell'header, dobbiamo renderizzare l'intero ProductStack oltre a ProductListScreen. Questo perché dobbiamo accedere all'header della schermata Product List per ottenere l'icona del carrello tramite il suo test ID. Per farlo serve renderizzare l'intero ProductStack, insieme al NavigationContainer .
Una volta recuperati con successo i prodotti, il test usa fireEvent.press per simulare la pressione dell'icona del carrello sul primo prodotto, che aggiunge il prodotto al carrello. Poi controlliamo che l'icona del carrello mostri la quantità corretta e che il prodotto sia stato aggiunto all'array productsInBasket dello store dei prodotti con la quantità e l'oggetto prodotto corretti.
Dopo di che simuliamo di nuovo la pressione dell'icona del carrello per togliere il prodotto, e controlliamo che l'icona non mostri più la quantità e che l'array productsInBasket dello store dei prodotti sia vuoto.
In sintesi, questo caso di test verifica l'aggiunta e la rimozione di un prodotto dal carrello, e la modifica delle quantità, premendo l'icona del carrello sulla scheda del prodotto nella schermata Product List, e conferma che lo store dei prodotti gestisce correttamente i prodotti e le loro quantità nel carrello.
2.1.6 Il flusso di test completo della schermata con la lista dei prodotti
Il flusso di test completo della schermata con la lista dei prodotti è il seguente:
import { NavigationContainer } from "@react-navigation/native";
import { renderHook } from "@testing-library/react-hooks";
import { fireEvent, render, screen } from "@testing-library/react-native";
import React from "react";
import { setupGetAllProductsFailedHandler } from "../../../__mocks__/msw/handlers";
import { useGetAllProducts } from "../../api/product";
import ProductStack from "../../navigation/product-stack";
import { RouteNames } from "../../navigation/route-names";
import { useProductStore } from "../../store/product";
import { createReactQueryWrapper } from "../../utils/testing";
import ProductListScreen from "../product-list";

// We render the whole app stack instead of rendering just the screen
// because we need access to the react-navigation's header, which wouldn't
// be possible if we just rendered the screen.
const rootAppComponent = (
  <NavigationContainer>
    <ProductStack />
  </NavigationContainer>
);
const navigateMock = jest.fn();
const navigation = { navigate: navigateMock } as any;
const route = jest.fn() as any;

const component = <ProductListScreen navigation={navigation} route={route} />;

describe("Product list screen", () => {
  it("should display loading indicator initially", async () => {
    // We render the component and expect to see a loading indicator
    render(component, { wrapper: createReactQueryWrapper });
    expect(screen.queryByTestId(`screen-loader`)).toBeTruthy();

    // We render the product list using useGetAllProducts hook and wait until the products are loaded
    const { result, waitFor } = renderHook(() => useGetAllProducts(), {
      wrapper: createReactQueryWrapper,
    });
    await waitFor(() => result.current.isSuccess);

    // We expect the loading indicator to disappear after the products are loaded
    expect(screen.queryByTestId(`screen-loader`)).not.toBeTruthy();
  });

  it("should display product list data correctly", async () => {
    // Render the component and wait for it to load
    render(component, { wrapper: createReactQueryWrapper });

    // Check that no product card is rendered before fetching data
    expect(screen.queryByTestId(`product-list-card-1`)).not.toBeTruthy();

    // Fetch the product data
    const { result, waitFor } = renderHook(() => useGetAllProducts(), {
      wrapper: createReactQueryWrapper,
    });

    // Wait for the data to be fetched successfully
    await waitFor(() => result.current.isSuccess);

    // Check that each product card is rendered for each product in the data
    for (const { id } of result.current.data!) {
      expect(screen.queryByTestId(`product-list-card-${id}`)).toBeTruthy();
    }
  });

  it("should display error text in case get all products query fails", async () => {
    // Set up the mock handler for GET requests to the /products endpoint that returns an error response
    setupGetAllProductsFailedHandler();

    // Render the ProductListScreen component wrapped in the React Query wrapper
    render(component, { wrapper: createReactQueryWrapper });

    // Set up a mock React hook that calls the useGetAllProducts hook from the API module
    const { result, waitFor } = renderHook(() => useGetAllProducts(), {
      wrapper: createReactQueryWrapper,
    });

    // Wait for the useGetAllProducts hook to throw an error
    await waitFor(() => result.current.isError);

    // Assert that the "An error occurred" text is displayed on the screen
    expect(screen.getByText(`An error occurred`)).toBeTruthy();
  });

  it("should call navigation action on pressing the first product item", async () => {
    // Render the ProductListScreen component along with react-query wrapper
    render(component, { wrapper: createReactQueryWrapper });

    // Render the useGetAllProducts hook with react-query wrapper to fetch data
    const { result, waitFor } = renderHook(() => useGetAllProducts(), {
      wrapper: createReactQueryWrapper,
    });

    // Wait for the data to be fetched
    await waitFor(() => result.current.isSuccess);

    // Find the first product card in the list and simulate a press event on it
    const firstProductItem = screen.getByTestId(`product-list-card-1`);
    fireEvent.press(firstProductItem);

    // Expect that the navigation function is called with the correct route name and params
    expect(navigateMock).toHaveBeenCalledWith(RouteNames.productDetail, {
      id: 1,
    });
  });

  it("should add/remove product item correctly on pressing product items basket icon", async () => {
    // We render the entire app stack and use the createReactQueryWrapper as a
    // wrapper for the render function to set up the React Query Provider.
    render(rootAppComponent, {
      wrapper: createReactQueryWrapper,
    });

    // We use the renderHook function to invoke the useGetAllProducts hook which
    // fetches the data.
    const { result, waitFor } = renderHook(() => useGetAllProducts(), {
      wrapper: createReactQueryWrapper,
    });

    // We use the renderHook function to get access to the useProductStore hook
    // which we will use to check that the products in the basket were added/removed correctly.
    const { result: productStore } = renderHook(() => useProductStore(), {
      wrapper: createReactQueryWrapper,
    });

    // We wait for the useGetAllProducts hook to complete fetching the data before proceeding
    // with the test.
    await waitFor(() => result.current.isSuccess);

    // We get the basket button for the first product item using the getByTestId function.
    const firstProductItemBasketButton = screen.getByTestId(`basket-button-1`);

    // We click the basket button for the first product item.
    fireEvent.press(firstProductItemBasketButton);

    // We check that the basket icon quantity text is present using the getByTestId function.
    expect(screen.getByTestId("basket-icon-quantity-text-1")).toBeTruthy();

    // We check that the products in the basket have been added correctly using the productStore.
    expect(productStore.current.productsInBasket).toHaveLength(1);
    expect(productStore.current.productsInBasket[0].quantity).toBe(1);
    expect(productStore.current.productsInBasket[0].product).toMatchObject(
      result.current.data![0]
    );

    // We click the basket button for the first product item again to remove it from the basket.
    fireEvent.press(firstProductItemBasketButton);

    // We check that the basket icon quantity text is not present.
    expect(
      screen.queryByTestId("basket-icon-quantity-text-1")
    ).not.toBeTruthy();

    // We check that the products in the basket have been removed correctly using the productStore.
    expect(productStore.current.productsInBasket).toHaveLength(0);
  });
});
Per concludere
In conclusione, questo articolo ha esplorato strategie di test efficaci per le applicazioni React Native che usano React-Query e Zustand, librerie oggi molto diffuse in qualsiasi applicazione React/React Native. Usando come esempio una semplice app di negozio e fornendo esempi completi e dettagliati, abbiamo visto il processo di test e come garantire la qualità del codice scrivendo test. Puoi dare un'occhiata al codice sorgente completo con il link qui sotto. Buona giornata!
Link al codice sorgente completo
Pubblicato su
Questo articolo è pubblicato anche su: