React Native sudah menjadi pilihan populer untuk membangun aplikasi mobile karena siklus pengembangannya yang cepat dan kompatibilitas lintas platform. Untuk memaksimalkan pengembangan React Native, developer sering memakai library pihak ketiga seperti React-Query dan Zustand untuk menangani pengambilan data dan state management. React-Query menyediakan cara yang fleksibel dan efisien untuk mengambil, menyimpan cache, dan mengelola data, sementara Zustand membuat state management sederhana sekaligus ampuh dengan pendekatannya yang minimalis.
Di artikel ini, kita akan membahas cara menguji aplikasi React Native yang memakai kedua library ini secara efektif. Kita akan memakai aplikasi toko sederhana sebagai contoh dan memberikan contoh yang lengkap dan detail untuk membantu kamu memahami proses pengujiannya. Di akhir artikel ini, kamu akan punya pemahaman yang baik tentang cara memakai dan menguji React-Query dan Zustand di aplikasi React Native kamu.
1. Menyiapkan environment
Kita akan memakai React Native versi 0.71.2 untuk menginisialisasi aplikasi toko kita, serta React-Query (Tanstack query) versi 3.39.3 dan Zustand versi 4.3.2 untuk menangani pengambilan data dan state management. Saya akan menyediakan source code lengkap aplikasinya di GitHub, jadi kalau kamu ingin langsung melihatnya beraksi, kamu bisa membuka tautan yang dibagikan di akhir artikel. Dengan begitu kamu bisa mengikuti contoh-contohnya dan melihat kode lengkap aplikasinya.
1.1. Menyiapkan API toko
Kita akan memakai https://fakestoreapi.com sebagai API untuk mendemonstrasikan teknik pengujian yang efektif di React Native. Aplikasi toko kita akan mengambil sekumpulan produk dari API ini dan menyediakan tampilan detail untuk setiap produk. Walaupun FakeStoreProduct punya REST API lain yang bisa kita manfaatkan, memakainya akan menambah kompleksitas dan mengalihkan fokus dari tujuan utama artikel ini.
Untuk berkomunikasi dengan API di seluruh aplikasi, kita akan membuat instance axios.
1.2. Setup instance axios
import axios from "axios";

export const BASE_URL = "https://fakestoreapi.com";

export const api = axios.create({
  baseURL: BASE_URL,
});
Langkah berikutnya adalah membuat setup react-query untuk API kita.
1.3. Membuat key factory untuk mengelola cache query
Apa itu key factory?
Walaupun aplikasi kita yang sederhana tidak terlalu membutuhkan caching, kita tetap akan memanfaatkan fitur caching React-Query yang ampuh. Karena itu, kita akan membuat key factory sederhana seperti yang ditunjukkan di bawah ini.
export const productKeyFactory = {
  products: ["all-products"],
  productById: (id: number) => [...productKeyFactory.products, id],
} as const;
1.4. Mengambil produk dengan react-query
import { AxiosError } from "axios";
import { useQuery, UseQueryOptions } from "react-query";
import { api } from "../axios.instance";
import { productKeyFactory } from "./key-factory";
import { Product } from "./types";

export const getAllProducts = async () => {
  return (await api.get<Array<Product>>("/products")).data;
};

export const useGetAllProducts = (
  options?: UseQueryOptions<
    Array<Product>,
    AxiosError,
    Array<Product>,
    readonly [string]
  >
) => {
  return useQuery({
    queryKey: [...productKeyFactory.products],
    queryFn: getAllProducts,
    ...options,
  });
};
Di atas, kita membuat hook useGetAllProducts untuk mengambil produk, sekaligus memanfaatkan query key yang kita buat di bagian sebelumnya.
1.5. Mengambil detail produk dengan react-query
import { AxiosError } from "axios";
import { useQuery, UseQueryOptions } from "react-query";
import { api } from "../axios.instance";
import { productKeyFactory } from "./key-factory";
import { Product } from "./types";

export const getProductById = async (productId: number) => {
  return (await api.get<Product>(`/products/${productId}`)).data;
};

export const useGetProductById = (
  productId: number,
  options?: UseQueryOptions<
    Product,
    AxiosError,
    Product,
    readonly (string | number)[]
  >
) => {
  return useQuery({
    queryFn: () => getProductById(productId),
    queryKey: [...productKeyFactory.productById(productId)],
    ...options,
  });
};
Hampir sama dengan hook sebelumnya, hanya saja kali ini hook useGetProductById dipakai untuk mengambil detail produk berdasarkan id-nya.
1.6. Tipe produk
Jangan sampai terlewat, mari kita lihat bentuk objek produknya.
export interface Product {
  id: number;
  title: string;
  price: number;
  description: string;
  category: string;
  image: string;
  rating: Rating;
}

export interface Rating {
  rate: number;
  count: number;
}
1.7. Saatnya zustand: mengelola produk di keranjang
Aplikasi ini akan punya fitur dasar yang memungkinkan pengguna menambahkan atau menghapus produk dari keranjang, serta mengatur jumlah tiap produk. Selain itu, pengguna bisa mereset seluruh keranjang. Fungsi-fungsi ini akan dikelola dengan Zustand. Di bawah ini, kita akan melihat implementasinya.
import { create } from "zustand";
import { shallow } from "zustand/shallow";
import { Product } from "../api/product";

export type ProductInBasket = {
  product: Product;
  quantity: number;
};

export const updateProductQuantity = (
  productsInBasket: Array<ProductInBasket>,
  productId: number,
  updateType: "increase" | "decrease"
) => {
  return productsInBasket.map((productInBasket) => {
    if (productInBasket.product.id === productId) {
      return {
        ...productInBasket,
        quantity:
          updateType === "increase"
            ? productInBasket.quantity + 1
            : productInBasket.quantity - 1,
      };
    }
    return productInBasket;
  });
};

export const increaseProductQuantityInBasket = (
  productsInBasket: Array<ProductInBasket>,
  productId: number
) => {
  return updateProductQuantity(productsInBasket, productId, "increase");
};

export const decreaseProductQuantityInBasket = (
  productsInBasket: Array<ProductInBasket>,
  productId: number
) => {
  return updateProductQuantity(productsInBasket, productId, "decrease");
};

export interface ProductStore {
  productsInBasket: Array<ProductInBasket>;
  actions: {
    addProductToBasket: (val: Product) => void;
    removeProductFromBasket: (productId: number) => void;
    increaseProductQuantityInBasket: (productId: number) => void;
    decreaseProductQuantityInBasket: (productId: number) => void;
    resetAllProductsInBasket: () => void;
  };
}

export const useProductStore = create<ProductStore>((set, get) => ({
  productsInBasket: [],
  actions: {
    addProductToBasket: (product) =>
      set({
        productsInBasket: [
          ...get().productsInBasket,
          { product: product, quantity: 1 },
        ],
      }),
    removeProductFromBasket: (productId) =>
      set({
        productsInBasket: [
          ...get().productsInBasket.filter(
            (productInBasket) => productInBasket.product.id !== productId
          ),
        ],
      }),
    increaseProductQuantityInBasket: (productId) => {
      set({
        productsInBasket: increaseProductQuantityInBasket(
          get().productsInBasket,
          productId
        ),
      });
    },
    resetAllProductsInBasket: () => set({ productsInBasket: [] }),
    decreaseProductQuantityInBasket: (productId) => {
      set({
        productsInBasket: decreaseProductQuantityInBasket(
          get().productsInBasket,
          productId
        ),
      });
    },
  },
}));

export const useProductActions = () =>
  useProductStore((state) => state.actions);

export const useProductsInBasket = () =>
  useProductStore((state) => state.productsInBasket, shallow);
export const useProductsInBasketCount = () =>
  useProductStore((state) => state.productsInBasket.length);
export const useProductInBasketQuantityById = (productId: number | undefined) =>
  useProductStore(
    (state) =>
      state.productsInBasket.find(
        (productInBasket) => productInBasket.product.id === productId
      )?.quantity
  );
Bagian pertama kode mendefinisikan tiga fungsi, updateProductQuantity, increaseProductQuantityInBasket, dan decreaseProductQuantityInBasket, yang merupakan method helper untuk memperbarui jumlah produk di keranjang. Fungsi updateProductQuantity menerima input berupa array objek yang sesuai dengan productsInBasket, sebuah ID produk, dan tipe pembaruan (increase atau decrease), lalu mengembalikan array productsInBasket baru dengan jumlah yang sudah diperbarui untuk produk tersebut.
Interface ProductStore mendefinisikan schema untuk store produk. Interface ini berisi dua properti:
-
productsInBasket adalah array objek ProductInBasket yang merepresentasikan produk di keranjang.
-
actions adalah objek berisi fungsi untuk mengelola produk di keranjang, termasuk menambahkan produk, menghapus produk, menambah atau mengurangi jumlahnya, dan mereset keranjang.
Hook useProductStore dibuat dengan fungsi create dari Zustand. Hook ini mengembalikan store produk beserta state dan action-nya.
Hook lainnya, useProductActions, useProductsInBasket, useProductsInBasketCount, dan useProductInBasketQuantityById, adalah selector yang diturunkan dari hook useProductStore. Hook-hook ini memberi akses ke bagian tertentu dari store produk, seperti action atau jumlah produk favorit.
Di sisi lain, perlu disebutkan bahwa kita memakai shallow dari zustand di useProductsInBasket. Alasannya, array objek yang dikembalikan dari useProductsInBasket akan menyebabkan rerender karena isinya bukan tipe primitif. Karena itu, kita cukup memberi tahu zustand bahwa kita ingin objek tersebut dibandingkan secara shallow dengan memberikan fungsi shallow equality.
1.8. Menginstal package yang dibutuhkan untuk testing
Sekarang kita bisa beralih ke bagian yang lebih kita pedulikan, yaitu testing. Kita akan memakai package berikut:
Supaya ringkas dan artikelnya tidak terlalu panjang, kita akan melewatkan beberapa proses konfigurasi environment testing seperti jest.config.js dan ts-jest.
Silakan lihat bagaimana akhirnya kita menyiapkan environment test melalui tautan source code lengkap yang tersedia di akhir artikel.
1.9. Mock data API dengan MSW
Untuk menguji aplikasi kita dengan react-query secara efektif, kita perlu melakukan mock pada API. Untuk itu, kita akan memakai mock service worker (MSW).
import { rest } from "msw";
import { setupServer } from "msw/node";
import { BASE_URL } from "../../src/api/axios.instance";
import {
  GET_ALL_PRODUCTS_MOCK_RESPONSE,
  GET_PRODUCT_BY_ID_MOCK_RESPONSE,
} from "./mock-data";

const getAllProductsUrl = BASE_URL + "/products";
const getProductByIdUrl = BASE_URL + `/products/:id`;

const getAllProductsHandler = rest.get(getAllProductsUrl, (_req, res, ctx) => {
  return res(ctx.status(200), ctx.json(GET_ALL_PRODUCTS_MOCK_RESPONSE));
});

const getProductByIdHandler = rest.get(getProductByIdUrl, (_req, res, ctx) => {
  return res(ctx.status(200), ctx.json(GET_PRODUCT_BY_ID_MOCK_RESPONSE));
});

const handlers = [getAllProductsHandler, getProductByIdHandler];

export const mswServer = setupServer(...handlers);

const getAllProductsFailedHandler = rest.get(
  getAllProductsUrl,
  (_req, res, ctx) => {
    return res(ctx.status(500));
  }
);

const getProductByIdFailedHandler = rest.get(
  getProductByIdUrl,
  (_req, res, ctx) => {
    return res(ctx.status(500));
  }
);

export const setupGetAllProductsFailedHandler = () =>
  mswServer.use(getAllProductsFailedHandler);

export const setupGetProductByIdFailedHandler = () =>
  mswServer.use(getProductByIdFailedHandler);
Pada kode di atas, kita meng-import modul yang dibutuhkan dan menyiapkan handler MSW. Kita membuat dua endpoint mock, satu untuk mengambil semua produk dan satu lagi untuk mengambil produk berdasarkan id, keduanya mengembalikan response yang berhasil. Untuk memastikan pengujian yang menyeluruh, kita juga membuat handler gagal untuk kedua endpoint ini guna menyimulasikan dan menguji skenario kegagalan.
Untuk melengkapi setup mock di atas, kita perlu memakai objek mswServer di jest.setup.js. Kita cukup menginisialisasi mswServer sebelum test case apa pun, mereset handler setelah setiap test case, dan di akhir mematikannya.
import "react-native-gesture-handler/jestSetup";
import { mswServer } from "./__mocks__/msw/handlers";

jest.useFakeTimers();

// https://mswjs.io/docs/getting-started/integrate/node#setup

// Establish API mocking before all tests.
beforeAll(() => mswServer.listen());
// Reset any request handlers that we may add during the tests,
// so they don't affect other tests.
afterEach(() => mswServer.resetHandlers());
// Clean up after the tests are finished.
afterAll(() => mswServer.close());

// Silence the warning: Animated: `useNativeDriver` is not supported because the native animated module is missing
jest.mock("react-native/Libraries/Animated/NativeAnimatedHelper");
Sekarang API kita sudah di-mock sehingga bisa dipakai di test. Tapi kita belum selesai. Kita juga perlu menyiapkan testing untuk zustand memakai dokumentasi yang mereka sediakan. Dengan begitu kita bisa mereset state di antara test saat memakai zustand di test case kita.
1.10. Mengonfigurasi zustand untuk testing
// https://docs.pmnd.rs/zustand/guides/testing#resetting-state-between-tests-in-react-dom
const { create: actualCreate } = jest.requireActual("zustand"); // if using jest
import { act } from "@testing-library/react-native";

// a variable to hold reset functions for all stores declared in the app
const storeResetFns = new Set();

// when creating a store, we get its initial state, create a reset function and add it in the set
export const create = (createState) => {
  const store = actualCreate(createState);
  const initialState = store.getState();
  storeResetFns.add(() => store.setState(initialState, true));
  return store;
};

// Reset all stores after each test run
beforeEach(() => {
  act(() => storeResetFns.forEach((resetFn) => resetFn()));
});
Hal yang krusial di sini adalah menaruh file di atas di direktori yang benar, tergantung environment testing kita. Karena kita memakai jest, kita harus menaruh file ini di mocks/zustand.js seperti yang dijelaskan di dokumentasi.
Kamu mungkin sudah merasa kewalahan dengan setup environment (testing) ini, tetapi saya tetap perlu membahasnya karena semua ini adalah kerangka environment kita.
Dengan begitu, mari langsung masuk ke bagian tempat kita membuat layar untuk menampilkan produk.
2. Gambaran layar daftar produk
Seperti yang sudah disebutkan, kita akan punya layar untuk menampilkan produk. Mari kita lihat kode lengkap layar daftar produk di bawah ini:
import { DefaultTheme } from "@react-navigation/native";
import * as React from "react";
import {
  FlatList,
  ListRenderItemInfo,
  RefreshControl,
  StyleSheet,
  Text,
  View,
} from "react-native";
import { SafeAreaView } from "react-native-safe-area-context";
import { Product, useGetAllProducts } from "../api/product";
import ProductListCard from "../components/product-list-card";
import ScreenLoading from "../components/screen-loading";
import Spacing from "../components/spacing";
import useRefreshByUser from "../hooks/useRefreshByUser";
import { RouteNames } from "../navigation/route-names";
import { ProductListScreenProps } from "../navigation/types";
import { useProductActions, useProductsInBasket } from "../store/product";
import { COMMON_STYLES } from "../theme/common-styles";

type Props = ProductListScreenProps;

const ProductListScreen: React.FC<Props> = ({ navigation }) => {
  const { data, isLoading, refetch, isError, isSuccess } = useGetAllProducts();

  const { isRefetchingByUser, refetchByUser } = useRefreshByUser(refetch);

  const { addProductToBasket, removeProductFromBasket } = useProductActions();
  const productsInBasket = useProductsInBasket();

  const onAddToBasketPress = React.useCallback(
    (product: Product) => () => {
      if (
        productsInBasket.find(
          (productInBasket) => productInBasket.product.id === product.id
        )
      ) {
        removeProductFromBasket(product.id);
      } else {
        addProductToBasket(product);
      }
    },
    [addProductToBasket, productsInBasket, removeProductFromBasket]
  );

  const onProductCardPress = React.useCallback(
    (productId: number) => () => {
      navigation.navigate(RouteNames.productDetail, { id: productId });
    },
    [navigation]
  );

  const renderItemSeparator = () => (
    <Spacing
      backgroundColor={DefaultTheme.colors.background}
      height={COMMON_STYLES.screenPadding}
    />
  );

  const getKeyExtractor = (item: Product) => item.id.toString();

  const renderItem = ({ item: product }: ListRenderItemInfo<Product>) => {
    return (
      <ProductListCard
        {...product}
        testID={`product-list-card-${product.id}`}
        basketButtonTestID={`basket-button-${product.id}`}
        isInBasket={
          typeof productsInBasket.find(
            (productInBasket) => productInBasket.product.id === product.id
          ) !== "undefined"
        }
        onAddToBasketPress={onAddToBasketPress(product)}
        onPress={onProductCardPress(product.id)}
      />
    );
  };

  if (isLoading) {
    return <ScreenLoading />;
  }

  return (
    <SafeAreaView style={COMMON_STYLES.flex} edges={["bottom"]}>
      {isError && (
        <View style={COMMON_STYLES.flexCenter}>
          <Text>An error occurred</Text>
        </View>
      )}

      {isSuccess && (
        <FlatList<Product>
          data={data}
          testID="product-list-flat-list"
          refreshControl={
            <RefreshControl
              refreshing={isRefetchingByUser}
              onRefresh={refetchByUser}
            />
          }
          renderItem={renderItem}
          numColumns={2}
          ItemSeparatorComponent={renderItemSeparator}
          columnWrapperStyle={styles.columnWrapper}
          contentContainerStyle={styles.contentContainerStyle}
          showsVerticalScrollIndicator={false}
          keyExtractor={getKeyExtractor}
          style={COMMON_STYLES.flex}
        />
      )}
    </SafeAreaView>
  );
};

export default ProductListScreen;

const styles = StyleSheet.create({
  contentContainerStyle: {
    flexGrow: 1,
    padding: COMMON_STYLES.screenPadding,
  },
  columnWrapper: {
    justifyContent: "space-between",
  },
});
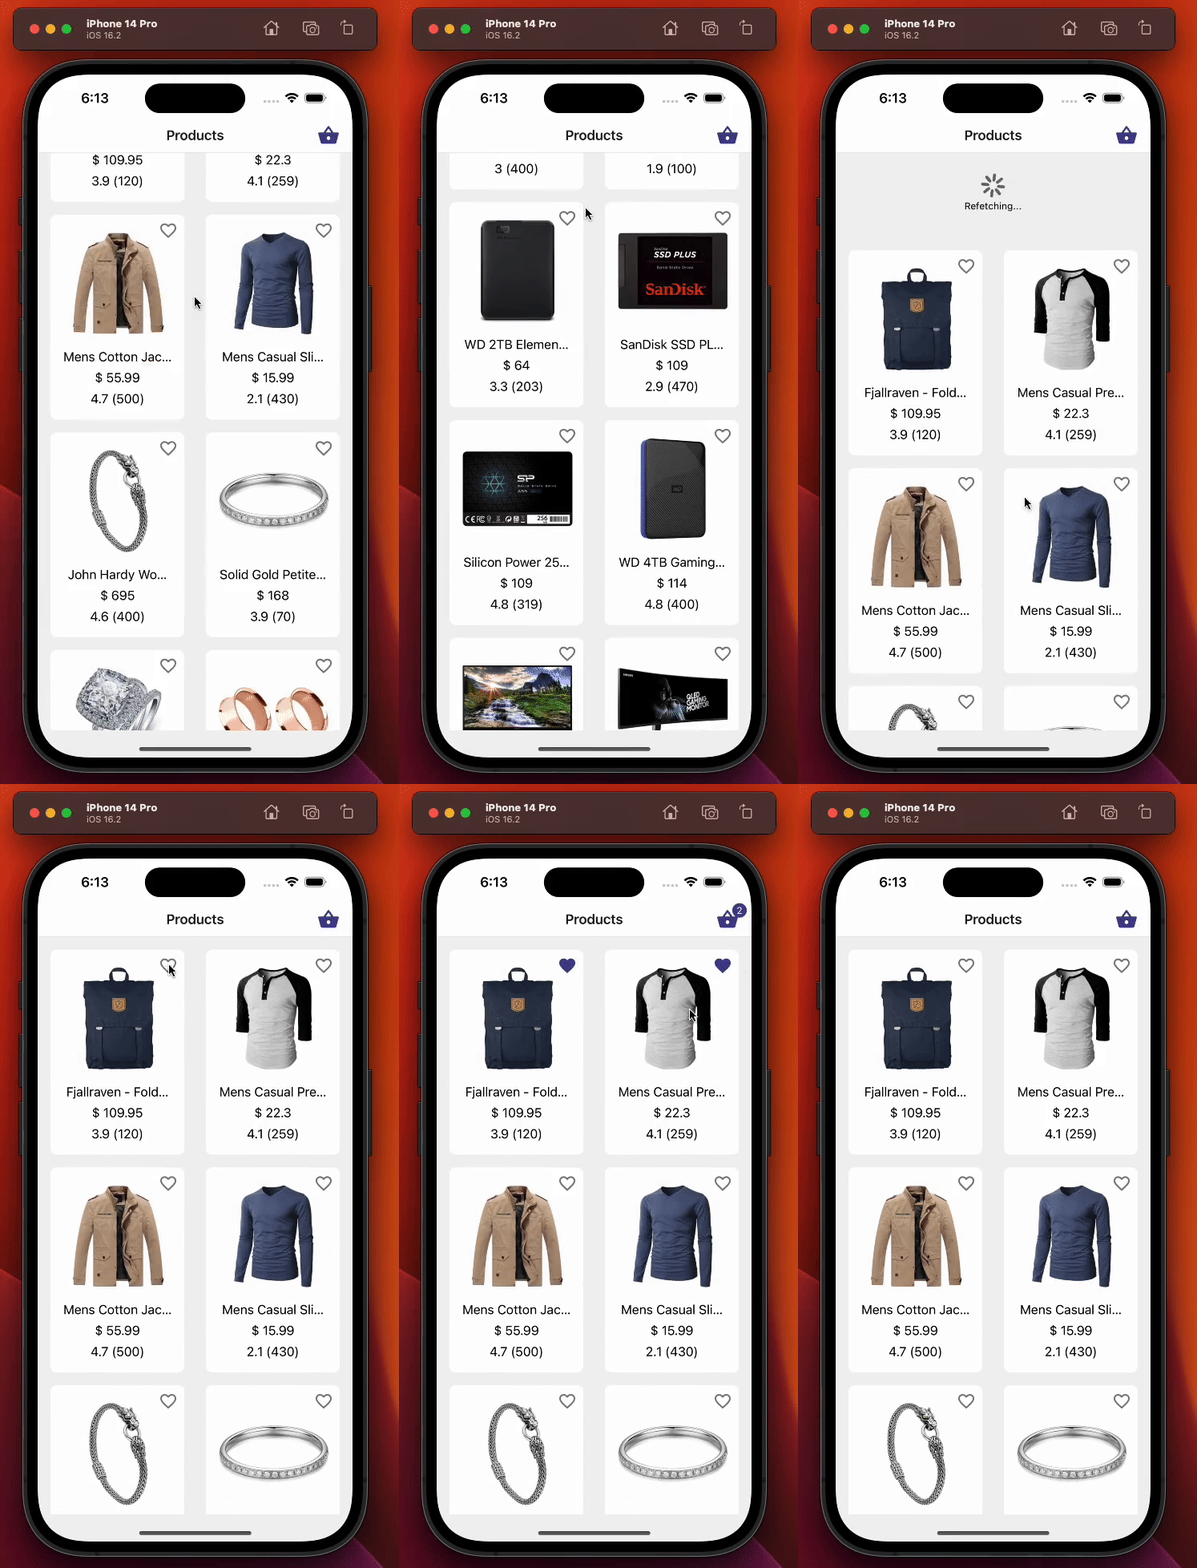
Layar ini bertanggung jawab untuk hal-hal berikut:
-
Menampilkan produk dengan custom hook react query, useGetAllProducts, yang kita buat di bagian 1.4. Mengambil produk dengan react-query.
-
Memungkinkan pengguna menambahkan atau menghapus produk dari keranjang memakai custom hook zustand useProductActions, yang juga sudah kita bahas di bagian 1.7. Saatnya zustand: mengelola produk di keranjang.
-
Mengambil ulang produk dengan pull to refresh.
-
Memperbarui teks jumlah yang ditampilkan di ikon keranjang di kanan header.
Berikut demonstrasi layar daftar produk:
2.1. Menguji layar daftar produk
Di bagian ini, kita akan melakukan pengujian pada layar daftar produk. Test case awal yang akan dijalankan adalah sebagai berikut:
-
Awalnya, indikator loading harus ditampilkan, walaupun kita melakukan mock pada data. Flag boolean isLoading di react-query tetap bernilai true untuk waktu yang singkat. Setelah data diambil, isLoading akan bernilai false, dan loader tidak lagi ditampilkan.
-
Daftar produk harus ditampilkan dengan akurat setelah data diambil. Prop testID dari komponen ProductListCard akan dipakai untuk memverifikasi kasus ini.
-
Jika query untuk mengambil semua produk gagal, layar harus menampilkan pesan error. Kita akan memakai helper setupGetAllProductsFailedHandler yang dibuat di 1.9. Mock data API dengan MSW
2.1.1. Test case: Harus menampilkan indikator loading di awal
import { renderHook } from "@testing-library/react-hooks";
import { render, screen } from "@testing-library/react-native";
import React from "react";
import { useGetAllProducts } from "../../api/product";
import { createReactQueryWrapper } from "../../utils/testing";
import ProductListScreen from "../product-list";

const navigateMock = jest.fn();
const navigation = { navigate: navigateMock } as any;
const route = jest.fn() as any;

const component = <ProductListScreen navigation={navigation} route={route} />;

describe("Product list screen", () => {
  it("should display loading indicator initially", async () => {
    // We render the component and expect to see a loading indicator
    render(component, { wrapper: createReactQueryWrapper });
    expect(screen.queryByTestId(`screen-loader`)).toBeTruthy();

    // We render the product list using useGetAllProducts hook and wait until the products are loaded
    const { result, waitFor } = renderHook(() => useGetAllProducts(), {
      wrapper: createReactQueryWrapper,
    });
    await waitFor(() => result.current.isSuccess);

    // We expect the loading indicator to disappear after the products are loaded
    expect(screen.queryByTestId(`screen-loader`)).not.toBeTruthy();
  });
});
Di bagian atas file, kita meng-import modul yang dibutuhkan untuk menjalankan test. Lalu kita membuat variabel bernama component untuk menyimpan layar daftar produk, supaya variabel ini bisa dipakai ulang di seluruh test case. Selain itu, karena ini adalah sebuah layar, dan kita sudah mendeklarasikan props layar di bagian 2. Gambaran layar daftar produk, maka di baris 22 kita juga perlu memberikan props layar yang dibutuhkan, yaitu navigation dan route. Kita akan kembali membahas di test case berikutnya kenapa kita melakukan destructuring pada objek navigation di atas.
Ulasan singkat tentang istilah yang perlu kita pahami untuk mengerti test case:
-
render: Merender elemen React yang diberikan secara mendalam dan mengembalikan helper untuk melakukan query pada struktur komponen hasilnya.
-
screen: Menyimpan nilai dari pemanggilan render terakhir agar lebih mudah mengakses query dan fungsi lain yang dikembalikan oleh render.
-
renderHook: Merender komponen test yang akan memanggil callback yang diberikan, termasuk hook apa pun yang dipanggilnya, setiap kali komponen tersebut dirender.
Karena tujuan utama artikel ini adalah memberikan panduan cara melakukan pengujian, bukan pengenalan library testing dan fungsinya, kita tidak akan membahasnya secara mendalam. Bagaimanapun, kita akan punya cukup banyak contoh untuk melihat penggunaannya di sepanjang artikel.
Test case di atas memeriksa apakah komponen loader layar ditampilkan di awal. Fungsi render merender komponen ProductListScreen yang dibungkus dengan fungsi createReactQueryWrapper, yaitu fungsi utilitas sederhana untuk membuat QueryClientProvider. Fungsi screen.queryByTestId() memeriksa apakah loader layar ditampilkan.
Fungsi renderHook dipakai untuk menguji hook useGetAllProducts, yang dipakai di komponen ProductListScreen untuk mengambil data produk. Opsi wrapper diberikan ke fungsi renderHook untuk membungkus hook useGetAllProducts dengan fungsi createReactQueryWrapper. Variabel result berisi nilai yang dikembalikan oleh hook useGetAllProducts. Sementara itu, fungsi waitFor menunggu sampai properti isSuccess dari objek result bernilai true, yang berarti data produk sudah berhasil diambil.
Bagian kedua memeriksa apakah komponen loader layar sudah tidak ditampilkan setelah data produk berhasil diambil.
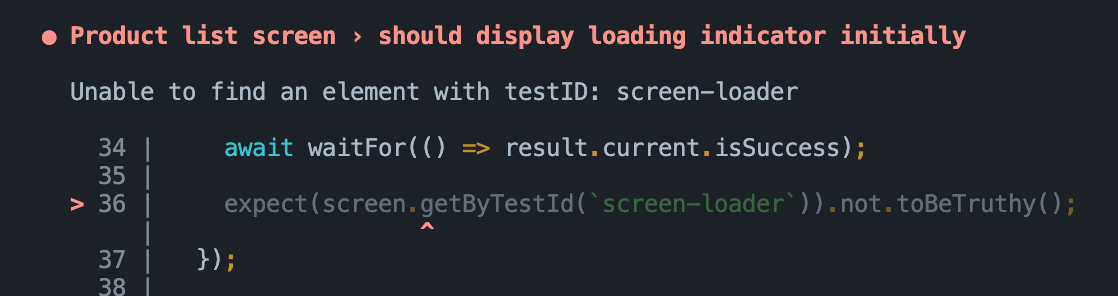
Alasan kita memakai queryByTestId alih-alih getByTestId adalah karena kita tahu komponen loader layar tidak akan terlihat setelah data diambil, sehingga memakai getByTestId akan melempar error.
Error yang akan kita hadapi jika memakai getByTestId bisa seperti berikut:
2.1.2. Test case: Harus menampilkan data daftar produk dengan benar
import { renderHook } from "@testing-library/react-hooks";
import { render, screen } from "@testing-library/react-native";
import React from "react";
import { useGetAllProducts } from "../../api/product";
import { createReactQueryWrapper } from "../../utils/testing";
import ProductListScreen from "../product-list";

const navigateMock = jest.fn();
const navigation = { navigate: navigateMock } as any;
const route = jest.fn() as any;

const component = <ProductListScreen navigation={navigation} route={route} />;

describe("Product list screen", () => {
  it("should display product list data correctly", async () => {
    // Render the component and wait for it to load
    render(component, { wrapper: createReactQueryWrapper });

    // Check that no product card is rendered before fetching data
    expect(screen.queryByTestId(`product-list-card-1`)).not.toBeTruthy();

    // Fetch the product data
    const { result, waitFor } = renderHook(() => useGetAllProducts(), {
      wrapper: createReactQueryWrapper,
    });

    // Wait for the data to be fetched successfully
    await waitFor(() => result.current.isSuccess);

    // Check that each product card is rendered for each product in the data
    for (const { id } of result.current.data!) {
      expect(screen.queryByTestId(`product-list-card-${id}`)).toBeTruthy();
    }
  });
});
Kode test ini menguji apakah layar daftar produk menampilkan data produk yang diambil dengan benar.
Kali ini kita kembali menunggu data berhasil diambil, lalu memastikan data daftar produk ditampilkan dengan benar dengan melakukan loop pada data yang diambil dan mengharapkan kartu daftar produk dengan testID product-list-card-${id} ada untuk setiap produk di data tersebut. Properti id dibuat secara dinamis berdasarkan ID produk. Jika test gagal, artinya item daftar produk tidak menampilkan data produk dengan benar.
Perhatikan bagaimana kita memakai fungsi renderItem untuk merender item list di bawah. Kita melakukan loop pada product.id dan menggabungkannya dengan string product-list-card untuk membuat testID dinamis bagi komponen ProductListCard. Dengan cara ini, kita bisa menguji semua produk beserta prop testID masing-masing.
const renderItem = ({ item: product }: ListRenderItemInfo<Product>) => {
  return (
    <ProductListCard
      {...product}
      testID={`product-list-card-${product.id}`}
      basketButtonTestID={`basket-button-${product.id}`}
      isInBasket={
        typeof productsInBasket.find(
          (productInBasket) => productInBasket.product.id === product.id
        ) !== "undefined"
      }
      onAddToBasketPress={onAddToBasketPress(product)}
      onPress={onProductCardPress(product.id)}
    />
  );
};
2.1.3. Test case: Harus menampilkan teks error jika query semua produk gagal
Di test case ini, kita menguji skenario ketika panggilan API untuk mengambil semua produk gagal.
import { renderHook } from "@testing-library/react-hooks";
import { render, screen } from "@testing-library/react-native";
import React from "react";
import { setupGetAllProductsFailedHandler } from "../../../__mocks__/msw/handlers";
import { useGetAllProducts } from "../../api/product";
import { createReactQueryWrapper } from "../../utils/testing";
import ProductListScreen from "../product-list";

const navigateMock = jest.fn();
const navigation = { navigate: navigateMock } as any;
const route = jest.fn() as any;

const component = <ProductListScreen navigation={navigation} route={route} />;

describe("Product list screen", () => {
  it("should display error text in case get all products query fails", async () => {
    // Set up the mock handler for GET requests to the /products endpoint that returns an error response
    setupGetAllProductsFailedHandler();

    // Render the ProductListScreen component wrapped in the React Query wrapper
    render(component, { wrapper: createReactQueryWrapper });

    // Set up a mock React hook that calls the useGetAllProducts hook from the API module
    const { result, waitFor } = renderHook(() => useGetAllProducts(), {
      wrapper: createReactQueryWrapper,
    });

    // Wait for the useGetAllProducts hook to throw an error
    await waitFor(() => result.current.isError);

    // Assert that the "An error occurred" text is displayed on the screen
    expect(screen.getByText(`An error occurred`)).toBeTruthy();
  });
});
Untuk menyimulasikan kegagalan API, kita memakai fungsi setupGetAllProductsFailedHandler dari mock service worker (msw), yang kita implementasikan di bagian 1.9. Mock data API dengan MSW pada baris 38. Lalu kita merender komponen ProductListScreen dengan fungsi render, dan memanggil hook useGetAllProducts yang mengambil data dengan fungsi renderHook.
Kita memakai fungsi waitFor dari @testing-library/react-hooks untuk menunggu properti isError dari objek result.current bernilai true. Ini memastikan hook sudah selesai dijalankan dan panggilan API sudah gagal. Terakhir, kita memastikan bahwa pesan error “An error occurred” (yang bisa kamu cek ulang di source code layar daftar produk) ditampilkan di layar dengan memeriksa keberadaan teks tersebut memakai fungsi getByText dari @testing-library/react-native.
2.1.4. Test case: Harus memanggil aksi navigasi saat item produk pertama ditekan
Kita akan menguji potongan kode berikut yang sebenarnya diambil dari layar daftar produk kita. Kode ini bertugas menangani aksi pengguna saat menekan salah satu kartu daftar produk di list.
const onProductCardPress = React.useCallback(
  (productId: number) => () => {
    navigation.navigate(RouteNames.productDetail, { id: productId });
  },
  [navigation]
);

const renderItem = ({ item: product }: ListRenderItemInfo<Product>) => {
  return (
    <ProductListCard
      {...product}
      testID={`product-list-card-${product.id}`}
      basketButtonTestID={`basket-button-${product.id}`}
      isInBasket={
        typeof productsInBasket.find(
          (productInBasket) => productInBasket.product.id === product.id
        ) !== "undefined"
      }
      onAddToBasketPress={onAddToBasketPress(product)}
      onPress={onProductCardPress(product.id)}
    />
  );
};
Mari kita lihat di bawah bagaimana cara mengujinya:
import { renderHook } from "@testing-library/react-hooks";
import { fireEvent, render, screen } from "@testing-library/react-native";
import React from "react";
import { useGetAllProducts } from "../../api/product";
import { RouteNames } from "../../navigation/route-names";
import { createReactQueryWrapper } from "../../utils/testing";
import ProductListScreen from "../product-list";

const navigateMock = jest.fn();
const navigation = { navigate: navigateMock } as any;
const route = jest.fn() as any;

const component = <ProductListScreen navigation={navigation} route={route} />;

describe("Product list screen", () => {
  it("should call navigation action on pressing the first product item", async () => {
    // render ProductListScreen component with createReactQueryWrapper as a wrapper
    render(component, { wrapper: createReactQueryWrapper });

    // render hook for useGetAllProducts with createReactQueryWrapper as a wrapper
    const { result, waitFor } = renderHook(() => useGetAllProducts(), {
      wrapper: createReactQueryWrapper,
    });

    // wait for useGetAllProducts to succeed
    await waitFor(() => result.current.isSuccess);

    // find first product item and simulate a press event on it
    const firstProductItem = screen.getByTestId(`product-list-card-1`);
    fireEvent.press(firstProductItem);

    // assert that navigation action was called with correct route name and params
    expect(navigateMock).toHaveBeenCalledWith(RouteNames.productDetail, {
      id: 1,
    });
  });
});
Pada potongan kode test ini, kita menguji apakah aksi navigasi dipanggil saat sebuah item produk ditekan. Pertama, kita merender komponen ProductListScreen dan menunggu data berhasil diambil seperti di test case sebelumnya. Setelah itu, kita mengambil item produk pertama dari list dan menyimulasikan event tekan padanya memakai fireEvent.press. Terakhir, kita mengharapkan fungsi navigate dari objek navigation sudah dipanggil dengan parameter RouteName dan productId yang diharapkan.
2.1.5. Test case: Harus menambahkan atau menghapus item produk dengan benar saat ikon keranjang item produk ditekan
Test case di bawah menguji skenario ketika pengguna menambahkan dan menghapus produk dari keranjang dengan menekan ikon keranjang di kartu produk pada layar Product List.
import { NavigationContainer } from "@react-navigation/native";
import { renderHook } from "@testing-library/react-hooks";
import { fireEvent, render, screen } from "@testing-library/react-native";
import React from "react";
import { useGetAllProducts } from "../../api/product";
import ProductStack from "../../navigation/product-stack";
import { useProductStore } from "../../store/product";
import { createReactQueryWrapper } from "../../utils/testing";

// We render the whole app stack instead of rendering just the screen
// because we need access to the react-navigation's header, which wouldn't
// be possible if we just rendered the screen.
const rootAppComponent = (
  <NavigationContainer>
    <ProductStack />
  </NavigationContainer>
);

describe("Product list screen", () => {
  it("should add/remove product item correctly on pressing product items basket icon", async () => {
    // We render the entire app stack and use the createReactQueryWrapper as a
    // wrapper for the render function to set up the React Query Provider.
    render(rootAppComponent, {
      wrapper: createReactQueryWrapper,
    });

    // We use the renderHook function to invoke the useGetAllProducts hook which
    // fetches the data.
    const { result, waitFor } = renderHook(() => useGetAllProducts(), {
      wrapper: createReactQueryWrapper,
    });

    // We use the renderHook function to get access to the useProductStore hook
    // which we will use to check that the products in the basket were added/removed correctly.
    const { result: productStore } = renderHook(() => useProductStore(), {
      wrapper: createReactQueryWrapper,
    });

    // We wait for the useGetAllProducts hook to complete fetching the data before proceeding
    // with the test.
    await waitFor(() => result.current.isSuccess);

    // We get the basket button for the first product item using the getByTestId function.
    const firstProductItemBasketButton = screen.getByTestId(`basket-button-1`);

    // We click the basket button for the first product item.
    fireEvent.press(firstProductItemBasketButton);

    // We check that the basket icon quantity text is present using the getByTestId function.
    expect(screen.getByTestId("basket-icon-quantity-text-1")).toBeTruthy();

    // We check that the products in the basket have been added correctly using the productStore.
    expect(productStore.current.productsInBasket).toHaveLength(1);
    expect(productStore.current.productsInBasket[0].quantity).toBe(1);
    expect(productStore.current.productsInBasket[0].product).toMatchObject(
      result.current.data![0]
    );

    // We click the basket button for the first product item again to remove it from the basket.
    fireEvent.press(firstProductItemBasketButton);

    // We check that the basket icon quantity text is not present.
    expect(
      screen.queryByTestId("basket-icon-quantity-text-1")
    ).not.toBeTruthy();

    // We check that the products in the basket have been removed correctly using the productStore.
    expect(productStore.current.productsInBasket).toHaveLength(0);
  });
});
Untuk menguji fungsi ikon keranjang di header, kita perlu merender seluruh ProductStack selain ProductListScreen. Alasannya, kita perlu mengakses header layar Product List untuk mendapatkan ikon keranjang berdasarkan test ID-nya. Ini mengharuskan seluruh ProductStack dirender, bersama dengan NavigationContainer.
Setelah selesai mengambil produk dengan sukses, test memakai fireEvent.press untuk menyimulasikan penekanan ikon keranjang pada item produk pertama, yang menambahkan produk ke keranjang. Lalu kita memeriksa apakah ikon keranjang menampilkan jumlah yang benar, dan apakah produk ditambahkan ke array productsInBasket di store produk dengan jumlah dan objek produk yang benar.
Setelah itu, kita menyimulasikan penekanan ikon keranjang sekali lagi untuk menghapus produk dari keranjang, lalu memeriksa apakah ikon keranjang sudah tidak menampilkan jumlah, dan apakah array productsInBasket di store produk sudah kosong.
Singkatnya, test case ini menguji fungsi menambahkan dan menghapus produk dari keranjang serta mengatur jumlahnya dengan menekan ikon keranjang di kartu produk pada layar Product List, dan memastikan store produk mengelola produk beserta jumlahnya di keranjang dengan benar.
2.1.6. Alur test lengkap layar daftar produk
Alur test lengkap untuk layar daftar produk adalah sebagai berikut:
import { NavigationContainer } from "@react-navigation/native";
import { renderHook } from "@testing-library/react-hooks";
import { fireEvent, render, screen } from "@testing-library/react-native";
import React from "react";
import { setupGetAllProductsFailedHandler } from "../../../__mocks__/msw/handlers";
import { useGetAllProducts } from "../../api/product";
import ProductStack from "../../navigation/product-stack";
import { RouteNames } from "../../navigation/route-names";
import { useProductStore } from "../../store/product";
import { createReactQueryWrapper } from "../../utils/testing";
import ProductListScreen from "../product-list";

// We render the whole app stack instead of rendering just the screen
// because we need access to the react-navigation's header, which wouldn't
// be possible if we just rendered the screen.
const rootAppComponent = (
  <NavigationContainer>
    <ProductStack />
  </NavigationContainer>
);
const navigateMock = jest.fn();
const navigation = { navigate: navigateMock } as any;
const route = jest.fn() as any;

const component = <ProductListScreen navigation={navigation} route={route} />;

describe("Product list screen", () => {
  it("should display loading indicator initially", async () => {
    // We render the component and expect to see a loading indicator
    render(component, { wrapper: createReactQueryWrapper });
    expect(screen.queryByTestId(`screen-loader`)).toBeTruthy();

    // We render the product list using useGetAllProducts hook and wait until the products are loaded
    const { result, waitFor } = renderHook(() => useGetAllProducts(), {
      wrapper: createReactQueryWrapper,
    });
    await waitFor(() => result.current.isSuccess);

    // We expect the loading indicator to disappear after the products are loaded
    expect(screen.queryByTestId(`screen-loader`)).not.toBeTruthy();
  });

  it("should display product list data correctly", async () => {
    // Render the component and wait for it to load
    render(component, { wrapper: createReactQueryWrapper });

    // Check that no product card is rendered before fetching data
    expect(screen.queryByTestId(`product-list-card-1`)).not.toBeTruthy();

    // Fetch the product data
    const { result, waitFor } = renderHook(() => useGetAllProducts(), {
      wrapper: createReactQueryWrapper,
    });

    // Wait for the data to be fetched successfully
    await waitFor(() => result.current.isSuccess);

    // Check that each product card is rendered for each product in the data
    for (const { id } of result.current.data!) {
      expect(screen.queryByTestId(`product-list-card-${id}`)).toBeTruthy();
    }
  });

  it("should display error text in case get all products query fails", async () => {
    // Set up the mock handler for GET requests to the /products endpoint that returns an error response
    setupGetAllProductsFailedHandler();

    // Render the ProductListScreen component wrapped in the React Query wrapper
    render(component, { wrapper: createReactQueryWrapper });

    // Set up a mock React hook that calls the useGetAllProducts hook from the API module
    const { result, waitFor } = renderHook(() => useGetAllProducts(), {
      wrapper: createReactQueryWrapper,
    });

    // Wait for the useGetAllProducts hook to throw an error
    await waitFor(() => result.current.isError);

    // Assert that the "An error occurred" text is displayed on the screen
    expect(screen.getByText(`An error occurred`)).toBeTruthy();
  });

  it("should call navigation action on pressing the first product item", async () => {
    // Render the ProductListScreen component along with react-query wrapper
    render(component, { wrapper: createReactQueryWrapper });

    // Render the useGetAllProducts hook with react-query wrapper to fetch data
    const { result, waitFor } = renderHook(() => useGetAllProducts(), {
      wrapper: createReactQueryWrapper,
    });

    // Wait for the data to be fetched
    await waitFor(() => result.current.isSuccess);

    // Find the first product card in the list and simulate a press event on it
    const firstProductItem = screen.getByTestId(`product-list-card-1`);
    fireEvent.press(firstProductItem);

    // Expect that the navigation function is called with the correct route name and params
    expect(navigateMock).toHaveBeenCalledWith(RouteNames.productDetail, {
      id: 1,
    });
  });

  it("should add/remove product item correctly on pressing product items basket icon", async () => {
    // We render the entire app stack and use the createReactQueryWrapper as a
    // wrapper for the render function to set up the React Query Provider.
    render(rootAppComponent, {
      wrapper: createReactQueryWrapper,
    });

    // We use the renderHook function to invoke the useGetAllProducts hook which
    // fetches the data.
    const { result, waitFor } = renderHook(() => useGetAllProducts(), {
      wrapper: createReactQueryWrapper,
    });

    // We use the renderHook function to get access to the useProductStore hook
    // which we will use to check that the products in the basket were added/removed correctly.
    const { result: productStore } = renderHook(() => useProductStore(), {
      wrapper: createReactQueryWrapper,
    });

    // We wait for the useGetAllProducts hook to complete fetching the data before proceeding
    // with the test.
    await waitFor(() => result.current.isSuccess);

    // We get the basket button for the first product item using the getByTestId function.
    const firstProductItemBasketButton = screen.getByTestId(`basket-button-1`);

    // We click the basket button for the first product item.
    fireEvent.press(firstProductItemBasketButton);

    // We check that the basket icon quantity text is present using the getByTestId function.
    expect(screen.getByTestId("basket-icon-quantity-text-1")).toBeTruthy();

    // We check that the products in the basket have been added correctly using the productStore.
    expect(productStore.current.productsInBasket).toHaveLength(1);
    expect(productStore.current.productsInBasket[0].quantity).toBe(1);
    expect(productStore.current.productsInBasket[0].product).toMatchObject(
      result.current.data![0]
    );

    // We click the basket button for the first product item again to remove it from the basket.
    fireEvent.press(firstProductItemBasketButton);

    // We check that the basket icon quantity text is not present.
    expect(
      screen.queryByTestId("basket-icon-quantity-text-1")
    ).not.toBeTruthy();

    // We check that the products in the basket have been removed correctly using the productStore.
    expect(productStore.current.productsInBasket).toHaveLength(0);
  });
});
Penutup
Sebagai kesimpulan, artikel ini sudah membahas strategi pengujian yang efektif untuk aplikasi React Native yang memakai library React-Query dan Zustand, yang cukup populer saat ini di aplikasi React/React Native mana pun. Dengan memakai aplikasi toko sederhana sebagai contoh dan memberikan contoh yang lengkap dan detail, kita sudah membahas proses pengujian dan cara memastikan kualitas kode melalui implementasi test. Silakan lihat source code lengkapnya melalui tautan di bawah. Semoga harimu menyenangkan!
Diterbitkan di
Artikel ini juga diterbitkan di: