तेज़ development cycle और cross-platform compatibility की वजह से React Native mobile applications बनाने के लिए एक लोकप्रिय विकल्प बन गया है। React Native development का पूरा फायदा उठाने के लिए developers अक्सर data fetching और state management के लिए React-Query और Zustand जैसी third-party libraries का सहारा लेते हैं। React-Query आपके data को fetch, cache और manage करने का एक flexible और efficient तरीका देती है, जबकि Zustand अपने minimalist तरीके से state management को आसान और ताकतवर बनाती है।
इस article में हम देखेंगे कि इन दोनों libraries का इस्तेमाल करने वाले React Native applications को असरदार तरीके से कैसे test करें। हम उदाहरण के तौर पर एक simple store app लेंगे और testing process समझाने के लिए विस्तृत उदाहरण देंगे। इस article के अंत तक आपको अच्छी समझ हो जाएगी कि अपने React Native apps में React-Query और Zustand का इस्तेमाल और testing कैसे करें
1. Environment setup करना
अपने store app को initialize करने के लिए हम React Native version 0.71.2 इस्तेमाल करेंगे, और data fetching व state management के लिए React-Query (Tanstack query) version 3.39.3 और Zustand version 4.3.2। पूरे app का complete source code मैं GitHub पर दूँगा, इसलिए अगर आप सीधे उसे चलते हुए देखना चाहते हैं, तो article के अंत में share किए गए link पर जाकर देख सकते हैं। इससे आप उदाहरणों के साथ-साथ चल पाएँगे और app का पूरा code देख पाएँगे।
1.1 Store API setup करना
React Native में असरदार testing तकनीकें दिखाने के लिए हम अपनी API के तौर पर https://fakestoreapi.com इस्तेमाल करेंगे। हमारा store app इस API से products का एक set fetch करेगा और हर product का detailed view दिखाएगा। FakeStoreProduct में और भी REST APIs हैं जिनका हम इस्तेमाल कर सकते थे, लेकिन ऐसा करने से complexity बढ़ती और इस article का मुख्य मकसद पीछे छूट जाता।
पूरे app में अपनी API से बात करने के लिए हम एक axios instance बनाएँगे।
1.2 axios instance setup करना
import axios from "axios";

export const BASE_URL = "https://fakestoreapi.com";

export const api = axios.create({
  baseURL: BASE_URL,
});
अगला कदम हमारी API के लिए react-query setup बनाना होगा।
1.3 Query caching manage करने के लिए key-factory बनाना
key-factory क्या है?
हमारा app इतना simple है कि caching की ज़रूरत ज़रूरी नहीं है, फिर भी हम React-Query के ताकतवर caching features का इस्तेमाल करेंगे। इसलिए हम एक simple key factory बनाएँगे, जो नीचे दिखाई गई है।
export const productKeyFactory = {
  products: ["all-products"],
  productById: (id: number) => [...productKeyFactory.products, id],
} as const;
1.4 react-query से products fetch करना
import { AxiosError } from "axios";
import { useQuery, UseQueryOptions } from "react-query";
import { api } from "../axios.instance";
import { productKeyFactory } from "./key-factory";
import { Product } from "./types";

export const getAllProducts = async () => {
  return (await api.get<Array<Product>>("/products")).data;
};

export const useGetAllProducts = (
  options?: UseQueryOptions<
    Array<Product>,
    AxiosError,
    Array<Product>,
    readonly [string]
  >
) => {
  return useQuery({
    queryKey: [...productKeyFactory.products],
    queryFn: getAllProducts,
    ...options,
  });
};
ऊपर हमने products fetch करने के लिए useGetAllProducts hook बनाया है, और पिछले section में बनाई गई query-key का इस्तेमाल भी किया है।
1.5 react-query से product detail fetch करना
import { AxiosError } from "axios";
import { useQuery, UseQueryOptions } from "react-query";
import { api } from "../axios.instance";
import { productKeyFactory } from "./key-factory";
import { Product } from "./types";

export const getProductById = async (productId: number) => {
  return (await api.get<Product>(`/products/${productId}`)).data;
};

export const useGetProductById = (
  productId: number,
  options?: UseQueryOptions<
    Product,
    AxiosError,
    Product,
    readonly (string | number)[]
  >
) => {
  return useQuery({
    queryFn: () => getProductById(productId),
    queryKey: [...productKeyFactory.productById(productId)],
    ...options,
  });
};
यह लगभग पिछले hook जैसा ही है, बस इस बार useGetProductById hook product की id से उसकी detail fetch करने के लिए इस्तेमाल होगा।
1.6 Product type
चलिए इसे skip न करें और देख लें कि product object दिखता कैसा है।
export interface Product {
  id: number;
  title: string;
  price: number;
  description: string;
  category: string;
  image: string;
  rating: Rating;
}

export interface Rating {
  rate: number;
  count: number;
}
1.7 अब आता है zustand: basket में products manage करना
app में basic features होंगे जिनसे users अपनी basket में products जोड़ या हटा सकें, और अलग-अलग products की quantity बदल सकें। साथ ही, users पूरी basket को reset भी कर सकते हैं। ये functionalities Zustand से manage होंगी। नीचे हम इसका implementation देखेंगे।
import { create } from "zustand";
import { shallow } from "zustand/shallow";
import { Product } from "../api/product";

export type ProductInBasket = {
  product: Product;
  quantity: number;
};

export const updateProductQuantity = (
  productsInBasket: Array<ProductInBasket>,
  productId: number,
  updateType: "increase" | "decrease"
) => {
  return productsInBasket.map((productInBasket) => {
    if (productInBasket.product.id === productId) {
      return {
        ...productInBasket,
        quantity:
          updateType === "increase"
            ? productInBasket.quantity + 1
            : productInBasket.quantity - 1,
      };
    }
    return productInBasket;
  });
};

export const increaseProductQuantityInBasket = (
  productsInBasket: Array<ProductInBasket>,
  productId: number
) => {
  return updateProductQuantity(productsInBasket, productId, "increase");
};

export const decreaseProductQuantityInBasket = (
  productsInBasket: Array<ProductInBasket>,
  productId: number
) => {
  return updateProductQuantity(productsInBasket, productId, "decrease");
};

export interface ProductStore {
  productsInBasket: Array<ProductInBasket>;
  actions: {
    addProductToBasket: (val: Product) => void;
    removeProductFromBasket: (productId: number) => void;
    increaseProductQuantityInBasket: (productId: number) => void;
    decreaseProductQuantityInBasket: (productId: number) => void;
    resetAllProductsInBasket: () => void;
  };
}

export const useProductStore = create<ProductStore>((set, get) => ({
  productsInBasket: [],
  actions: {
    addProductToBasket: (product) =>
      set({
        productsInBasket: [
          ...get().productsInBasket,
          { product: product, quantity: 1 },
        ],
      }),
    removeProductFromBasket: (productId) =>
      set({
        productsInBasket: [
          ...get().productsInBasket.filter(
            (productInBasket) => productInBasket.product.id !== productId
          ),
        ],
      }),
    increaseProductQuantityInBasket: (productId) => {
      set({
        productsInBasket: increaseProductQuantityInBasket(
          get().productsInBasket,
          productId
        ),
      });
    },
    resetAllProductsInBasket: () => set({ productsInBasket: [] }),
    decreaseProductQuantityInBasket: (productId) => {
      set({
        productsInBasket: decreaseProductQuantityInBasket(
          get().productsInBasket,
          productId
        ),
      });
    },
  },
}));

export const useProductActions = () =>
  useProductStore((state) => state.actions);

export const useProductsInBasket = () =>
  useProductStore((state) => state.productsInBasket, shallow);
export const useProductsInBasketCount = () =>
  useProductStore((state) => state.productsInBasket.length);
export const useProductInBasketQuantityById = (productId: number | undefined) =>
  useProductStore(
    (state) =>
      state.productsInBasket.find(
        (productInBasket) => productInBasket.product.id === productId
      )?.quantity
  );
code का पहला हिस्सा तीन functions define करता है: updateProductQuantity, increaseProductQuantityInBasket और decreaseProductQuantityInBasket, जो basket में किसी product की quantity update करने के helper methods हैं। updateProductQuantity function input के तौर पर objects का एक array (जो productsInBasket से मेल खाता है), एक product ID और एक update type (increase या decrease) लेता है, और दिए गए product की updated quantity के साथ एक नया productsInBasket array return करता है।
ProductStore interface product store का schema define करता है। इसमें दो properties हैं:
-
productsInBasket, ProductInBasketobjects का एक array है जो basket के products को दर्शाता है।
-
actions एक object है जिसमें basket के products manage करने वाले functions हैं, जैसे product जोड़ना, product हटाना, उसकी quantity बढ़ाना/घटाना, और basket reset करना।
useProductStore hook, Zustand के create function से बनाया गया है। यह अपने state और actions के साथ product store return करता है।
बाकी hooks, यानी useProductActions, useProductsInBasket, useProductsInBasketCount और useProductInBasketQuantityById, useProductStore hook से बने selectors हैं। इनसे product store के खास हिस्सों तक पहुँचा जा सकता है, जैसे actions या favorited products की गिनती।
दूसरी ओर, यह बताना ज़रूरी है कि हमने useProductsInBasket में zustand का shallowइस्तेमाल किया। ऐसा इसलिए क्योंकि useProductsInBasket से return होने वाला objects का array rerender करवाएगा, क्योंकि वे primitive types* नहीं हैं, इसलिए हम shallow equality function pass करके zustand को बस यह बता देते हैं कि object को shallowly diff किया जाए।
1.8 Testing के लिए ज़रूरी packages install करना
अब हम उस हिस्से पर आ सकते हैं जिसकी हमें ज़्यादा परवाह है: testing। हम नीचे दिए packages इस्तेमाल करेंगे:
article को छोटा रखने और बेवजह लंबा न करने के लिए, हम testing environment configure करने की कुछ प्रक्रियाएँ छोड़ देंगे, जैसे jest.config.js और ts-jest ।
हमने आखिर में test environment कैसे setup किया, यह article के अंत में दिए complete source code link से बेझिझक देख सकते हैं।
1.9 MSW से API data mock करना
react-query के साथ अपने app को असरदार तरीके से test करने के लिए हमें अपनी API mock करनी होगी। इसके लिए हम mock service worker (MSW) इस्तेमाल करेंगे।
import { rest } from "msw";
import { setupServer } from "msw/node";
import { BASE_URL } from "../../src/api/axios.instance";
import {
  GET_ALL_PRODUCTS_MOCK_RESPONSE,
  GET_PRODUCT_BY_ID_MOCK_RESPONSE,
} from "./mock-data";

const getAllProductsUrl = BASE_URL + "/products";
const getProductByIdUrl = BASE_URL + `/products/:id`;

const getAllProductsHandler = rest.get(getAllProductsUrl, (_req, res, ctx) => {
  return res(ctx.status(200), ctx.json(GET_ALL_PRODUCTS_MOCK_RESPONSE));
});

const getProductByIdHandler = rest.get(getProductByIdUrl, (_req, res, ctx) => {
  return res(ctx.status(200), ctx.json(GET_PRODUCT_BY_ID_MOCK_RESPONSE));
});

const handlers = [getAllProductsHandler, getProductByIdHandler];

export const mswServer = setupServer(...handlers);

const getAllProductsFailedHandler = rest.get(
  getAllProductsUrl,
  (_req, res, ctx) => {
    return res(ctx.status(500));
  }
);

const getProductByIdFailedHandler = rest.get(
  getProductByIdUrl,
  (_req, res, ctx) => {
    return res(ctx.status(500));
  }
);

export const setupGetAllProductsFailedHandler = () =>
  mswServer.use(getAllProductsFailedHandler);

export const setupGetProductByIdFailedHandler = () =>
  mswServer.use(getProductByIdFailedHandler);
ऊपर के code में हम ज़रूरी modules import करते हैं और MSW handlers setup करते हैं। हम दो mock endpoints बनाते हैं, एक सारे products fetch करने के लिए और दूसरा id से एक product fetch करने के लिए, और दोनों successful response देते हैं। अच्छी तरह testing पक्की करने के लिए, हम इन दोनों endpoints के failed handlers भी बनाते हैं ताकि failure scenarios को simulate और test कर सकें।
ऊपर का mocking setup पूरा करने के लिए हमें अपनी jest.setup.js में mswServer object इस्तेमाल करना होगा। हम बस इतना चाहते हैं कि किसी भी test case से पहले mswServer initialize हो, हर test case के बाद handlers reset हों, और अंत में इसे बंद कर दिया जाए।
import "react-native-gesture-handler/jestSetup";
import { mswServer } from "./__mocks__/msw/handlers";

jest.useFakeTimers();

// https://mswjs.io/docs/getting-started/integrate/node#setup

// Establish API mocking before all tests.
beforeAll(() => mswServer.listen());
// Reset any request handlers that we may add during the tests,
// so they don't affect other tests.
afterEach(() => mswServer.resetHandlers());
// Clean up after the tests are finished.
afterAll(() => mswServer.close());

// Silence the warning: Animated: `useNativeDriver` is not supported because the native animated module is missing
jest.mock("react-native/Libraries/Animated/NativeAnimatedHelper");
अब हमने अपनी API mock कर दी है ताकि उसे tests में इस्तेमाल कर सकें। लेकिन हम अभी पूरे नहीं हुए हैं। हमें zustand के लिए भी testing setup करनी होगी, उनके दिए documentation के हिसाब से। इससे test cases में zustand इस्तेमाल करते समय हम tests के बीच state reset कर पाएँगे।
1.10 Testing के लिए zustand configure करना
// https://docs.pmnd.rs/zustand/guides/testing#resetting-state-between-tests-in-react-dom
const { create: actualCreate } = jest.requireActual("zustand"); // if using jest
import { act } from "@testing-library/react-native";

// a variable to hold reset functions for all stores declared in the app
const storeResetFns = new Set();

// when creating a store, we get its initial state, create a reset function and add it in the set
export const create = (createState) => {
  const store = actualCreate(createState);
  const initialState = store.getState();
  storeResetFns.add(() => store.setState(initialState, true));
  return store;
};

// Reset all stores after each test run
beforeEach(() => {
  act(() => storeResetFns.forEach((resetFn) => resetFn()));
});
यहाँ सबसे ज़रूरी बात यह है कि ऊपर वाली file को अपने testing environment के हिसाब से सही directory में रखा जाए। चूँकि हम jest इस्तेमाल करते हैं, हमें यह file mocks/zustand.js में रखनी चाहिए, जैसा documentation में बताया गया है।
हो सकता है (testing) environment setup करते-करते आप पहले ही थोड़ा परेशान महसूस कर रहे हों, फिर भी मुझे इन्हें cover करना ही था, क्योंकि ये हमारे environment का ढाँचा हैं।
इतना कहकर, चलिए सीधे उस section पर चलते हैं जिसमें हम products दिखाने वाली screen बनाते हैं।
2. Product list screen का overview
जैसा हमने पहले बताया, हमारे पास products दिखाने के लिए एक screen होगी। नीचे product list screen का पूरा code देखते हैं:
import { DefaultTheme } from "@react-navigation/native";
import * as React from "react";
import {
  FlatList,
  ListRenderItemInfo,
  RefreshControl,
  StyleSheet,
  Text,
  View,
} from "react-native";
import { SafeAreaView } from "react-native-safe-area-context";
import { Product, useGetAllProducts } from "../api/product";
import ProductListCard from "../components/product-list-card";
import ScreenLoading from "../components/screen-loading";
import Spacing from "../components/spacing";
import useRefreshByUser from "../hooks/useRefreshByUser";
import { RouteNames } from "../navigation/route-names";
import { ProductListScreenProps } from "../navigation/types";
import { useProductActions, useProductsInBasket } from "../store/product";
import { COMMON_STYLES } from "../theme/common-styles";

type Props = ProductListScreenProps;

const ProductListScreen: React.FC<Props> = ({ navigation }) => {
  const { data, isLoading, refetch, isError, isSuccess } = useGetAllProducts();

  const { isRefetchingByUser, refetchByUser } = useRefreshByUser(refetch);

  const { addProductToBasket, removeProductFromBasket } = useProductActions();
  const productsInBasket = useProductsInBasket();

  const onAddToBasketPress = React.useCallback(
    (product: Product) => () => {
      if (
        productsInBasket.find(
          (productInBasket) => productInBasket.product.id === product.id
        )
      ) {
        removeProductFromBasket(product.id);
      } else {
        addProductToBasket(product);
      }
    },
    [addProductToBasket, productsInBasket, removeProductFromBasket]
  );

  const onProductCardPress = React.useCallback(
    (productId: number) => () => {
      navigation.navigate(RouteNames.productDetail, { id: productId });
    },
    [navigation]
  );

  const renderItemSeparator = () => (
    <Spacing
      backgroundColor={DefaultTheme.colors.background}
      height={COMMON_STYLES.screenPadding}
    />
  );

  const getKeyExtractor = (item: Product) => item.id.toString();

  const renderItem = ({ item: product }: ListRenderItemInfo<Product>) => {
    return (
      <ProductListCard
        {...product}
        testID={`product-list-card-${product.id}`}
        basketButtonTestID={`basket-button-${product.id}`}
        isInBasket={
          typeof productsInBasket.find(
            (productInBasket) => productInBasket.product.id === product.id
          ) !== "undefined"
        }
        onAddToBasketPress={onAddToBasketPress(product)}
        onPress={onProductCardPress(product.id)}
      />
    );
  };

  if (isLoading) {
    return <ScreenLoading />;
  }

  return (
    <SafeAreaView style={COMMON_STYLES.flex} edges={["bottom"]}>
      {isError && (
        <View style={COMMON_STYLES.flexCenter}>
          <Text>An error occurred</Text>
        </View>
      )}

      {isSuccess && (
        <FlatList<Product>
          data={data}
          testID="product-list-flat-list"
          refreshControl={
            <RefreshControl
              refreshing={isRefetchingByUser}
              onRefresh={refetchByUser}
            />
          }
          renderItem={renderItem}
          numColumns={2}
          ItemSeparatorComponent={renderItemSeparator}
          columnWrapperStyle={styles.columnWrapper}
          contentContainerStyle={styles.contentContainerStyle}
          showsVerticalScrollIndicator={false}
          keyExtractor={getKeyExtractor}
          style={COMMON_STYLES.flex}
        />
      )}
    </SafeAreaView>
  );
};

export default ProductListScreen;

const styles = StyleSheet.create({
  contentContainerStyle: {
    flexGrow: 1,
    padding: COMMON_STYLES.screenPadding,
  },
  columnWrapper: {
    justifyContent: "space-between",
  },
});
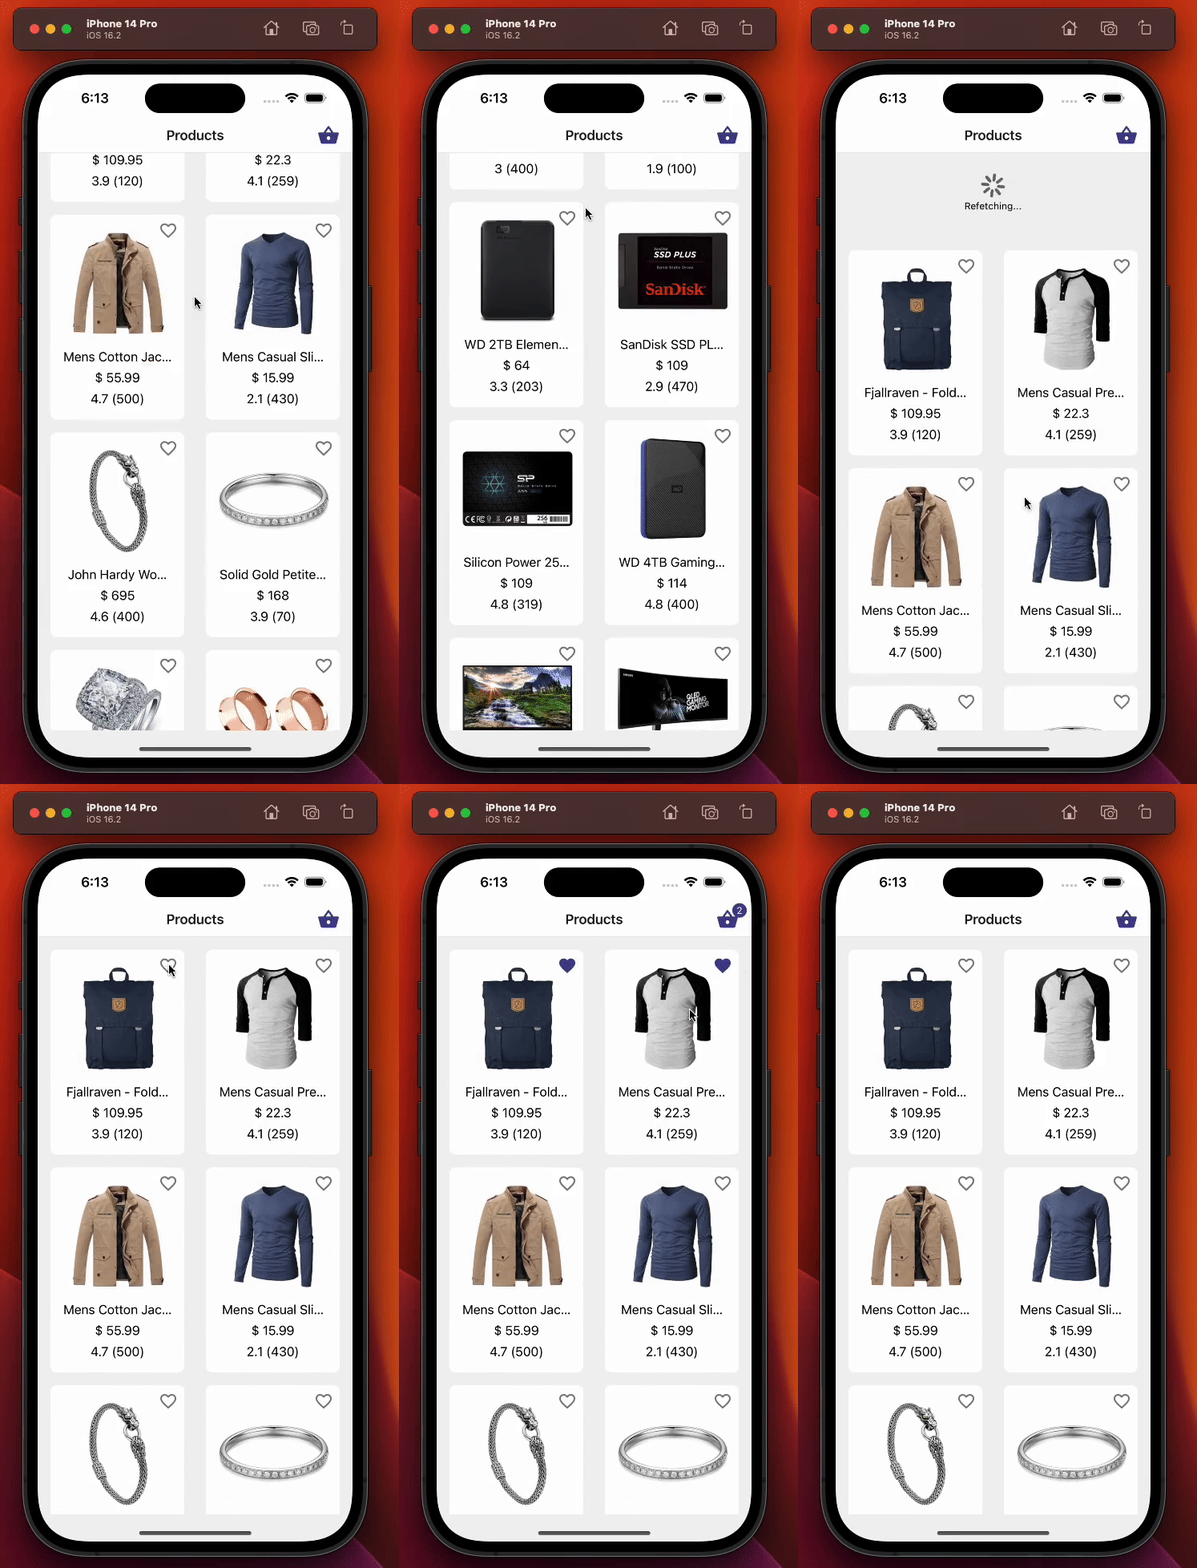
यह screen इन कामों के लिए ज़िम्मेदार है:
-
custom react query hook useGetAllProducts से products दिखाना, जिसे हमने 1.4 react-query से products fetch करना section में बनाया था।
-
useProductActions custom zustand hook से users को अपनी basket में products जोड़ने या हटाने देना, जिसे हमने 1.7 अब आता है zustand: basket में products manage करना section में cover किया था।
-
pull-to-refresh से products को फिर से fetch करना।
-
header में दाईं ओर basket icon पर दिखने वाले quantity text को update करना।
नीचे product list screen का demonstration है:
2.1 Product list screen की testing
इस section में हम product list screen की testing करेंगे। शुरुआती test cases ये होंगे:
-
शुरुआत में loading indicator दिखना चाहिए, भले ही हम data mock कर रहे हों। react-query का isLoading boolean flag फिर भी थोड़ी देर के लिए trueरहेगा। data fetch होने के बाद isLoading false हो जाएगा और loader नहीं दिखेगा।
-
data fetch होने के बाद product list सही तरह दिखनी चाहिए। इस case को verify करने के लिए ProductListCardcomponent का testID prop इस्तेमाल होगा।
-
अगर सारे products लाने वाली query fail हो जाए, तो screen पर एक error message दिखना चाहिए। हम setupGetAllProductsFailedHandler helper इस्तेमाल करेंगे, जो 1.9 MSW से API data mock करना में बनाया गया था
2.1.1 Test case: शुरुआत में loading indicator दिखना चाहिए
import { renderHook } from "@testing-library/react-hooks";
import { render, screen } from "@testing-library/react-native";
import React from "react";
import { useGetAllProducts } from "../../api/product";
import { createReactQueryWrapper } from "../../utils/testing";
import ProductListScreen from "../product-list";

const navigateMock = jest.fn();
const navigation = { navigate: navigateMock } as any;
const route = jest.fn() as any;

const component = <ProductListScreen navigation={navigation} route={route} />;

describe("Product list screen", () => {
  it("should display loading indicator initially", async () => {
    // We render the component and expect to see a loading indicator
    render(component, { wrapper: createReactQueryWrapper });
    expect(screen.queryByTestId(`screen-loader`)).toBeTruthy();

    // We render the product list using useGetAllProducts hook and wait until the products are loaded
    const { result, waitFor } = renderHook(() => useGetAllProducts(), {
      wrapper: createReactQueryWrapper,
    });
    await waitFor(() => result.current.isSuccess);

    // We expect the loading indicator to disappear after the products are loaded
    expect(screen.queryByTestId(`screen-loader`)).not.toBeTruthy();
  });
});
file के ऊपर हमने tests चलाने के लिए ज़रूरी modules import किए हैं। फिर हमने component नाम का एक variable बनाया जिसमें product list screen रखी है, ताकि इस variable को सारे test cases में reuse कर सकें। इसके अलावा, चूँकि यह एक screen है, और हमने section 2. Product list screen का overview में screen props declare किए थे, इसलिए line 22 में हमें ज़रूरी screen props, यानी navigation और route, भी देने होंगे। ऊपर हमने navigation object को destructure क्यों किया, इस पर हम आने वाले test cases में लौटेंगे।
test cases समझने के लिए ज़रूरी terminology पर एक छोटी नज़र:
-
render: दिए गए React element को deeply render करता है और output components के structure को query करने के लिए helpers return करता है।
-
screen: latest render call की value रखता है, ताकि render से return होने वाले query और दूसरे functions तक आसानी से पहुँचा जा सके।
-
renderHook : एक test component render करता है जो हर render पर दिए गए callback को call करेगा, उसमें call होने वाले सभी hooks समेत।
चूँकि इस article का मुख्य मकसद testing libraries और उनके functions का परिचय देना नहीं, बल्कि यह बताना है कि testing कैसे करें, इसलिए हम इनकी गहराई में नहीं जाएँगे। वैसे भी पूरे article में इनके इस्तेमाल के काफी उदाहरण मिलेंगे।
ऊपर वाला test case check करता है कि शुरुआत में screen पर screen loader component दिखता है या नहीं। render function, ProductListScreen component को createReactQueryWrapper function में wrap करके render करता है, जो QueryClientProvider बनाने के लिए एक simple utility function है । screen.queryByTestId() function check करता है कि screen loader screen पर दिख रहा है या नहीं।
renderHook function, useGetAllProducts hook को test करने के लिए इस्तेमाल होता है, जो ProductListScreen component में products data fetch करने के लिए इस्तेमाल होता है। useGetAllProducts hook को createReactQueryWrapper function में wrap करने के लिए renderHook function को wrapper option pass किया जाता है। result variable में useGetAllProducts hook से return हुई value होती है। वहीं, waitFor function तब तक इंतज़ार करता है जब तक result object की isSuccess property true न हो जाए, यानी products data सफलतापूर्वक fetch हो चुका है।
दूसरा हिस्सा check करता है कि product data सफलतापूर्वक fetch होने के बाद screen loader component अब नहीं दिख रहा।
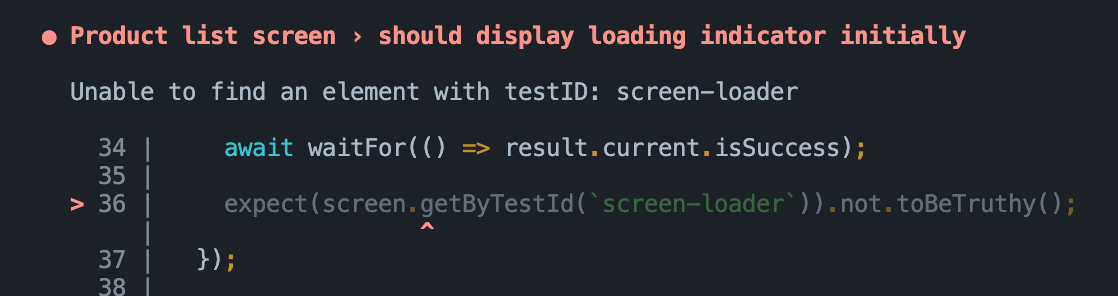
हमने getByTestId की जगह queryByTestId इसलिए इस्तेमाल किया क्योंकि हमें पता है कि data fetch होने के बाद screen loader component दिखेगा नहीं, इसलिए getByTestId इस्तेमाल करने पर error आता।
getByTestId इस्तेमाल करने पर हमें कुछ ऐसा error मिल सकता था:
2.1.2 Test case: product list data सही तरह दिखना चाहिए
import { renderHook } from "@testing-library/react-hooks";
import { render, screen } from "@testing-library/react-native";
import React from "react";
import { useGetAllProducts } from "../../api/product";
import { createReactQueryWrapper } from "../../utils/testing";
import ProductListScreen from "../product-list";

const navigateMock = jest.fn();
const navigation = { navigate: navigateMock } as any;
const route = jest.fn() as any;

const component = <ProductListScreen navigation={navigation} route={route} />;

describe("Product list screen", () => {
  it("should display product list data correctly", async () => {
    // Render the component and wait for it to load
    render(component, { wrapper: createReactQueryWrapper });

    // Check that no product card is rendered before fetching data
    expect(screen.queryByTestId(`product-list-card-1`)).not.toBeTruthy();

    // Fetch the product data
    const { result, waitFor } = renderHook(() => useGetAllProducts(), {
      wrapper: createReactQueryWrapper,
    });

    // Wait for the data to be fetched successfully
    await waitFor(() => result.current.isSuccess);

    // Check that each product card is rendered for each product in the data
    for (const { id } of result.current.data!) {
      expect(screen.queryByTestId(`product-list-card-${id}`)).toBeTruthy();
    }
  });
});
यह test code check करता है कि product list screen fetch किया गया product data सही तरह दिखाती है या नहीं।
इस बार भी हम data के सफलतापूर्वक fetch होने का इंतज़ार करते हैं, फिर fetch हुए data पर loop चलाकर और यह expect करके कि data के हर product के लिए product-list-card-${id} testID वाला एक product list card मौजूद है, हम पक्का करते हैं कि product list data सही दिख रहा है। id property product ID के आधार पर dynamically बनती है। अगर test fail होता है, तो इसका मतलब है कि product list items product data सही नहीं दिखा रहे।
ध्यान दीजिए कि नीचे list items render करने के लिए हम renderItem function कैसे इस्तेमाल कर रहे थे। हम product.id पर loop चलाते हैं और उसे product-list-card string के साथ जोड़कर ProductListCard component के लिए एक dynamic testID बनाते हैं। इस तरह हम सारे products को उनके अपने testID prop के साथ test कर पाएँगे।
const renderItem = ({ item: product }: ListRenderItemInfo<Product>) => {
  return (
    <ProductListCard
      {...product}
      testID={`product-list-card-${product.id}`}
      basketButtonTestID={`basket-button-${product.id}`}
      isInBasket={
        typeof productsInBasket.find(
          (productInBasket) => productInBasket.product.id === product.id
        ) !== "undefined"
      }
      onAddToBasketPress={onAddToBasketPress(product)}
      onPress={onProductCardPress(product.id)}
    />
  );
};
2.1.3 Test case: सारे products वाली query fail होने पर error text दिखना चाहिए
इस test case में हम उस scenario को test कर रहे हैं जिसमें सारे products fetch करने वाली API call fail हो जाती है।
import { renderHook } from "@testing-library/react-hooks";
import { render, screen } from "@testing-library/react-native";
import React from "react";
import { setupGetAllProductsFailedHandler } from "../../../__mocks__/msw/handlers";
import { useGetAllProducts } from "../../api/product";
import { createReactQueryWrapper } from "../../utils/testing";
import ProductListScreen from "../product-list";

const navigateMock = jest.fn();
const navigation = { navigate: navigateMock } as any;
const route = jest.fn() as any;

const component = <ProductListScreen navigation={navigation} route={route} />;

describe("Product list screen", () => {
  it("should display error text in case get all products query fails", async () => {
    // Set up the mock handler for GET requests to the /products endpoint that returns an error response
    setupGetAllProductsFailedHandler();

    // Render the ProductListScreen component wrapped in the React Query wrapper
    render(component, { wrapper: createReactQueryWrapper });

    // Set up a mock React hook that calls the useGetAllProducts hook from the API module
    const { result, waitFor } = renderHook(() => useGetAllProducts(), {
      wrapper: createReactQueryWrapper,
    });

    // Wait for the useGetAllProducts hook to throw an error
    await waitFor(() => result.current.isError);

    // Assert that the "An error occurred" text is displayed on the screen
    expect(screen.getByText(`An error occurred`)).toBeTruthy();
  });
});
API failure simulate करने के लिए हम mock server worker (msw) का setupGetAllProductsFailedHandler function इस्तेमाल करते हैं, जिसे हमने 1.9 MSW से API data mock करना section की line 38 में implement किया था। फिर render function से ProductListScreen component render करते हैं, और renderHook function से useGetAllProducts hook invoke करते हैं जो data fetch करता है।
हम @testing-library/react-hooks के waitFor function से result.current object की isError property के true होने का इंतज़ार करते हैं। इससे पक्का होता है कि hook execute हो चुका है और API call fail हो गई है। आखिर में, @testing-library/react-native के getByText function से text मौजूद है या नहीं यह check करके हम assert करते हैं कि error message “An error occurred” screen पर दिखेगा (इसे आप product list screen का source code देखकर दोबारा check कर सकते हैं)।
2.1.4 Test case: पहले product item को press करने पर navigation action call होना चाहिए
हम नीचे दिया code snippet test करेंगे, जो असल में हमारी product list screen से ही लिया गया है। यह code list में किसी भी product list card पर user के press action को संभालता है।
const onProductCardPress = React.useCallback(
  (productId: number) => () => {
    navigation.navigate(RouteNames.productDetail, { id: productId });
  },
  [navigation]
);

const renderItem = ({ item: product }: ListRenderItemInfo<Product>) => {
  return (
    <ProductListCard
      {...product}
      testID={`product-list-card-${product.id}`}
      basketButtonTestID={`basket-button-${product.id}`}
      isInBasket={
        typeof productsInBasket.find(
          (productInBasket) => productInBasket.product.id === product.id
        ) !== "undefined"
      }
      onAddToBasketPress={onAddToBasketPress(product)}
      onPress={onProductCardPress(product.id)}
    />
  );
};
नीचे देखते हैं कि इसकी testing कैसे कर सकते हैं:
import { renderHook } from "@testing-library/react-hooks";
import { fireEvent, render, screen } from "@testing-library/react-native";
import React from "react";
import { useGetAllProducts } from "../../api/product";
import { RouteNames } from "../../navigation/route-names";
import { createReactQueryWrapper } from "../../utils/testing";
import ProductListScreen from "../product-list";

const navigateMock = jest.fn();
const navigation = { navigate: navigateMock } as any;
const route = jest.fn() as any;

const component = <ProductListScreen navigation={navigation} route={route} />;

describe("Product list screen", () => {
  it("should call navigation action on pressing the first product item", async () => {
    // render ProductListScreen component with createReactQueryWrapper as a wrapper
    render(component, { wrapper: createReactQueryWrapper });

    // render hook for useGetAllProducts with createReactQueryWrapper as a wrapper
    const { result, waitFor } = renderHook(() => useGetAllProducts(), {
      wrapper: createReactQueryWrapper,
    });

    // wait for useGetAllProducts to succeed
    await waitFor(() => result.current.isSuccess);

    // find first product item and simulate a press event on it
    const firstProductItem = screen.getByTestId(`product-list-card-1`);
    fireEvent.press(firstProductItem);

    // assert that navigation action was called with correct route name and params
    expect(navigateMock).toHaveBeenCalledWith(RouteNames.productDetail, {
      id: 1,
    });
  });
});
इस test code snippet में हम test कर रहे हैं कि किसी product item को press करने पर navigation action call होता है या नहीं। पहले हम ProductListScreen component render करते हैं और पिछले test cases की तरह data के सफलतापूर्वक fetch होने का इंतज़ार करते हैं। इसके बाद हम list से पहला product item लेते हैं और fireEvent.press से उस पर press event simulate करते हैं। आखिर में हम expect करते हैं कि navigation object का navigate function अपेक्षित RouteName और productId parameters के साथ call हुआ है।
2.1.5 Test case: product item के basket icon को press करने पर product item सही तरह जुड़ना/हटना चाहिए
नीचे वाला test case उस scenario को test करता है जिसमें user Product List screen पर product card के basket icon को press करके basket में product जोड़ता और हटाता है।
import { NavigationContainer } from "@react-navigation/native";
import { renderHook } from "@testing-library/react-hooks";
import { fireEvent, render, screen } from "@testing-library/react-native";
import React from "react";
import { useGetAllProducts } from "../../api/product";
import ProductStack from "../../navigation/product-stack";
import { useProductStore } from "../../store/product";
import { createReactQueryWrapper } from "../../utils/testing";

// We render the whole app stack instead of rendering just the screen
// because we need access to the react-navigation's header, which wouldn't
// be possible if we just rendered the screen.
const rootAppComponent = (
  <NavigationContainer>
    <ProductStack />
  </NavigationContainer>
);

describe("Product list screen", () => {
  it("should add/remove product item correctly on pressing product items basket icon", async () => {
    // We render the entire app stack and use the createReactQueryWrapper as a
    // wrapper for the render function to set up the React Query Provider.
    render(rootAppComponent, {
      wrapper: createReactQueryWrapper,
    });

    // We use the renderHook function to invoke the useGetAllProducts hook which
    // fetches the data.
    const { result, waitFor } = renderHook(() => useGetAllProducts(), {
      wrapper: createReactQueryWrapper,
    });

    // We use the renderHook function to get access to the useProductStore hook
    // which we will use to check that the products in the basket were added/removed correctly.
    const { result: productStore } = renderHook(() => useProductStore(), {
      wrapper: createReactQueryWrapper,
    });

    // We wait for the useGetAllProducts hook to complete fetching the data before proceeding
    // with the test.
    await waitFor(() => result.current.isSuccess);

    // We get the basket button for the first product item using the getByTestId function.
    const firstProductItemBasketButton = screen.getByTestId(`basket-button-1`);

    // We click the basket button for the first product item.
    fireEvent.press(firstProductItemBasketButton);

    // We check that the basket icon quantity text is present using the getByTestId function.
    expect(screen.getByTestId("basket-icon-quantity-text-1")).toBeTruthy();

    // We check that the products in the basket have been added correctly using the productStore.
    expect(productStore.current.productsInBasket).toHaveLength(1);
    expect(productStore.current.productsInBasket[0].quantity).toBe(1);
    expect(productStore.current.productsInBasket[0].product).toMatchObject(
      result.current.data![0]
    );

    // We click the basket button for the first product item again to remove it from the basket.
    fireEvent.press(firstProductItemBasketButton);

    // We check that the basket icon quantity text is not present.
    expect(
      screen.queryByTestId("basket-icon-quantity-text-1")
    ).not.toBeTruthy();

    // We check that the products in the basket have been removed correctly using the productStore.
    expect(productStore.current.productsInBasket).toHaveLength(0);
  });
});
header पर basket icon की functionality test करने के लिए हमें ProductListScreen के साथ पूरी ProductStack render करनी होगी। ऐसा इसलिए क्योंकि basket icon को उसके test ID से पाने के लिए हमें Product List screen के header तक पहुँचना होगा। इसके लिए ज़रूरी है कि पूरी ProductStack, NavigationContainer के साथ render हो।
products सफलतापूर्वक fetch होने के बाद, यह पहले product item के basket icon को press करना simulate करने के लिए fireEvent.press इस्तेमाल करता है, जिससे product basket में जुड़ जाता है। फिर हम check करते हैं कि basket icon सही quantity दिखा रहा है, और product store के productsInBasket array में product सही quantity और product object के साथ जुड़ गया है।
इसके बाद हम product को basket से हटाने के लिए basket icon को फिर से press करना simulate करते हैं, और check करते हैं कि basket icon अब quantity नहीं दिखा रहा, और product store का productsInBasket array खाली है।
संक्षेप में, यह test case Product List screen पर product card के basket icon को press करके basket में product जोड़ने, हटाने और उनकी quantity बदलने की functionality test करता है, और पुष्टि करता है कि product store basket में products और उनकी quantities को सही तरह manage करता है।
2.1.6 Product list screen का पूरा test flow
product list screen का पूरा test flow इस तरह है:
import { NavigationContainer } from "@react-navigation/native";
import { renderHook } from "@testing-library/react-hooks";
import { fireEvent, render, screen } from "@testing-library/react-native";
import React from "react";
import { setupGetAllProductsFailedHandler } from "../../../__mocks__/msw/handlers";
import { useGetAllProducts } from "../../api/product";
import ProductStack from "../../navigation/product-stack";
import { RouteNames } from "../../navigation/route-names";
import { useProductStore } from "../../store/product";
import { createReactQueryWrapper } from "../../utils/testing";
import ProductListScreen from "../product-list";

// We render the whole app stack instead of rendering just the screen
// because we need access to the react-navigation's header, which wouldn't
// be possible if we just rendered the screen.
const rootAppComponent = (
  <NavigationContainer>
    <ProductStack />
  </NavigationContainer>
);
const navigateMock = jest.fn();
const navigation = { navigate: navigateMock } as any;
const route = jest.fn() as any;

const component = <ProductListScreen navigation={navigation} route={route} />;

describe("Product list screen", () => {
  it("should display loading indicator initially", async () => {
    // We render the component and expect to see a loading indicator
    render(component, { wrapper: createReactQueryWrapper });
    expect(screen.queryByTestId(`screen-loader`)).toBeTruthy();

    // We render the product list using useGetAllProducts hook and wait until the products are loaded
    const { result, waitFor } = renderHook(() => useGetAllProducts(), {
      wrapper: createReactQueryWrapper,
    });
    await waitFor(() => result.current.isSuccess);

    // We expect the loading indicator to disappear after the products are loaded
    expect(screen.queryByTestId(`screen-loader`)).not.toBeTruthy();
  });

  it("should display product list data correctly", async () => {
    // Render the component and wait for it to load
    render(component, { wrapper: createReactQueryWrapper });

    // Check that no product card is rendered before fetching data
    expect(screen.queryByTestId(`product-list-card-1`)).not.toBeTruthy();

    // Fetch the product data
    const { result, waitFor } = renderHook(() => useGetAllProducts(), {
      wrapper: createReactQueryWrapper,
    });

    // Wait for the data to be fetched successfully
    await waitFor(() => result.current.isSuccess);

    // Check that each product card is rendered for each product in the data
    for (const { id } of result.current.data!) {
      expect(screen.queryByTestId(`product-list-card-${id}`)).toBeTruthy();
    }
  });

  it("should display error text in case get all products query fails", async () => {
    // Set up the mock handler for GET requests to the /products endpoint that returns an error response
    setupGetAllProductsFailedHandler();

    // Render the ProductListScreen component wrapped in the React Query wrapper
    render(component, { wrapper: createReactQueryWrapper });

    // Set up a mock React hook that calls the useGetAllProducts hook from the API module
    const { result, waitFor } = renderHook(() => useGetAllProducts(), {
      wrapper: createReactQueryWrapper,
    });

    // Wait for the useGetAllProducts hook to throw an error
    await waitFor(() => result.current.isError);

    // Assert that the "An error occurred" text is displayed on the screen
    expect(screen.getByText(`An error occurred`)).toBeTruthy();
  });

  it("should call navigation action on pressing the first product item", async () => {
    // Render the ProductListScreen component along with react-query wrapper
    render(component, { wrapper: createReactQueryWrapper });

    // Render the useGetAllProducts hook with react-query wrapper to fetch data
    const { result, waitFor } = renderHook(() => useGetAllProducts(), {
      wrapper: createReactQueryWrapper,
    });

    // Wait for the data to be fetched
    await waitFor(() => result.current.isSuccess);

    // Find the first product card in the list and simulate a press event on it
    const firstProductItem = screen.getByTestId(`product-list-card-1`);
    fireEvent.press(firstProductItem);

    // Expect that the navigation function is called with the correct route name and params
    expect(navigateMock).toHaveBeenCalledWith(RouteNames.productDetail, {
      id: 1,
    });
  });

  it("should add/remove product item correctly on pressing product items basket icon", async () => {
    // We render the entire app stack and use the createReactQueryWrapper as a
    // wrapper for the render function to set up the React Query Provider.
    render(rootAppComponent, {
      wrapper: createReactQueryWrapper,
    });

    // We use the renderHook function to invoke the useGetAllProducts hook which
    // fetches the data.
    const { result, waitFor } = renderHook(() => useGetAllProducts(), {
      wrapper: createReactQueryWrapper,
    });

    // We use the renderHook function to get access to the useProductStore hook
    // which we will use to check that the products in the basket were added/removed correctly.
    const { result: productStore } = renderHook(() => useProductStore(), {
      wrapper: createReactQueryWrapper,
    });

    // We wait for the useGetAllProducts hook to complete fetching the data before proceeding
    // with the test.
    await waitFor(() => result.current.isSuccess);

    // We get the basket button for the first product item using the getByTestId function.
    const firstProductItemBasketButton = screen.getByTestId(`basket-button-1`);

    // We click the basket button for the first product item.
    fireEvent.press(firstProductItemBasketButton);

    // We check that the basket icon quantity text is present using the getByTestId function.
    expect(screen.getByTestId("basket-icon-quantity-text-1")).toBeTruthy();

    // We check that the products in the basket have been added correctly using the productStore.
    expect(productStore.current.productsInBasket).toHaveLength(1);
    expect(productStore.current.productsInBasket[0].quantity).toBe(1);
    expect(productStore.current.productsInBasket[0].product).toMatchObject(
      result.current.data![0]
    );

    // We click the basket button for the first product item again to remove it from the basket.
    fireEvent.press(firstProductItemBasketButton);

    // We check that the basket icon quantity text is not present.
    expect(
      screen.queryByTestId("basket-icon-quantity-text-1")
    ).not.toBeTruthy();

    // We check that the products in the basket have been removed correctly using the productStore.
    expect(productStore.current.productsInBasket).toHaveLength(0);
  });
});
समापन
अंत में, इस article में हमने React-Query और Zustand libraries इस्तेमाल करने वाले React Native applications के लिए असरदार testing strategies देखीं, जो आजकल किसी भी React/React Native application में काफी लोकप्रिय हैं। एक simple store app को उदाहरण बनाकर और विस्तृत उदाहरण देकर, हमने testing process और tests implement करके code quality पक्की करने का तरीका cover किया। नीचे दिए link से पूरा source code बेझिझक देखें। आपका दिन अच्छा हो!
यहाँ भी प्रकाशित
यह article यहाँ भी प्रकाशित है: