
React Navigation: typings का पूरा फायदा उठाएँ
आज के समय में navigation बनाना किसी भी mobile application का बुनियादी feature है। React Native की दुनिया में हमारे पास React Navigation मौजूद है।
यह article बताएगा कि एक आम React Navigation setup को TypeScript के साथ कैसे implement किया जा सकता है, और साथ ही TypeScript इस्तेमाल करने की अलग अलग strategies की तुलना भी करेगा।
और सबसे ज़रूरी बात, यह यह भी कवर करेगा कि navigation पर ज़्यादा scalable architecture बनाने के लिए हम TypeScript features का पूरा फायदा कैसे उठा सकते हैं।
ध्यान दें: इस article के उदाहरण @react-navigation@6.x version के आधार पर बनाए गए हैं।
ध्यान दें: इस article में कवर किए गए तरीके या strategies ऐसे नहीं हैं जिन्हें आपको सख्ती से मानना ही पड़े। ये बस मेरी पसंद हैं, और मुझे लगा कि इन्हें इस article के पाठकों के साथ share करना काम का होगा। React Navigation में TypeScript के इस्तेमाल पर पहले से ही एक शानदार और अच्छी तरह documented section है। इसलिए सिर्फ इस documentation को follow करके भी आप react-navigation का एक बढ़िया TypeScript structure बना सकते हैं।
Stack Navigator बनाना
आइए देखें कि React Navigation package का इस्तेमाल करके stack navigator कैसे बनाया जाता है।
नीचे React Navigation से लिया गया उदाहरण देखें:
import { createStackNavigator } from "@react-navigation/stack";
import * as React from "react";
import { View } from "react-native";

const Stack = createStackNavigator();

const Home = () => <View />;
const Notifications = () => <View />;
const Profile = () => <View />;
const Settings = () => <View />;

function AppStack() {
  return (
    <Stack.Navigator>
      <Stack.Screen name="Home" component={Home} />
      <Stack.Screen name="Notifications" component={Notifications} />
      <Stack.Screen name="Profile" component={Profile} />
      <Stack.Screen name="Settings" component={Settings} />
    </Stack.Navigator>
  );
}
जैसा कि दिख रहा है, यहाँ TypeScript से जुड़ा कुछ खास नहीं है, तो चलिए इस code snippet में थोड़ा TypeScript जोड़ते हैं।
import { createStackNavigator } from "@react-navigation/stack";
import * as React from "react";
import { View } from "react-native";

type AppStackParamList = {
  Home: undefined;
  Notifications: undefined;
  Profile: undefined;
  Settings: undefined;
};

const Home = () => <View />;
const Notifications = () => <View />;
const Profile = () => <View />;
const Settings = () => <View />;

const Stack = createStackNavigator<AppStackParamList>();

function AppStack() {
  return (
    <Stack.Navigator>
      <Stack.Screen name="Home" component={Home} />
      <Stack.Screen name="Notifications" component={Notifications} />
      <Stack.Screen name="Profile" component={Profile} />
      <Stack.Screen name="Settings" component={Settings} />
    </Stack.Navigator>
  );
}
ऊपर हमने createStackNavigator के लिए ParamList type जोड़ा है। लेकिन रुकिए, हमें कैसे पता कि createStackNavigator एक generic type लेता है? इसे पता करने के कुछ तरीके हैं। सबसे पहले documentation देखना हमेशा अच्छी आदत रही है। इस उदाहरण में आप देखेंगे कि docs में इसके लिए पहले से एक section मौजूद है।
दूसरी तरफ, मान लीजिए कि createStackNavigator की यह खास typing website पर documented नहीं है। तब यह पता करने का एक तरीका कि function में यह typing है या नहीं, बस function की type definition पर jump करना है। शुरुआत में यह डरावना लग सकता है, क्योंकि वहाँ ढेर सारे types, interfaces और generics इधर उधर उड़ते दिखेंगे, लेकिन जितनी ज़्यादा आपको type definition पर jump करने की आदत पड़ेगी, यह उतना ही कम भारी लगेगा।
Update!
अगर आप TypeScript के साथ अतिरिक्त complexity झेलना चाहते हैं और React team की शानदार TS utility (React.ComponentProps) को नज़रअंदाज़ करना चाहते हैं, तो आप इस article को आखिर तक पढ़ते रह सकते हैं।
लेकिन मुझे डर है कि शायद यही section आखिरी साबित हो!
हम React.ComponentProps
पूरा उदाहरण नीचे देखें:
import { createStackNavigator } from "@react-navigation/stack";
import * as React from "react";
import { View } from "react-native";

type AppStackParamList = {
  Home: undefined;
  Notifications: undefined;
  Profile: undefined;
  Settings: undefined;
};

const Home = () => <View />;
const Notifications = () => <View />;
const Profile = () => <View />;
const Settings = () => <View />;

const Stack = createStackNavigator<AppStackParamList>();

const routes: Array<React.ComponentProps<typeof Stack.Screen>> = [
  {
    name: "Home",
    component: Home,
  },
  {
    name: "Notifications",
    component: Notifications,
  },
  {
    name: "Profile",
    component: Profile,
  },
  {
    name: "Settings",
    component: Settings,
  },
];

function AppStack() {
  return (
    <Stack.Navigator>
      {routes.map((routeConfig) => (
        <Stack.Screen key={routeConfig.name} {...routeConfig} />
      ))}
    </Stack.Navigator>
  );
}
और हाँ, इसमें intellisense अब भी रहेगा, और अगर आप अपने stack में कोई असंबंधित screen (यानी ऐसी screen जो आपके stack के type declaration में नहीं है) डालते हैं तो यह आपको चेतावनी भी देगा, कुछ इस तरह:
 गलत screen
Intellisense भी मौजूद रहेगा:
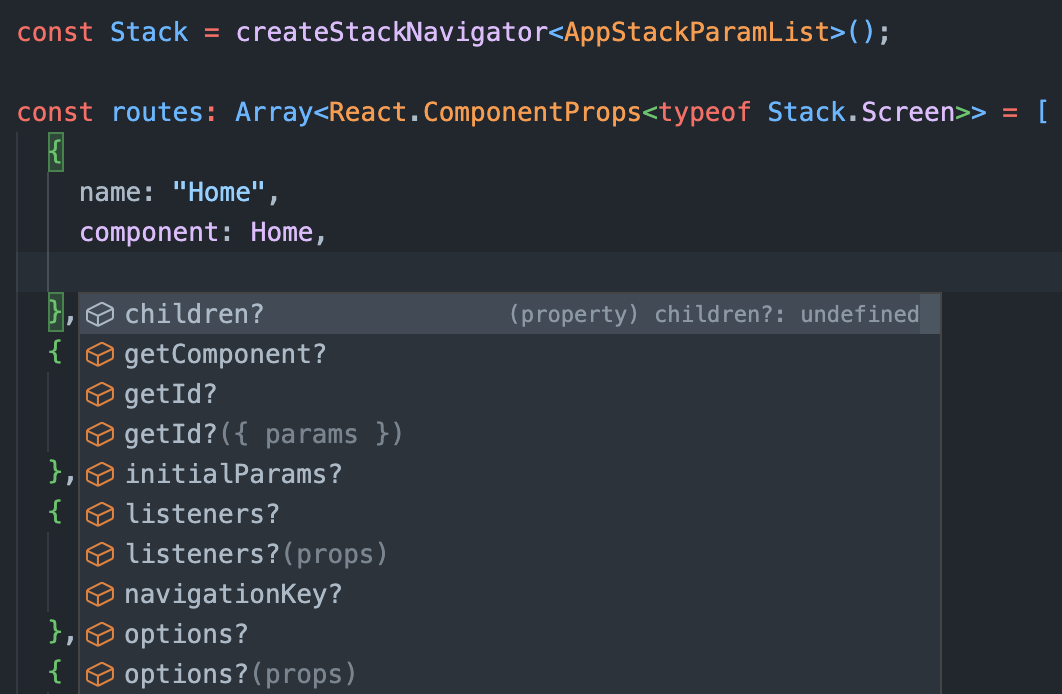
यह ज़्यादा साफ, configurable और dynamic भी है:
const getAuthStackRoutes = (
  // other parameters...
  theme: ThemeType
): Array<React.ComponentProps<typeof Stack.Screen>> => {
  // more business logic...

  return [
    {
      name: "Home",
      component: Home,
      options: {
        headerStyle: {
          backgroundColor: theme.colors.primary,
          // other theme stylings...
        },
      },
    },
  ];
};
कुल मिलाकर, यह approach हमें complex navigation structures को आसानी से manage करने देता है (कम से कम जब हम इस approach की तुलना इस article के दूसरे approaches से करते हैं)। ऐसा इसलिए क्योंकि आपको साफ JSX मिलेगा, और साथ ही आप अपने routes को ज़्यादा dynamic और modular तरीके से configure कर पाएँगे।
TypeScript के इस्तेमाल को एक कदम आगे ले जाना
यह सिर्फ createStackNavigator का generic type declare करने तक सीमित नहीं है। Stack.Navigator के children elements के type के बारे में क्या? हालाँकि यह concept official documentation में पहले से काफी अच्छी तरह समझाया गया है, फिर भी नीचे देखते हैं कि structure बनाने का ज़्यादा decoupled तरीका पाने के लिए हम इसके साथ कैसे खेल सकते हैं।
import type { RouteConfig, StackNavigationState } from "@react-navigation/core";
import {
  createStackNavigator,
  StackNavigationEventMap,
  StackNavigationOptions,
} from "@react-navigation/stack";
import * as React from "react";
import { View } from "react-native";

// stack param list type
type AppStackParamList = {
  Home: undefined;
  Notifications: undefined;
  Profile: undefined;
  Settings: undefined;
};

// type of the single route in app stack
type AppStackRoutesType = RouteConfig<
  AppStackParamList,
  keyof AppStackParamList,
  StackNavigationState<AppStackParamList>,
  StackNavigationOptions,
  StackNavigationEventMap
>;

// mocking the screen components for the sake of example
const Home = () => <View />;
const Notifications = () => <View />;
const Profile = () => <View />;
const Settings = () => <View />;

// strictly typed array of app stack routes
const appStackRoutes: Array<AppStackRoutesType> = [
  {
    name: "Home",
    component: Home,
  },
  {
    name: "Notifications",
    component: Notifications,
  },
  {
    name: "Profile",
    component: Profile,
  },
  {
    name: "Settings",
    component: Settings,
  },
];

const Stack = createStackNavigator<AppStackParamList>();

function AppStack() {
  return (
    <Stack.Navigator>
      {/** mapping the app stack routes */}
      {appStackRoutes.map((stackRoute) => (
        <Stack.Screen key={stackRoute.name} {...stackRoute} />
      ))}
    </Stack.Navigator>
  );
}
अरे, यहाँ तो बहुत कुछ हो रहा है... चलिए हर code block को अलग अलग हिस्सों में बाँटते हैं।
import type { RouteConfig, StackNavigationState } from "@react-navigation/core";
import {
  createStackNavigator,
  StackNavigationEventMap,
  StackNavigationOptions,
} from "@react-navigation/stack";
import * as React from "react";
import { View } from "react-native";
Code snippet के ऊपर हम ज़रूरी modules import कर रहे हैं। इन imports में types, functions और दूसरी ज़रूरी चीज़ें हैं। ये दिलचस्प नहीं हैं, लेकिन ज़रूरी हैं :)
// mocking the screen components for the sake of example
const Home = () => <View />;
const Notifications = () => <View />;
const Profile = () => <View />;
const Settings = () => <View />;
ऊपर हम react-native से View component import कर रहे हैं, ताकि उदाहरण को ज़्यादा आसान तरीके से दिखाया जा सके।
// type of the single route in app stack
type AppStackRoutesType = RouteConfig<
  AppStackParamList,
  keyof AppStackParamList,
  StackNavigationState<AppStackParamList>,
  StackNavigationOptions,
  StackNavigationEventMap
>;
अब आता है दिलचस्प हिस्सा। @react-navigation/core से import किया गया RouteConfig ठीक पाँच types को generic type के रूप में लेता है। यह खास type definition official react-navigation website पर documented नहीं है, फिर भी ऊपर बताए गए type definition पर jump करने वाले तरीके से आप इसे आसानी से समझ सकते हैं।
भले ही एक आम react-native TypeScript project में यह बेकार या गैर ज़रूरी लगे, इसके कई फायदे हैं, जो नीचे वाले section में कवर किए जाएँगे।
IntelliSense
क्योंकि हमारे पास एक strictly typed stack routes (यानी app routes) array है, इसलिए array का हर element अब array की type definition का पालन करने के लिए बाध्य है। इसका मतलब है कि array में नया element जोड़ते समय IntelliSense बिना किसी setup के काम करेगा।
इसके अलावा, यह type लगाने से हमें मजबूर होना पड़ता है कि जब भी app routes में कोई नया element जोड़ा जाए, तो हम AppStackRoutesType को update करें। वरना हम ऐसा नया element नहीं जोड़ पाएँगे जो AppStackRoutesType (AppStackParamList) में मौजूद नहीं है।
Routes को map करना
अब आखिरी हिस्सा: हम createStackNavigator का इस्तेमाल करके stack navigator बना रहे हैं। फिर बस ऊपर बनाए गए array को उसके strict type के साथ map करने की बात है।
आखिरकार हम अपने array के हर element पर भरोसा कर सकते हैं, उसके सभी elements सही तरह से typed होंगे, इसलिए spread syntax इस्तेमाल करना सुरक्षित है।
const Stack = createStackNavigator<AppStackParamList>();

function AppStack() {
  return (
    <Stack.Navigator>
      {/** mapping the app stack routes */}
      {appStackRoutes.map((stackRoute) => (
        <Stack.Screen key={stackRoute.name} {...stackRoute} />
      ))}
    </Stack.Navigator>
  );
}
क्या यह सच में आखिरी हिस्सा था?
तो... नहीं!
हमने जो उदाहरण कवर किया है, उसमें हम अपनी typings को और बेहतर बना सकते हैं।
// generic stack routes type
export type StackRoutesType<ParamList extends ParamListBase> = Array<
  RouteConfig<
    ParamList,
    keyof ParamList,
    StackNavigationState<ParamList>,
    StackNavigationOptions,
    StackNavigationEventMap
  >
>;

type AppStackRoutesType = StackRoutesType<AppStackParamList>;

// mocking the screen components for the sake of example
const Home = () => <View />;
const Notifications = () => <View />;
const Profile = () => <View />;
const Settings = () => <View />;

// strictly typed array of app stack routes
const appStackRoutes: AppStackRoutesType = [
  {
    name: "Home",
    component: Home,
  },
  {
    name: "Notifications",
    component: Notifications,
  },
  {
    name: "Profile",
    component: Profile,
  },
  {
    name: "Settings",
    component: Settings,
  },
];
आपने जो फर्क नोटिस किया होगा वह यह है कि हमारे पास StackRoutesType है, जो एक generic type लेता है और उसी type के बराबर है जो हम पहले देख चुके हैं। लेकिन आप पूछ सकते हैं कि इसका फायदा क्या है। इस सवाल का जवाब visual तरीके से देना बेहतर होगा।
// too much duplicated code...

type AppStackRoutesType = RouteConfig<
  AppStackParamList,
  keyof AppStackParamList,
  StackNavigationState<AppStackParamList>,
  StackNavigationOptions,
  StackNavigationEventMap
>;

type OtherStackRoutesType = RouteConfig<
  OtherStackParamList,
  keyof OtherStackParamList,
  StackNavigationState<OtherStackParamList>,
  StackNavigationOptions,
  StackNavigationEventMap
>;

type AnotherStackRoutesType = RouteConfig<
  AnotherStackParamList,
  keyof AnotherStackParamList,
  StackNavigationState<AnotherStackParamList>,
  StackNavigationOptions,
  StackNavigationEventMap
>;
अगर हम generic StackRoutesType इस्तेमाल न करते, तो हमें app के हर stack के लिए typings duplicate करनी पड़तीं।
इसलिए जैसे जैसे app बड़ा होगा, यह एक बुरे सपने जैसा हो जाएगा। (यहाँ धारणा यह है कि app में stacks की संख्या और app की complexity सीधे अनुपात में हैं। असल में यह हमेशा 100% सही धारणा नहीं है, फिर भी इस खास उदाहरण के लिए ठीक है)
// generic stack routes type
export type StackRoutesType<ParamList extends ParamListBase> = Array<
  RouteConfig<
    ParamList,
    keyof ParamList,
    StackNavigationState<ParamList>,
    StackNavigationOptions,
    StackNavigationEventMap
  >
>;

// becomes one line typings for each stack
type AppStackRoutesType = StackRoutesType<AppStackParamList>;
type OtherStackRoutesType = StackRoutesType<OtherStackParamList>;
type AnotherStackRoutesType = StackRoutesType<AnotherStackParamList>;
दूसरी तरफ, ऊपर देखिए कि generic type इस्तेमाल करने पर यह अब कितना सरल और साफ हो जाता है।
अब की तस्वीर
आइए तुलना करें कि दो अलग scenarios में एक आम Stack function कैसा दिखेगा:
तस्वीर 1: सभी stack screens को JSX में एक एक करके render करना।
// ...imports, components

function AppStack() {
  return (
    <Stack.Navigator>
      <Stack.Screen name="Home" component={Home} />
      <Stack.Screen name="Notifications" component={Notifications} />
      <Stack.Screen name="Profile" component={Profile} />
      <Stack.Screen name="Settings" component={Settings} />
      {/** n more screens... */}
    </Stack.Navigator>
  );
}
तस्वीर 2: strictly typed TypeScript से बनाए गए stack routes array का इस्तेमाल करके screens render करना। 🎉
function AppStack() {
  return (
    <Stack.Navigator>
      {appStackRoutes.map((stackRoute) => (
        <Stack.Screen key={stackRoute.name} {...stackRoute} />
      ))}
    </Stack.Navigator>
  );
}
एक और बात... Navigator props का क्या?
अब एक और चीज़ पर विचार करना बाकी है, और वह है stack navigator के props। नीचे दिए गए StackNavigator को देखें, तो एक ही navigator के लिए configurations का एक बड़ा हिस्सा मौजूद है। क्यों न इन configurations को JSX से अलग कर दिया जाए?
import type {
  DefaultNavigatorOptions,
  ParamListBase,
  StackNavigationState,
} from "@react-navigation/core";
import {
  StackNavigationEventMap,
  StackNavigationOptions,
} from "@react-navigation/stack";
// other necessary imports for screens...

// generic typing for stack navigator options
type StackNavigatorOptions<ParamList extends ParamListBase> =
  DefaultNavigatorOptions<
    ParamList,
    StackNavigationState<ParamList>,
    StackNavigationOptions,
    StackNavigationEventMap
  >;

// omit the children as it corresponds to stack screen
const appStackNavigatorProps: Omit<
  StackNavigatorOptions<AppStackParamList>,
  "children"
> = {
  initialRouteName: "Home",
  screenOptions: {
    headerShown: false,
    cardOverlayEnabled: true,
    gestureEnabled: false,
    cardStyle: {
      backgroundColor: "royalblue",
    },
    headerLeftContainerStyle: {
      backgroundColor: "firebrick",
    },
    presentation: "modal",
    headerTitleStyle: {
      fontSize: 24,
      color: "olivedrab",
    },
  },
  // ...rest
};

// screen components and stack routes...

function AppStack() {
  return (
    <Stack.Navigator {...appStackNavigatorProps}>
      {appStackRoutes.map((stackRoute) => (
        <Stack.Screen key={stackRoute.name} {...stackRoute} />
      ))}
    </Stack.Navigator>
  );
}
Line 13 से शुरू करें, तो हम पहले से जानते हैं कि हम generic type क्यों इस्तेमाल करते हैं। यहाँ stack routes वाली typing से एकमात्र फर्क शायद DefaultNavigatorOptions type है, जो @react-navigation/core से import किया गया है। Type का नाम ही सब कुछ बता देता है: यह navigator के लिए options है।
ऊपर बताए गए RouteConfig type की तरह यह भी कई generic types लेता है। इसके अलावा ध्यान रखें कि हम children key को साफ तौर पर omit कर रहे हैं, क्योंकि हम पहले से ही Stack.Navigator के children render कर रहे हैं, जो Stack.Screen से जुड़े हैं।
Line 22 पर हम एक बिल्कुल नया object बना रहे हैं (या यह एक function भी हो सकता है, बस शर्त यह है कि वह ऐसा object लौटाए जो navigator options type को satisfy करे), जो हमारे navigator के options को दर्शाएगा।
नतीजतन, Line 50 पर इस object को spread syntax के साथ सुरक्षित रूप से इस्तेमाल किया जा सकता है, बशर्ते वह दिए गए type को satisfy करे।
कहीं ज़्यादा साफ JSX... मेरी राय में...
अब की तस्वीर: Navigator props
आइए फिर से तुलना करें कि दो अलग scenarios में एक आम Stack function कैसा दिखेगा:
तस्वीर 1: stack navigator की configurations JSX के अंदर।
function AppStack() {
  return (
    <Stack.Navigator
      initialRouteName="Home"
      screenOptions={{
        headerShown: false,
        cardOverlayEnabled: true,
        gestureEnabled: false,
        cardStyle: {
          backgroundColor: "royalblue",
        },
        headerLeftContainerStyle: {
          backgroundColor: "firebrick",
        },
        presentation: "modal",
        headerTitleStyle: {
          fontSize: 24,
          color: "olivedrab",
        },
      }}
      // rest...
    >
      {appStackRoutes.map((stackRoute) => (
        <Stack.Screen key={stackRoute.name} {...stackRoute} />
      ))}
    </Stack.Navigator>
  );
}
तस्वीर 2: stack navigator की configurations JSX से अलग।
// ...

function AppStack() {
  return (
    <Stack.Navigator {...appStackNavigatorProps}>
      {appStackRoutes.map((stackRoute) => (
        <Stack.Screen key={stackRoute.name} {...stackRoute} />
      ))}
    </Stack.Navigator>
  );
}
निष्कर्ष
इस article में हमने कवर किया कि हम TypeScript का असल में फायदा कैसे उठा सकते हैं और अपने react-native navigators का structure ज़्यादा साफ तरीके से कैसे बना सकते हैं।
आप सबका दिन bug-free रहे।
कहाँ प्रकाशित हुआ
यह article यहाँ भी प्रकाशित है: