Expo में Live Activity Timer बनाना
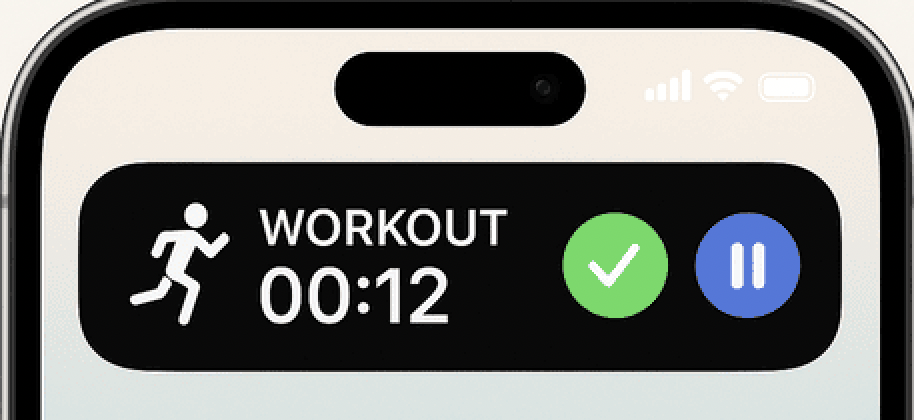
iOS पर Live Activities पूरा खेल बदल देती हैं, इनसे apps सीधे Lock Screen या Dynamic Island पर real-time updates दिखा सकते हैं। ज़ाहिर है, मैं सोचने लगा कि वहाँ एक workout timer चलता हो तो कितना बढ़िया होगा, जो users को phone unlock किए बिना ही motivated रखे। लेकिन एक दिक्कत थी: Live Activities Apple के native tools, जैसे Swift और ActivityKit, से बनती हैं। तभी मुझे expo-apple-targets नाम का एक tool मिला, जिससे पूरे modules शुरू से लिखने की ज़रूरत नहीं पड़ी, और काम मेरी उम्मीद से कहीं आसान हो गया। इस article में मैं बताऊँगा कि मैंने iOS के लिए timer वाली Live Activity कैसे बनाई, कौन से steps लिए और रास्ते में क्या सीखा।
Live Activities के पीछे मैं इतना दीवाना क्यों हुआ
Live Activities सिर्फ़ एक cool trick नहीं हैं, user engagement के लिए ये पूरा खेल बदल देती हैं। Apple की Human Interface Guidelines इन्हें time-sensitive कामों के लिए "current, glanceable information" देने का तरीका बताती हैं। सोचिए, एक fitness app workout के बीच आपका plank time दिखा रहा है, एक food delivery app आपके pizza का सफ़र track कर रहा है, या एक ride-sharing app आपके driver का ETA update कर रहा है, और यह सब Lock Screen पर या iPhone 14 Pro और उसके बाद के models में Dynamic Island पर। यह ऐसा है जैसे users को आपके app के सबसे ज़रूरी updates का VIP pass मिल जाए, phone unlock किए बिना।
मैं चाहता था कि users set के दौरान अपना workout timer बढ़ते हुए देखें, ताकि app खोले बिना उनका ध्यान बना रहे। यह वही polish है जो किसी app को pro जैसा महसूस कराती है, और मैं पूरी तरह इसमें लग गया। लेकिन यह सब किसी native layer को छुए बिना नहीं हो सकता, इसलिए मुझे पता था कि Swift में उतरना पड़ेगा और Xcode से जूझना पड़ेगा। फिर मुझे expo-apple-targets मिला, एक package जो Expo की JavaScript दुनिया और iOS के native features के बीच का फ़ासला भरता है। Evan Bacon को बहुत शाबाशी, इस tool ने एक डरावने काम को मुश्किल लेकिन हल होने लायक puzzle बना दिया।
बड़ी तस्वीर: एक Expo app में Live Activities
Live Activities सिर्फ़ iOS की party है। ये ActivityKit से चलती हैं, जो Swift पर आधारित framework है, यानी आपको native code लिखना ही पड़ेगा, चाहे पसंद हो या न हो। एक Expo app के लिए यह किसी मछली को पेड़ पर चढ़ाने जैसा है: हो सकता है, लेकिन मेहनत लगेगी। expo-apple-targets एक अनुभवी guide की तरह आता है और native modules व widget extensions बनाने का framework देता है, ताकि शुरू से शुरुआत न करनी पड़े। यह Expo के module system (Expo Modules API) पर बना है, जिससे आप Swift में native code लिखकर उसे JavaScript के सामने expose कर सकते हैं, और पूरा काम दाँत के ऑपरेशन जैसा कम लगता है।
Project setup करना
शुरुआत बिल्कुल आसान नहीं थी, लेकिन expo-apple-targets ने इसे संभालने लायक बना दिया। मैंने ऐसे शुरू किया:
-
expo-apple-targets install करना: एक छोटे से npm install expo-apple-targets से काम चल पड़ा। Package का README सोने की खान है, यह Xcode में widget extension जोड़ने और app.json में Live Activity entitlement (com.apple.developer.activitykit) update करने में पूरी मदद करता है।
-
Native Module setup: मैंने Expo के module system से एक Swift module बनाया जो ActivityKit से बात करता है। Expo Modules docs साफ़ function signatures और events define करने पर ज़ोर देते हैं, जिससे मैं startActivity जैसे methods बिना ज़्यादा पसीना बहाए JavaScript को expose कर पाया।
-
Widget Extension: यहाँ SwiftUI काम आया, जिससे मैंने Lock Screen और Dynamic Island के लिए Live Activity का look design किया। expo-apple-targets एक widget template देता है, लेकिन चलता हुआ timer और interactive buttons दिखाने के लिए मुझे उसे customize करना पड़ा।
-
Intents: इनसे users widget पर buttons tap करके timer को pause या resume कर सकते हैं। expo-apple-targets intent setup को आसान बनाता है, फिर भी notifications को सही तरह चलाने के लिए मुझे कुछ गड़बड़ियाँ debug करनी पड़ीं।
हर second update होने वाला timer?
 एक developer जोश में हर second timer update लागू करता है, और timer की तबाही से system पर अफ़रा-तफ़री वाला overload हो जाता है। (Generated by gpt-4o)
जब मैंने पहली बार timer पर काम शुरू किया, तो दिमाग ने कहा, "बस हर second Live Activity को current time के साथ update कर दो।" सुनने में सीधा लगता है, है ना? गलत। मुझे एक Reddit thread मिला जहाँ devs Live Activity timer को update करने की क्षमता पर बात कर रहे थे। फ़ैसला एकमत था: हर second update करना तबाही है। यह hamster wheel से spaceship चलाने जैसा है; चलेगा तो सही, लेकिन जल्दी ही थक कर बैठ जाएगा। लगातार updates CPU पर भारी पड़ते हैं, battery खाते हैं और app को सुस्त बना देते हैं।
उस Reddit thread ने मेरी आँखें खोल दीं। मुझे Apple के SwiftUI docs में SwiftUI का Text(timerInterval:) मिला, और यह एक खुलासे जैसा था। यह view timer updates को natively संभालता है, पूरी Live Activity को refresh किए बिना चलता रहता है। यह ऐसा है जैसे उबाऊ काम iOS को सौंप दिया जाए ताकि आप मज़ेदार हिस्सों पर ध्यान दे सकें।
तो मैंने हर second update वाला plan छोड़ दिया और startedAt/pausedAt वाला तरीका अपनाया। यह क्यों जीतता है:
-
Performance: हर second updates भेजने के बजाय, मैं timer का start time (startedAt) और pause time (pausedAt, अगर paused है) store करता हूँ। Widget startedAt के आधार पर live timer दिखाने के लिए Text(timerInterval:) इस्तेमाल करता है, और paused होने पर pausedAt से एक static time दिखाता है। इससे API calls लगभग शून्य हो जाती हैं।
-
Battery Efficiency: बार-बार updates battery के लिए पिशाच हैं। Ticking का काम SwiftUI को देने से app हल्का रहता है और users के phones खुश रहते हैं।
-
API Compliance: Apple की Live Activity APIs real-time spam के लिए नहीं बनी हैं। startedAt/pausedAt setup iOS की उम्मीदों के साथ अच्छी तरह चलता है, जिससे rate-limiting का खतरा घटता है।
-
Code Simplicity: Updates की धारा संभालने से दो timestamps संभालना कहीं आसान है। इससे code साफ़ रहता है और मेरा stress काबू में।
यह तरीका किसी video game में छुपा shortcut मिलने जैसा लगा। Timer smoothly चलता है, अच्छा दिखता है और resources नहीं खाता। वह Reddit thread (यह रहा फिर से) मुझे सही दिशा दिखाने के लिए medal का हकदार है।
Live Activity का दिल
मैं आपको code की हर line से bore नहीं करूँगा, चलिए उन ख़ास snippets पर ध्यान देते हैं जिनसे यह timer चलता है। Article के आख़िर में मैं पूरा source code GitHub पर share करूँगा।
LiveActivityAttributes Struct
यह struct Live Activity की रीढ़ है, जो उसका data और उसके बदलने का तरीका define करता है।
    struct LiveActivityAttributes: ActivityAttributes {
      public struct ContentState: Codable, Hashable {
        var startedAt: Date
        var pausedAt: Date?

        func getElapsedTimeInSeconds() -> TimeInterval {
          if let pausedAt = pausedAt {
            return pausedAt.timeIntervalSince(startedAt)
          } else {
            return Date().timeIntervalSince(startedAt)
          }
        }
        func isRunning() -> Bool {
          return pausedAt == nil
        }
        func getFormattedElapsedTime() -> String {
          let elapsed = getElapsedTimeInSeconds()
          let totalSeconds = Int(elapsed)
          let hours = totalSeconds / 3600
          let minutes = (totalSeconds % 3600) / 60
          let seconds = totalSeconds % 60
          if hours > 0 {
            return String(format: "%d:%02d:%02d", hours, minutes, seconds)
          } else {
            return String(format: "%d:%02d", minutes, seconds)
          }
        }
        func getFutureDate() -> Date {
          return Date().addingTimeInterval(365 * 24 * 60 * 60)
        }
      }
      var activityName: String
      var activityIcon: String
    }
यह Live Activity के DNA जैसा है। बाहरी LiveActivityAttributes में static चीज़ें होती हैं: activityName (जैसे "Workout") और activityIcon (जैसे "RUNNING"), जो activity शुरू होने पर set होती हैं। अंदर का ContentState वह जगह है जहाँ असली काम होता है, यह startedAt (timer कब शुरू हुआ) और pausedAt (कब pause हुआ, अगर हुआ) track करता है। Helper methods असली MVPs हैं:
-
getElapsedTimeInSeconds() गिनता है कि timer कितनी देर से चल रहा है; paused हो तो pausedAt पर रुक जाता है, active हो तो current time इस्तेमाल करता है। इससे logic कसा हुआ और reusable रहता है।
-
isRunning() एक सीधा check है: अगर pausedAt null है, तो timer चल रहा है। यह बाकी जगहों पर उलझे हुए state checks से बचने का साफ़ तरीका है।
-
getFormattedElapsedTime() seconds को widget के लिए एक अच्छी "MM:SS" या "HH:MM:SS" string में बदलता है। मैंने hours support तब जोड़ा जब समझ आया कि कुछ users marathon जैसे बहुत लंबे workouts कर सकते हैं।
-
getFutureDate() एक साल आगे की date set करता है, जिसे मैं Text(timerInterval:) को देता हूँ ताकि timer end date की चिंता किए बिना लगातार चल सके।
मुझे पसंद है कि यह struct चीज़ों को कितना व्यवस्थित रखता है। यह अच्छी तरह पैक किए गए backpack जैसा है: जो चाहिए सब है, जो नहीं चाहिए कुछ नहीं। Codable और Hashable conformance से updates के लिए serialize करना और SwiftUI में इस्तेमाल करना आसान हो जाता है, जो module और widget के बीच state sync करते समय जान बचाने वाला साबित हुआ।
Live Activity शुरू करना
startActivity function से जादू शुरू होता है, यह एक नई Live Activity चालू करता है।
    AsyncFunction("startActivity") { (activityName: String, activityIcon: String) -> String in
        if #available(iOS 16.2, *) {
            await self.endAllActivities()
            self.startedAt = Date()
            self.pausedAt = nil
            if !ActivityAuthorizationInfo().areActivitiesEnabled {
                return ""
            }
            let attributes = LiveActivityAttributes(activityName: activityName, activityIcon: activityIcon)
            let contentState = LiveActivityAttributes.ContentState(startedAt: self.startedAt!, pausedAt: nil)
            do {
                let activity = try Activity.request(attributes: attributes, content: .init(state: contentState, staleDate: nil), pushType: nil)
                self.currentActivityId = activity.id
                self.sendTimerUpdateEvent()
                return activity.id
            } catch {
                throw error
            }
        }
        return ""
    }
यह function वह चिंगारी है जो आग जलाती है। यह Expo के module system के ज़रिए JavaScript को expose होता है, जिससे मेरा React Native app इसे एक name और icon के साथ call कर सकता है। यह क्या करता है:
-
यह check करता है कि iOS 16.2 या उसके बाद का version है, उससे पहले Live Activities होती ही नहीं।
-
यह मौजूदा activities हटाने के लिए endAllActivities() call करता है। iOS कई Live Activities की इजाज़त देता है, लेकिन confusion से बचने के लिए मैं एक समय में एक ही चाहता था।
-
यह startedAt को current time पर set करता है और pausedAt साफ़ करता है, ताकि timer चलने के लिए तैयार हो।
-
यह verify करता है कि Live Activities enabled हैं (users इन्हें Settings में disable कर सकते हैं, और शुरू में इसने मुझे चकरा दिया था)।
-
यह दिए गए name और icon से एक LiveActivityAttributes बनाता है, और start time के साथ एक ContentState।
-
यह Activity.request से एक नई activity माँगता है, जो मुझे एक unique ID वाला Activity object देता है।
-
यह ID store करता है, JavaScript को एक update event भेजता है और ID return करता है ताकि app उसे track कर सके।
Timer को pause करना
Timer को pause करने का काम performPause संभालता है, जो Live Activity की state update करता है।
    private func performPause(activityId: String?) async -> Bool {
        guard #available(iOS 16.2, *), self.pausedAt == nil else {
            return false
        }
        let targetId = activityId ?? self.currentActivityId
        guard let targetId = targetId else {
            return false
        }
        guard let activity = await self.findActivityById(targetId) else {
            return false
        }
        guard let currentStartedAt = self.startedAt else {
            return false
        }
        let now = Date()
        self.pausedAt = now
        let contentState = LiveActivityAttributes.ContentState(startedAt: currentStartedAt, pausedAt: self.pausedAt)
        await activity.update(using: contentState)
        self.sendTimerUpdateEvent()
        return true
    }
यहीं startedAt/pausedAt वाला तरीका चमकता है। जब user timer pause करता है (app से या widget से), यह function:
-
Check करता है कि हम iOS 16.2 पर हैं और timer पहले से paused नहीं है (दो बार pause की इजाज़त नहीं)।
-
Activity ID लेता है, और अगर कोई नहीं दी गई तो currentActivityId इस्तेमाल करता है।
-
findActivityById से activity ढूँढता है, जो active activities में खोजता है।
-
pausedAt को current time पर set करता है, जिससे timer थम जाता है।
-
Original startedAt और नए pausedAt के साथ एक नया ContentState बनाता है।
-
activity.update से activity update करता है, ताकि widget paused time दिखाए।
-
App का UI sync में रखने के लिए JavaScript को एक event भेजता है।
यहाँ का logic पूरी तरह सटीकता के बारे में है; हर check (जैसे pausedAt == nil) अजीब edge cases रोकने के लिए है, जैसे ऐसी activity को pause करना जो मौजूद ही नहीं। Event handling के लिए मैंने Expo Modules docs का सहारा लिया और JavaScript तक updates भेजने के लिए sendEvent इस्तेमाल किया। इस function के शुरुआती versions startedAt को validate नहीं करते थे, जिससे timer अजीब तरह से दिखता था। सबक: अपनी state को हमेशा guard करें।
Lock Screen View
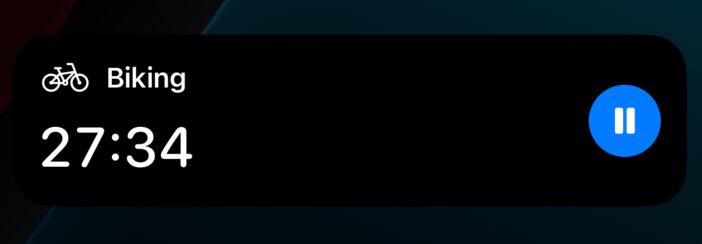
LockScreenLiveActivityView वह है जो users को phone lock होने पर दिखता है, और इसे शानदार दिखना ही चाहिए।
 Lock Screen Live Activity
    struct LockScreenLiveActivityView: View {
        let context: ActivityViewContext<LiveActivityAttributes>
        var body: some View {
            ZStack {
                Color.black.opacity(0.8)
                    .clipShape(RoundedRectangle(cornerRadius: 16))
                HStack(spacing: 16) {
                    VStack(alignment: .leading, spacing: 12) {
                        HStack(spacing: 8) {
                            ActivityIcon(activityIcon: mapJSIconToSFSymbol(context.attributes.activityIcon),
                                        themeColor: .white,
                                        size: 18)
                            Text(context.attributes.activityName)
                                .font(.headline)
                                .foregroundColor(.white)
                        }
                        VStack(alignment: .leading, spacing: 4) {
                            if !context.state.isRunning() {
                                Text(context.state.getFormattedElapsedTime())
                                    .font(.system(size: 34, weight: .semibold, design: .rounded))
                                    .foregroundColor(.white)
                                    .fontWeight(.medium)
                                    .monospacedDigit()
                            } else {
                                Text(timerInterval: context.state.startedAt...context.state.getFutureDate(),
                                     pauseTime: nil,
                                     countsDown: false,
                                     showsHours: false)
                                    .font(.system(size: 34, weight: .semibold, design: .rounded))
                                    .foregroundColor(.white)
                                    .fontWeight(.medium)
                                    .monospacedDigit()
                            }
                        }
                    }
                    .frame(maxHeight: .infinity, alignment: .center)
                    Spacer()
                    VStack {
                        Spacer()
                        if context.state.isRunning() {
                            Button(intent: PauseIntent()) {
                                ZStack {
                                    Circle()
                                        .fill(Color(hex: "#007bff"))
                                        .frame(width: 44, height: 44)
                                    Image(systemName: "pause.fill")
                                        .font(.system(size: 18, weight: .bold))
                                        .foregroundColor(.white)
                                }
                            }
                            .buttonStyle(PlainButtonStyle())
                        } else {
                            HStack(spacing: 8) {
                                Button(intent: CompleteIntent()) {
                                    ZStack {
                                        Circle()
                                            .fill(Color(hex: "#28a745"))
                                            .frame(width: 44, height: 44)
                                        Image(systemName: "checkmark")
                                            .font(.system(size: 16, weight: .bold))
                                            .foregroundColor(.white)
                                    }
                                }
                                .buttonStyle(PlainButtonStyle())
                                Button(intent: ResumeIntent()) {
                                    ZStack {
                                        Circle()
                                            .fill(Color(hex: "#007bff"))
                                            .frame(width: 44, height: 44)
                                        Image(systemName: "play.fill")
                                            .font(.system(size: 18, weight: .bold))
                                            .foregroundColor(.white)
                                    }
                                }
                                .buttonStyle(PlainButtonStyle())
                            }
                        }
                        Spacer()
                    }
                }
                .padding(16)
            }
        }
    }
यह Live Activity का visual दिल है, और यहीं SwiftUI अपना असली दम दिखाता है। View दो हिस्सों में बँटा है:
-
बायाँ हिस्सा: Activity का name, icon और timer दिखाता है। अगर timer चल रहा है, तो भारी काम Text(timerInterval:) करता है, startedAt से एक साल आगे तक (getFutureDate की बदौलत) गिनती करता है। अगर paused है, तो getFormattedElapsedTime से एक static time दिखाता है। .monospacedDigit() modifier numbers को साफ़ रखता है, और मैंने font को bold और पढ़ने लायक बनाने के लिए थोड़ा बदला।
-
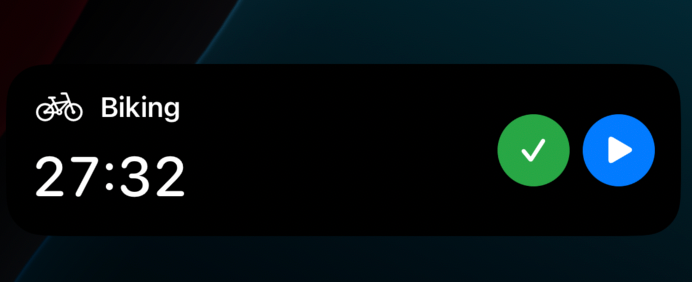
दायाँ हिस्सा: Buttons संभालता है। चलते समय एक नीला pause button होता है। Paused होने पर app खोलने के लिए एक हरा checkmark और resume करने के लिए एक नीला play button मिलता है। हर button एक intent चलाता है, जिसे native module पकड़ कर process करता है।
Dynamic Island में गहराई से
 Dynamic Island View
यह snippet define करता है कि Live Activity, Dynamic Island के तीन modes में कैसे दिखती है: expanded (पूरा view), compact (सिकुड़ा हुआ) और minimal (सबसे बुनियादी)।
    dynamicIsland: { context in
      DynamicIsland {
        DynamicIslandExpandedRegion(.leading) {
          VStack(alignment: .leading, spacing: 8) {
            HStack(spacing: 8) {
              ActivityIcon(activityIcon: mapJSIconToSFSymbol(context.attributes.activityIcon),
                          themeColor: .white,
                          size: 18)

              Text(context.attributes.activityName)
                .foregroundColor(.white)
                .font(.system(size: 16, weight: .semibold))
            }

            if !context.state.isRunning() {
              Text(context.state.getFormattedElapsedTime())
                .font(.system(size: 32, weight: .bold, design: .rounded))
                .foregroundColor(.white)
                .fontWeight(.medium)
                .monospacedDigit()
            } else {
              Text(timerInterval: context.state.startedAt...context.state.getFutureDate(),
                   pauseTime: nil,
                   countsDown: false,
                   showsHours: false)
                .font(.system(size: 32, weight: .bold, design: .rounded))
                .foregroundColor(.white)
                .fontWeight(.medium)
                .monospacedDigit()
            }
          }
          .padding(.leading, 8)
        }

        DynamicIslandExpandedRegion(.trailing) {
          VStack {
            Spacer()

            if context.state.isRunning() {
              Button(intent: PauseIntent()) {
                ZStack {
                  Circle()
                    .fill(Color(hex: "#007bff"))
                    .frame(width: 44, height: 44)
                  Image(systemName: "pause.fill")
                    .font(.system(size: 18, weight: .bold))
                    .foregroundColor(.white)
                }
              }
              .buttonStyle(PlainButtonStyle())
              .padding(.horizontal, 8)
            } else {
              HStack(spacing: 8) {
                Button(intent: CompleteIntent()) {
                  ZStack {
                    Circle()
                      .fill(Color(hex: "#28a745"))
                      .frame(width: 44, height: 44)
                    Image(systemName: "checkmark")
                      .font(.system(size: 16, weight: .bold))
                      .foregroundColor(.white)
                  }
                }
                .buttonStyle(PlainButtonStyle())

                Button(intent: ResumeIntent()) {
                  ZStack {
                    Circle()
                      .fill(Color(hex: "#007bff"))
                      .frame(width: 44, height: 44)
                    Image(systemName: "play.fill")
                      .font(.system(size: 18, weight: .bold))
                      .foregroundColor(.white)
                  }
                }
                .buttonStyle(PlainButtonStyle())
              }
            }
          }
          .frame(maxHeight: .infinity)
        }
      } compactLeading: {
        HStack(spacing: 4) {
          ActivityIcon(activityIcon: mapJSIconToSFSymbol(context.attributes.activityIcon),
                      themeColor: .white,
                      size: 16)

          Text(context.attributes.activityName)
            .foregroundColor(.white)
            .font(.system(size: 12))
            .lineLimit(1)
            .truncationMode(.tail)
        }
      } compactTrailing: {
        if !context.state.isRunning() {
          Text(context.state.getFormattedElapsedTime())
            .foregroundColor(.white)
            .monospacedDigit()
            .font(.system(size: 12, weight: .medium))
        } else {
          Text(timerInterval: context.state.startedAt...context.state.getFutureDate(),
               pauseTime: nil,
               countsDown: false,
               showsHours: false)
            .foregroundColor(.white)
            .monospacedDigit()
            .font(.system(size: 12, weight: .medium))
        }
      } minimal: {
        ActivityIcon(activityIcon: mapJSIconToSFSymbol(context.attributes.activityIcon),
                    themeColor: .white,
                    size: 12)
      }
    }
-
**Expanded Mode**: Long-press पर दिखता है, और .leading और .trailing में बँटा है। Leading side में icon (जैसे दौड़ती हुई आकृति) और name ("Workout") एक के ऊपर एक होते हैं, साथ में एक बड़ा timer: paused होने पर static (getFormattedElapsedTime), active होने पर चलता हुआ (Text(timerInterval:))। Trailing side में buttons हैं: चलते समय एक नीला pause button, या paused होने पर हरा checkmark (app खोलें) और नीला play (resume)। मैंने Island के curves में फ़िट करने के लिए fonts और padding में बदलाव किए।
-
**Compact Mode**: जब जगह कम हो जाती है, compactLeading एक छोटा icon और छोटा किया गया name दिखाता है, जबकि compactTrailing timer दिखाता है (static या चलता हुआ)। .lineLimit(1) name को साफ़ रखता है, और 12-point font पढ़ने लायक बनाता है।
-
**Minimal Mode**: बहुत तंग जगह में, यह बस एक 12-point icon है, जैसे dumbbell, जो कहता है "timer अभी भी यहीं है।" सरल लेकिन असरदार।
_shared Folder: यह इतना अहम क्यों है
 _shared folder का overview
expo-apple-targets में _shared folder एक top-level directory है, जिसे ज़रूरी code को आपके main app target और sub-targets, जैसे Live Activity widget, दोनों से link करने के लिए बनाया गया है।
Extensions, जैसे widgets, अलग processes में चलते हैं और उन्हें कुछ खास files अपने target के साथ साथ main app के target से भी link करनी पड़ती हैं। _shared folder पक्का करता है कि ये files अपने आप दोनों से link हो जाएँ, जिससे manual configuration की ज़रूरत खत्म हो जाती है। अपने timer के लिए मैंने LiveActivityAttributes struct यहाँ रखा, ताकि app और widget बिना sync issues के एक ही timer state (startedAt, pausedAt) share करें।
Live Activity Widget से app launch करना
CompleteIntent users को Live Activity widget पर checkmark button tap करके app खोलने देता है, यह संकेत देते हुए कि उनका timer पूरा हो गया। Workout खत्म करने के लिए यह एक सरल लेकिन बहुत ज़रूरी interaction है।
    import AppIntents
    import WidgetKit

    @available(iOS 16.2, *)
    struct CompleteIntent: AppIntent, LiveActivityIntent {
        static var title: LocalizedStringResource = "Complete Exercise"
        static var description: IntentDescription = "Opens the app to complete the exercise"
        static var openAppWhenRun: Bool = true

        init() {}
        func perform() async throws -> some IntentResult {
            NotificationCenter.default.post(name: Notification.Name("completeActivityFromWidget"), object: nil)

            return .result()
        }
    }
जब user हरा checkmark tap करता है, यह intent चलता है और completeActivityFromWidget notification post करता है। Native module इसे पकड़ता है, JavaScript को onWidgetCompleteActivity event भेजता है, और openAppWhenRun: true की बदौलत iOS app खोल देता है।
Intents से user taps संभालना
PauseIntent उन intents में से एक है जो widget को interactive बनाते हैं।
 Lock Screen Live Activity Intents
    import AppIntents
    import WidgetKit

    @available(iOS 16.2, *)
    struct PauseIntent: AppIntent, LiveActivityIntent {
      static var title: LocalizedStringResource = "Pause Timer"
      static var description: IntentDescription = "Pauses the current timer."

      init() {}

      func perform() async throws -> some IntentResult {
        NotificationCenter.default.post(name: Notification.Name("pauseTimerFromWidget"), object: nil)
        return .result()
      }
    }
यह intent तब चलता है जब user widget पर pause button tap करता है। यह बेहद सरल लेकिन ताकतवर है:
-
यह एक notification (pauseTimerFromWidget) post करता है, जिसे native module setupNotificationObservers के ज़रिए पकड़ता है।
-
फिर module performPause चलाता है, जो Live Activity की state update करता है और JavaScript को बताता है।
इसकी खूबसूरती यह है कि intents एक seamless loop बनाते हैं: user tap करता है → intent चलता है → module update करता है → app sync में रहता है। expo-apple-targets ने template देकर intents setup करना बहुत आसान बना दिया, फिर भी मुझे एक case debug करना पड़ा जहाँ taps register नहीं हो रहे थे। पता चला कि मैंने एक notification name की spelling गलत लिखी थी। Classic। Expo Modules docs से मुझे समझ आया कि native actions से trigger होने वाले events कैसे संभालें, जो इसे काम कराने की कुंजी थी।
JavaScript से बात करने वाले events

अगले section के events वह तरीका हैं जिससे native module, Expo के event system का इस्तेमाल करके, React Native app को Live Activity की state के साथ sync में रखता है।
onWidgetCompleteActivity
यह event तब चलता है जब user activity पूरी करने के लिए checkmark tap करता है, और इसे CompleteIntent trigger करता है।
    @objc func completeIntentHandler(_ notification: Notification) {
        guard let currentId = self.currentActivityId, self.startedAt != nil else {
            return
        }

        let elapsed = self.calculateElapsedTime()

        sendEvent("onWidgetCompleteActivity", [
            "activityId": currentId,
            "elapsedTime": Int(elapsed)
        ])
    }
completeIntentHandler, completeActivityFromWidget notification पकड़ता है, बीता हुआ समय गिनता है, और activity ID व बीते हुए seconds के साथ JavaScript को onWidgetCompleteActivity event भेजता है। फिर JavaScript app का UI update कर सकता है या workout पूरा होने को log कर सकता है
onLiveActivityUpdate
यह event तब चलता है जब भी timer की state बदलती है (जैसे pause, resume)।
    private func sendTimerUpdateEvent() {
        guard let currentId = self.currentActivityId else { return }
        guard self.startedAt != nil else { return }

        let state = self.pausedAt == nil ? "active" : "paused"
        let elapsed = self.calculateElapsedTime()

        sendEvent("onLiveActivityUpdate", [
            "state": state,
            "elapsedTime": Int(elapsed),
            "activityId": currentId
        ])
    }
State बदलने के बाद (जैसे performPause या performResume में) call होने पर, यह current state ("active" या "paused"), बीते हुए समय और activity ID के साथ onLiveActivityUpdate event भेजता है। JavaScript इसे सुनता है ताकि app का timer UI widget के साथ sync में रहे।
दोनों events native module और JavaScript के बीच एक कसा हुआ feedback loop बनाते हैं।
यह सब क्यों मायने रखता है
यह Live Activity सिर्फ़ एक timer नहीं है, यह एक ऐसा feature है जो मेरे app को iOS का असली native नागरिक बना देता है। यह इतना अहम क्यों है:
-
User Engagement: Lock Screen या Dynamic Island पर timer दिखाने से users बिना अपना flow तोड़े app से जुड़े रहते हैं। यह workouts के लिए एकदम सही है, जहाँ हर second मायने रखता है।
-
Native Polish: Widget का साफ़ design और interactive buttons app को ऐसा महसूस कराते हैं जैसे वह iOS का ही हिस्सा है, न कि बाद में सोचा गया cross-platform जुगाड़।
-
Performance: Text(timerInterval:) से चलने वाला startedAt/pausedAt तरीका पक्का करता है कि timer battery खत्म किए बिना या API limits से टकराए बिना smoothly चले।
expo-apple-targets और Expo Modules API यहाँ के गुमनाम हीरो थे, जिन्होंने JavaScript और Swift को जोड़ने के लिए एक मज़बूत framework दिया। Docs का साफ़ function definitions और event handling पर ज़ोर मेरे code को व्यवस्थित और maintainable रखता रहा।
आख़िरी विचार
यह Live Activity app में एक smooth, native एहसास जोड़ती है और सीधे Lock Screen और Dynamic Island पर real-time updates दिखाती है। expo-apple-targets, Expo Modules API और community की जानकारियों (हाँ, Reddit threads भी) की बदौलत इसे बनाना काफ़ी सीधा रहा। Live Activities apps को ज़्यादा जुड़ा हुआ और dynamic महसूस कराने का एक ताकतवर तरीका हैं
पूरे source repo का GitHub link यह रहा 👉🏻 https://github.com/tarikfp/expo-live-activity-timer