দ্রুত ডেভেলপমেন্ট চক্র আর ক্রস-প্ল্যাটফর্ম কম্প্যাটিবিলিটির কারণে মোবাইল অ্যাপ্লিকেশন তৈরিতে React Native একটি জনপ্রিয় পছন্দ হয়ে উঠেছে। React Native ডেভেলপমেন্টের সর্বোচ্চ সুবিধা নিতে ডেভেলপাররা প্রায়ই ডেটা ফেচিং আর state management-এর জন্য React-Query আর Zustand-এর মতো থার্ড-পার্টি লাইব্রেরির দিকে যান। React-Query আপনার ডেটা ফেচ, ক্যাশ আর ম্যানেজ করার একটি নমনীয় ও কার্যকর উপায় দেয়, আর Zustand তার ন্যূনতমবাদী পদ্ধতিতে state management-কে সহজ ও শক্তিশালী করে।
এই আর্টিকেলে আমরা দেখব এই দুটি লাইব্রেরি ব্যবহার করা React Native অ্যাপ্লিকেশন কীভাবে কার্যকরভাবে টেস্ট করা যায়। উদাহরণ হিসেবে একটি সাধারণ store অ্যাপ ব্যবহার করব, আর টেস্টিং প্রক্রিয়া বুঝতে সাহায্য করতে পূর্ণাঙ্গ ও বিস্তারিত উদাহরণ দেব। এই আর্টিকেলের শেষে আপনার React Native অ্যাপে React-Query আর Zustand কীভাবে ব্যবহার ও টেস্ট করতে হয় সে সম্পর্কে ভালো ধারণা থাকবে।
1. পরিবেশ সেটআপ
আমাদের store অ্যাপ ইনিশিয়ালাইজ করতে আমরা React Native সংস্করণ 0.71.2 ব্যবহার করব, আর ডেটা ফেচিং ও state management সামলাতে React-Query (Tanstack query) সংস্করণ 3.39.3 আর Zustand সংস্করণ 4.3.2 ব্যবহার করব। সম্পূর্ণ অ্যাপের পুরো সোর্স কোড GitHub-এ দেব, তাই সরাসরি ঢুকে এটা কাজ করতে দেখতে চাইলে আর্টিকেলের শেষে শেয়ার করা লিংকে গিয়ে তা করতে পারেন। এতে উদাহরণগুলোর সাথে সাথে এগোতে পারবেন আর অ্যাপের সম্পূর্ণ কোড দেখতে পারবেন।
1.1. store API সেটআপ
React Native-এ কার্যকর টেস্টিং কৌশল দেখাতে আমরা API হিসেবে https://fakestoreapi.com ব্যবহার করব। আমাদের store অ্যাপ এই API থেকে কিছু প্রোডাক্ট আনবে আর প্রতিটি প্রোডাক্টের বিস্তারিত ভিউ দেখাবে। FakeStoreProduct-এর আরও REST API আছে যেগুলো ব্যবহার করা যেত, কিন্তু তাতে জটিলতা বাড়বে আর এই আর্টিকেলের মূল উদ্দেশ্য থেকে মনোযোগ সরে যাবে।
অ্যাপ জুড়ে API-এর সাথে যোগাযোগের জন্য আমরা একটি axios instance তৈরি করব।
1.2. axios instance সেটআপ
import axios from "axios";

export const BASE_URL = "https://fakestoreapi.com";

export const api = axios.create({
  baseURL: BASE_URL,
});
পরের ধাপ হবে আমাদের API-এর জন্য react-query সেটআপ তৈরি করা।
1.3. query ক্যাশিং ম্যানেজ করতে key-factory তৈরি
key-factory কী?
আমাদের অ্যাপের সরলতার কারণে ক্যাশিং অপরিহার্য না হলেও আমরা React-Query-র শক্তিশালী ক্যাশিং ফিচারগুলো ব্যবহার করব। তাই একটি সহজ key factory তৈরি করব, যা নিচে দেখানো হলো।
export const productKeyFactory = {
  products: ["all-products"],
  productById: (id: number) => [...productKeyFactory.products, id],
} as const;
1.4. react-query দিয়ে প্রোডাক্ট আনা
import { AxiosError } from "axios";
import { useQuery, UseQueryOptions } from "react-query";
import { api } from "../axios.instance";
import { productKeyFactory } from "./key-factory";
import { Product } from "./types";

export const getAllProducts = async () => {
  return (await api.get<Array<Product>>("/products")).data;
};

export const useGetAllProducts = (
  options?: UseQueryOptions<
    Array<Product>,
    AxiosError,
    Array<Product>,
    readonly [string]
  >
) => {
  return useQuery({
    queryKey: [...productKeyFactory.products],
    queryFn: getAllProducts,
    ...options,
  });
};
ওপরে আমরা প্রোডাক্টগুলো আনার জন্য useGetAllProducts hook তৈরি করেছি, আর আগের অংশে তৈরি করা query-key ব্যবহার করেছি।
1.5. react-query দিয়ে প্রোডাক্টের বিস্তারিত আনা
import { AxiosError } from "axios";
import { useQuery, UseQueryOptions } from "react-query";
import { api } from "../axios.instance";
import { productKeyFactory } from "./key-factory";
import { Product } from "./types";

export const getProductById = async (productId: number) => {
  return (await api.get<Product>(`/products/${productId}`)).data;
};

export const useGetProductById = (
  productId: number,
  options?: UseQueryOptions<
    Product,
    AxiosError,
    Product,
    readonly (string | number)[]
  >
) => {
  return useQuery({
    queryFn: () => getProductById(productId),
    queryKey: [...productKeyFactory.productById(productId)],
    ...options,
  });
};
আগের hook-এর প্রায় একই, শুধু এবার useGetProductById hook id দিয়ে প্রোডাক্টের বিস্তারিত আনতে ব্যবহার হবে।
1.6. Product টাইপ
product অবজেক্ট দেখতে কেমন তার একটা ধারণা নিতে ভুলে না যাই।
export interface Product {
  id: number;
  title: string;
  price: number;
  description: string;
  category: string;
  image: string;
  rating: Rating;
}

export interface Rating {
  rate: number;
  count: number;
}
1.7. এবার zustand: বাস্কেটের প্রোডাক্ট ম্যানেজ করা
অ্যাপে কিছু মৌলিক ফিচার থাকবে, যা দিয়ে ব্যবহারকারীরা বাস্কেটে প্রোডাক্ট যোগ বা সরাতে পারবেন, আর আলাদা প্রোডাক্টের পরিমাণ বদলাতে পারবেন। এছাড়া ব্যবহারকারীরা পুরো বাস্কেট রিসেটও করতে পারবেন। এই ফাংশনালিটিগুলো Zustand দিয়ে ম্যানেজ করা হবে। নিচে এর ইমপ্লিমেন্টেশন দেখব।
import { create } from "zustand";
import { shallow } from "zustand/shallow";
import { Product } from "../api/product";

export type ProductInBasket = {
  product: Product;
  quantity: number;
};

export const updateProductQuantity = (
  productsInBasket: Array<ProductInBasket>,
  productId: number,
  updateType: "increase" | "decrease"
) => {
  return productsInBasket.map((productInBasket) => {
    if (productInBasket.product.id === productId) {
      return {
        ...productInBasket,
        quantity:
          updateType === "increase"
            ? productInBasket.quantity + 1
            : productInBasket.quantity - 1,
      };
    }
    return productInBasket;
  });
};

export const increaseProductQuantityInBasket = (
  productsInBasket: Array<ProductInBasket>,
  productId: number
) => {
  return updateProductQuantity(productsInBasket, productId, "increase");
};

export const decreaseProductQuantityInBasket = (
  productsInBasket: Array<ProductInBasket>,
  productId: number
) => {
  return updateProductQuantity(productsInBasket, productId, "decrease");
};

export interface ProductStore {
  productsInBasket: Array<ProductInBasket>;
  actions: {
    addProductToBasket: (val: Product) => void;
    removeProductFromBasket: (productId: number) => void;
    increaseProductQuantityInBasket: (productId: number) => void;
    decreaseProductQuantityInBasket: (productId: number) => void;
    resetAllProductsInBasket: () => void;
  };
}

export const useProductStore = create<ProductStore>((set, get) => ({
  productsInBasket: [],
  actions: {
    addProductToBasket: (product) =>
      set({
        productsInBasket: [
          ...get().productsInBasket,
          { product: product, quantity: 1 },
        ],
      }),
    removeProductFromBasket: (productId) =>
      set({
        productsInBasket: [
          ...get().productsInBasket.filter(
            (productInBasket) => productInBasket.product.id !== productId
          ),
        ],
      }),
    increaseProductQuantityInBasket: (productId) => {
      set({
        productsInBasket: increaseProductQuantityInBasket(
          get().productsInBasket,
          productId
        ),
      });
    },
    resetAllProductsInBasket: () => set({ productsInBasket: [] }),
    decreaseProductQuantityInBasket: (productId) => {
      set({
        productsInBasket: decreaseProductQuantityInBasket(
          get().productsInBasket,
          productId
        ),
      });
    },
  },
}));

export const useProductActions = () =>
  useProductStore((state) => state.actions);

export const useProductsInBasket = () =>
  useProductStore((state) => state.productsInBasket, shallow);
export const useProductsInBasketCount = () =>
  useProductStore((state) => state.productsInBasket.length);
export const useProductInBasketQuantityById = (productId: number | undefined) =>
  useProductStore(
    (state) =>
      state.productsInBasket.find(
        (productInBasket) => productInBasket.product.id === productId
      )?.quantity
  );
কোডের প্রথম অংশে তিনটি ফাংশন ডিফাইন করা হয়েছে: updateProductQuantity, increaseProductQuantityInBasket আর decreaseProductQuantityInBasket, যেগুলো বাস্কেটে কোনো প্রোডাক্টের পরিমাণ আপডেট করার helper মেথড। updateProductQuantity ফাংশন ইনপুট হিসেবে নেয় productsInBasket-এর সাথে মেলে এমন একটি অবজেক্টের array, একটি প্রোডাক্ট ID আর একটি আপডেটের ধরন (increase বা decrease), আর প্রদত্ত প্রোডাক্টের আপডেট হওয়া পরিমাণসহ একটি নতুন productsInBasket array ফেরত দেয়।
ProductStore interface প্রোডাক্ট store-এর schema ডিফাইন করে। এতে দুটি প্রপার্টি আছে:
-
productsInBasket হলো বাস্কেটের প্রোডাক্টগুলোর প্রতিনিধিত্ব করা ProductInBasket অবজেক্টের একটি array।
-
actions হলো একটি অবজেক্ট, যাতে বাস্কেটের প্রোডাক্ট ম্যানেজ করার ফাংশন থাকে, যেমন প্রোডাক্ট যোগ করা, প্রোডাক্ট সরানো, পরিমাণ বাড়ানো/কমানো আর বাস্কেট রিসেট করা।
useProductStore hook তৈরি হয় Zustand-এর create ফাংশন দিয়ে। এটি state আর action-সহ প্রোডাক্ট store ফেরত দেয়।
বাকি hook-গুলো, useProductActions, useProductsInBasket, useProductsInBasketCount আর useProductInBasketQuantityById, useProductStore hook থেকে বের করা selector। এগুলো দিয়ে প্রোডাক্ট store-এর নির্দিষ্ট অংশে পৌঁছানো যায়, যেমন action বা পছন্দের প্রোডাক্টের সংখ্যা।
অন্যদিকে উল্লেখ করার মতো, useProductsInBasket-এ আমরা zustand-এর shallow ব্যবহার করেছি। কারণ useProductsInBasket থেকে ফেরত আসা অবজেক্টের array primitive টাইপ না হওয়ায় rerender ঘটাবে, তাই shallow equality ফাংশন পাঠিয়ে আমরা শুধু zustand-কে জানাই যে অবজেক্টটি shallow ভাবে তুলনা করতে চাই।
1.8. টেস্টিংয়ের জন্য প্রয়োজনীয় প্যাকেজ ইনস্টল করা
এবার আমরা যে অংশটা নিয়ে বেশি মাথা ঘামাই সেখানে যেতে পারি, টেস্টিং। আমরা নিচের প্যাকেজগুলো ব্যবহার করব:
সংক্ষিপ্ততার জন্য আর আর্টিকেল লম্বা না করতে আমরা টেস্টিং পরিবেশ কনফিগারেশনের কিছু প্রক্রিয়া বাদ দেব, যেমন jest.config.js আর ts-jest।
শেষ পর্যন্ত আমরা কীভাবে টেস্ট পরিবেশ সেটআপ করেছি তা আর্টিকেলের শেষে দেওয়া সম্পূর্ণ সোর্স কোডের লিংক থেকে নির্দ্বিধায় দেখে নিতে পারেন।
1.9. MSW দিয়ে API ডেটা mock করা
react-query দিয়ে অ্যাপটি কার্যকরভাবে টেস্ট করতে আমাদের API mock করতে হবে। এ জন্য আমরা mock service worker (MSW) ব্যবহার করব।
import { rest } from "msw";
import { setupServer } from "msw/node";
import { BASE_URL } from "../../src/api/axios.instance";
import {
  GET_ALL_PRODUCTS_MOCK_RESPONSE,
  GET_PRODUCT_BY_ID_MOCK_RESPONSE,
} from "./mock-data";

const getAllProductsUrl = BASE_URL + "/products";
const getProductByIdUrl = BASE_URL + `/products/:id`;

const getAllProductsHandler = rest.get(getAllProductsUrl, (_req, res, ctx) => {
  return res(ctx.status(200), ctx.json(GET_ALL_PRODUCTS_MOCK_RESPONSE));
});

const getProductByIdHandler = rest.get(getProductByIdUrl, (_req, res, ctx) => {
  return res(ctx.status(200), ctx.json(GET_PRODUCT_BY_ID_MOCK_RESPONSE));
});

const handlers = [getAllProductsHandler, getProductByIdHandler];

export const mswServer = setupServer(...handlers);

const getAllProductsFailedHandler = rest.get(
  getAllProductsUrl,
  (_req, res, ctx) => {
    return res(ctx.status(500));
  }
);

const getProductByIdFailedHandler = rest.get(
  getProductByIdUrl,
  (_req, res, ctx) => {
    return res(ctx.status(500));
  }
);

export const setupGetAllProductsFailedHandler = () =>
  mswServer.use(getAllProductsFailedHandler);

export const setupGetProductByIdFailedHandler = () =>
  mswServer.use(getProductByIdFailedHandler);
ওপরের কোডে আমরা প্রয়োজনীয় মডিউল import করি আর MSW handler সেটআপ করি। আমরা দুটি mock endpoint তৈরি করি, একটি সব প্রোডাক্ট আনার জন্য আর অন্যটি id দিয়ে একটি প্রোডাক্ট আনার জন্য, দুটোই সফল response ফেরত দেয়। পুঙ্খানুপুঙ্খ টেস্টিং নিশ্চিত করতে এই দুটি endpoint-এর জন্য ব্যর্থ handler-ও তৈরি করি, যাতে ব্যর্থতার পরিস্থিতি সিমুলেট আর টেস্ট করা যায়।
ওপরের mock সেটআপ সম্পূর্ণ করতে আমাদের jest.setup.js-এ mswServer অবজেক্ট ব্যবহার করতে হবে। আমরা যেকোনো test case-এর আগে mswServer ইনিশিয়ালাইজ করতে চাই, প্রতিটি test case-এর পরে handler রিসেট করতে চাই, আর শেষে এটা বন্ধ করে দেব।
import "react-native-gesture-handler/jestSetup";
import { mswServer } from "./__mocks__/msw/handlers";

jest.useFakeTimers();

// https://mswjs.io/docs/getting-started/integrate/node#setup

// Establish API mocking before all tests.
beforeAll(() => mswServer.listen());
// Reset any request handlers that we may add during the tests,
// so they don't affect other tests.
afterEach(() => mswServer.resetHandlers());
// Clean up after the tests are finished.
afterAll(() => mswServer.close());

// Silence the warning: Animated: `useNativeDriver` is not supported because the native animated module is missing
jest.mock("react-native/Libraries/Animated/NativeAnimatedHelper");
এখন আমরা API mock করেছি, যাতে টেস্টে এটা ব্যবহার করা যায়। কিন্তু এখনো কাজ শেষ হয়নি। zustand-এর দেওয়া ডকুমেন্টেশন অনুযায়ী zustand-এর টেস্টিংও সেটআপ করতে হবে। এতে test case-এ zustand ব্যবহার করার সময় টেস্টগুলোর মাঝে state রিসেট করা যাবে।
1.10. টেস্টিংয়ের জন্য zustand কনফিগার করা
// https://docs.pmnd.rs/zustand/guides/testing#resetting-state-between-tests-in-react-dom
const { create: actualCreate } = jest.requireActual("zustand"); // if using jest
import { act } from "@testing-library/react-native";

// a variable to hold reset functions for all stores declared in the app
const storeResetFns = new Set();

// when creating a store, we get its initial state, create a reset function and add it in the set
export const create = (createState) => {
  const store = actualCreate(createState);
  const initialState = store.getState();
  storeResetFns.add(() => store.setState(initialState, true));
  return store;
};

// Reset all stores after each test run
beforeEach(() => {
  act(() => storeResetFns.forEach((resetFn) => resetFn()));
});
এখানে গুরুত্বপূর্ণ বিষয় হলো আমাদের টেস্টিং পরিবেশ অনুযায়ী ওপরের ফাইলটি সঠিক ডিরেক্টরিতে রাখা। আমরা যেহেতু jest ব্যবহার করি, তাই ডকুমেন্টেশনে যেমন বলা আছে, এই ফাইলটি mocks/zustand.js-এ রাখা উচিত।
(টেস্টিং) পরিবেশ সেটআপ নিয়ে হয়তো আপনি ইতিমধ্যে হাঁপিয়ে উঠেছেন, তবু এগুলো দেখাতেই হতো, কারণ এগুলোই আমাদের পরিবেশের কাঠামো।
এবার চলুন সরাসরি সেই অংশে যাই যেখানে প্রোডাক্ট দেখানোর স্ক্রিন তৈরি করি।
2. প্রোডাক্ট লিস্ট স্ক্রিনের সারসংক্ষেপ
আগেই বলেছি, প্রোডাক্ট দেখানোর জন্য আমাদের একটি স্ক্রিন থাকবে। চলুন নিচে প্রোডাক্ট লিস্ট স্ক্রিনের সম্পূর্ণ কোড দেখি:
import { DefaultTheme } from "@react-navigation/native";
import * as React from "react";
import {
  FlatList,
  ListRenderItemInfo,
  RefreshControl,
  StyleSheet,
  Text,
  View,
} from "react-native";
import { SafeAreaView } from "react-native-safe-area-context";
import { Product, useGetAllProducts } from "../api/product";
import ProductListCard from "../components/product-list-card";
import ScreenLoading from "../components/screen-loading";
import Spacing from "../components/spacing";
import useRefreshByUser from "../hooks/useRefreshByUser";
import { RouteNames } from "../navigation/route-names";
import { ProductListScreenProps } from "../navigation/types";
import { useProductActions, useProductsInBasket } from "../store/product";
import { COMMON_STYLES } from "../theme/common-styles";

type Props = ProductListScreenProps;

const ProductListScreen: React.FC<Props> = ({ navigation }) => {
  const { data, isLoading, refetch, isError, isSuccess } = useGetAllProducts();

  const { isRefetchingByUser, refetchByUser } = useRefreshByUser(refetch);

  const { addProductToBasket, removeProductFromBasket } = useProductActions();
  const productsInBasket = useProductsInBasket();

  const onAddToBasketPress = React.useCallback(
    (product: Product) => () => {
      if (
        productsInBasket.find(
          (productInBasket) => productInBasket.product.id === product.id
        )
      ) {
        removeProductFromBasket(product.id);
      } else {
        addProductToBasket(product);
      }
    },
    [addProductToBasket, productsInBasket, removeProductFromBasket]
  );

  const onProductCardPress = React.useCallback(
    (productId: number) => () => {
      navigation.navigate(RouteNames.productDetail, { id: productId });
    },
    [navigation]
  );

  const renderItemSeparator = () => (
    <Spacing
      backgroundColor={DefaultTheme.colors.background}
      height={COMMON_STYLES.screenPadding}
    />
  );

  const getKeyExtractor = (item: Product) => item.id.toString();

  const renderItem = ({ item: product }: ListRenderItemInfo<Product>) => {
    return (
      <ProductListCard
        {...product}
        testID={`product-list-card-${product.id}`}
        basketButtonTestID={`basket-button-${product.id}`}
        isInBasket={
          typeof productsInBasket.find(
            (productInBasket) => productInBasket.product.id === product.id
          ) !== "undefined"
        }
        onAddToBasketPress={onAddToBasketPress(product)}
        onPress={onProductCardPress(product.id)}
      />
    );
  };

  if (isLoading) {
    return <ScreenLoading />;
  }

  return (
    <SafeAreaView style={COMMON_STYLES.flex} edges={["bottom"]}>
      {isError && (
        <View style={COMMON_STYLES.flexCenter}>
          <Text>An error occurred</Text>
        </View>
      )}

      {isSuccess && (
        <FlatList<Product>
          data={data}
          testID="product-list-flat-list"
          refreshControl={
            <RefreshControl
              refreshing={isRefetchingByUser}
              onRefresh={refetchByUser}
            />
          }
          renderItem={renderItem}
          numColumns={2}
          ItemSeparatorComponent={renderItemSeparator}
          columnWrapperStyle={styles.columnWrapper}
          contentContainerStyle={styles.contentContainerStyle}
          showsVerticalScrollIndicator={false}
          keyExtractor={getKeyExtractor}
          style={COMMON_STYLES.flex}
        />
      )}
    </SafeAreaView>
  );
};

export default ProductListScreen;

const styles = StyleSheet.create({
  contentContainerStyle: {
    flexGrow: 1,
    padding: COMMON_STYLES.screenPadding,
  },
  columnWrapper: {
    justifyContent: "space-between",
  },
});
এই স্ক্রিনের দায়িত্বগুলো হলো:
-
কাস্টম react query hook useGetAllProducts দিয়ে প্রোডাক্ট দেখানো, যেটি আমরা 1.4. react-query দিয়ে প্রোডাক্ট আনা অংশে তৈরি করেছি।
-
কাস্টম zustand hook useProductActions দিয়ে ব্যবহারকারীদের বাস্কেটে প্রোডাক্ট যোগ বা সরাতে দেওয়া, যেটি আমরা 1.7. এবার zustand: বাস্কেটের প্রোডাক্ট ম্যানেজ করা অংশে দেখেছি।
-
pull-to-refresh দিয়ে প্রোডাক্ট আবার আনা।
-
header-এর ডান পাশের বাস্কেট আইকনে দেখানো পরিমাণের টেক্সট আপডেট করা।
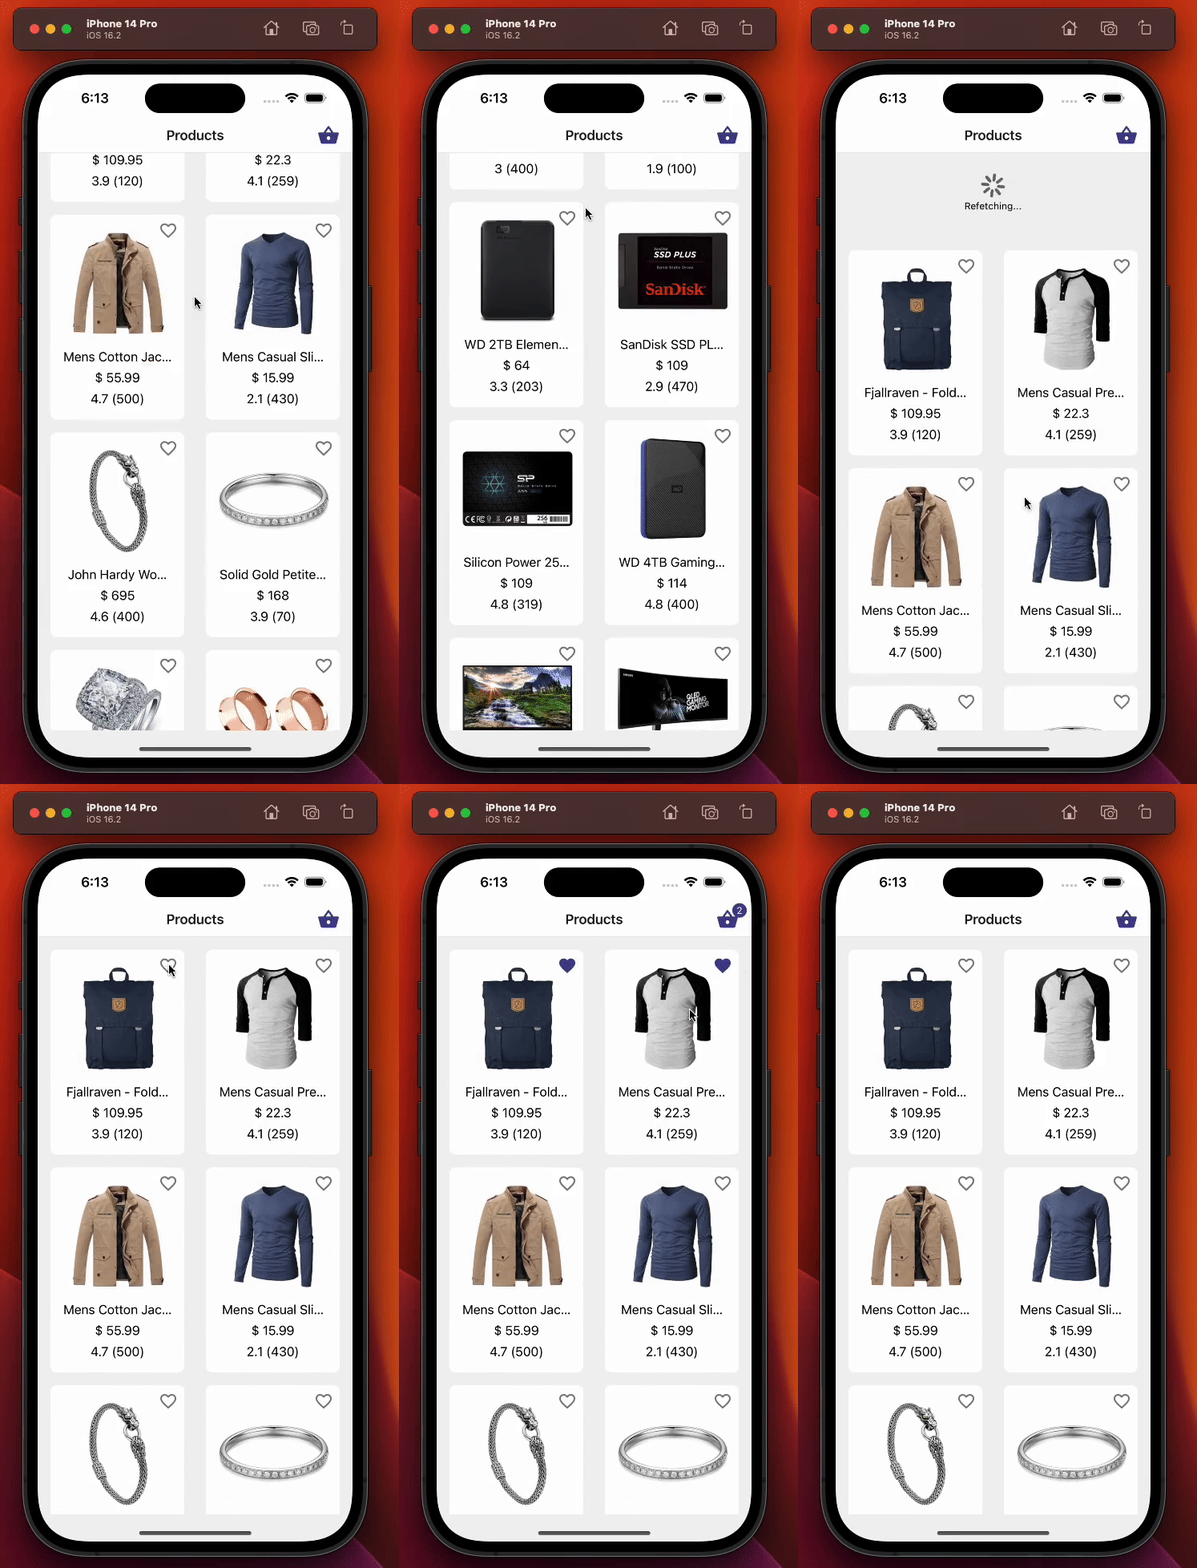
নিচে প্রোডাক্ট লিস্ট স্ক্রিনের ডেমো:
2.1. প্রোডাক্ট লিস্ট স্ক্রিন টেস্ট করা
এই অংশে আমরা প্রোডাক্ট লিস্ট স্ক্রিনে টেস্ট চালাব। প্রথমে যে test case-গুলো চালানো হবে সেগুলো হলো:
-
শুরুতে loading indicator দেখানো উচিত, যদিও আমরা ডেটা mock করছি। react-query-র isLoading boolean flag তখনো অল্প সময়ের জন্য true থাকবে। ডেটা আনার পরে isLoading false হবে, আর loader দেখানো হবে না।
-
ডেটা আনার পরে প্রোডাক্ট লিস্ট সঠিকভাবে দেখানো উচিত। এই ক্ষেত্র যাচাই করতে ProductListCard কম্পোনেন্টের testID prop ব্যবহার করা হবে।
-
সব প্রোডাক্ট আনার query ব্যর্থ হলে স্ক্রিনে একটি error মেসেজ দেখানো উচিত। এর জন্য আমরা 1.9. MSW দিয়ে API ডেটা mock করা অংশে তৈরি করা setupGetAllProductsFailedHandler helper ব্যবহার করব।
2.1.1. Test case: শুরুতে loading indicator দেখানো উচিত
import { renderHook } from "@testing-library/react-hooks";
import { render, screen } from "@testing-library/react-native";
import React from "react";
import { useGetAllProducts } from "../../api/product";
import { createReactQueryWrapper } from "../../utils/testing";
import ProductListScreen from "../product-list";

const navigateMock = jest.fn();
const navigation = { navigate: navigateMock } as any;
const route = jest.fn() as any;

const component = <ProductListScreen navigation={navigation} route={route} />;

describe("Product list screen", () => {
  it("should display loading indicator initially", async () => {
    // We render the component and expect to see a loading indicator
    render(component, { wrapper: createReactQueryWrapper });
    expect(screen.queryByTestId(`screen-loader`)).toBeTruthy();

    // We render the product list using useGetAllProducts hook and wait until the products are loaded
    const { result, waitFor } = renderHook(() => useGetAllProducts(), {
      wrapper: createReactQueryWrapper,
    });
    await waitFor(() => result.current.isSuccess);

    // We expect the loading indicator to disappear after the products are loaded
    expect(screen.queryByTestId(`screen-loader`)).not.toBeTruthy();
  });
});
ফাইলের শুরুতে টেস্ট চালানোর জন্য প্রয়োজনীয় মডিউল import করেছি। তারপর প্রোডাক্ট লিস্ট স্ক্রিন রাখতে component নামে একটি ভেরিয়েবল তৈরি করেছি, যাতে test case-গুলোতে এই ভেরিয়েবল বারবার ব্যবহার করা যায়। তাছাড়া এটা যেহেতু একটি স্ক্রিন, আর আমরা 2. প্রোডাক্ট লিস্ট স্ক্রিনের সারসংক্ষেপ অংশে screen props ঘোষণা করেছি, তাই line 22-এ প্রয়োজনীয় screen props, navigation আর route-ও দিতে হবে। ওপরে কেন navigation অবজেক্ট destructure করেছি, পরের test case-গুলোতে সেখানে ফিরে আসব।
test case বুঝতে যে পরিভাষাগুলো খেয়াল রাখা দরকার তার একটি সংক্ষিপ্ত পর্যালোচনা:
-
render: প্রদত্ত React এলিমেন্টকে গভীরভাবে রেন্ডার করে, আর আউটপুট কম্পোনেন্টের কাঠামোতে query করার helper ফেরত দেয়।
-
screen: সর্বশেষ render কলের মান ধরে রাখে, যাতে render-এর ফেরত দেওয়া query আর অন্যান্য ফাংশন সহজে ব্যবহার করা যায়।
-
renderHook: একটি টেস্ট কম্পোনেন্ট রেন্ডার করে, যা প্রতিবার রেন্ডারের সময় প্রদত্ত callback কল করে, সেই callback যে hook-গুলো কল করে সেগুলোসহ।
এই আর্টিকেলের মূল উদ্দেশ্য যেহেতু টেস্টিং লাইব্রেরি আর তাদের ফাংশনের পরিচিতি দেওয়া নয়, বরং কীভাবে টেস্টিং করতে হয় তার দিকনির্দেশনা দেওয়া, তাই আমরা এগুলোর গভীর খুঁটিনাটিতে যাব না। আর্টিকেল জুড়ে এগুলোর ব্যবহার দেখার মতো যথেষ্ট উদাহরণ এমনিতেই থাকবে।
ওপরের test case দেখে শুরুতে স্ক্রিনে একটি screen loader কম্পোনেন্ট দেখানো হচ্ছে কি না। render ফাংশন ProductListScreen কম্পোনেন্টকে createReactQueryWrapper ফাংশনে wrap করে রেন্ডার করে, যেটি QueryClientProvider তৈরির একটি সহজ utility ফাংশন। screen.queryByTestId() ফাংশন দেখে স্ক্রিনে screen loader দেখানো হচ্ছে কি না।
renderHook ফাংশন useGetAllProducts hook টেস্ট করতে ব্যবহার হয়, যেটি ProductListScreen কম্পোনেন্টে প্রোডাক্টের ডেটা আনতে ব্যবহার হয়। useGetAllProducts hook-কে createReactQueryWrapper ফাংশনে wrap করতে renderHook ফাংশনে wrapper অপশন পাঠানো হয়। result ভেরিয়েবলে useGetAllProducts hook-এর ফেরত দেওয়া মান থাকে। এদিকে waitFor ফাংশন অপেক্ষা করে যতক্ষণ না result অবজেক্টের isSuccess প্রপার্টি true হয়, অর্থাৎ প্রোডাক্টের ডেটা সফলভাবে আনা হয়েছে।
দ্বিতীয় অংশ দেখে প্রোডাক্টের ডেটা সফলভাবে আনার পরে screen loader কম্পোনেন্ট আর দেখানো হচ্ছে না কি না।
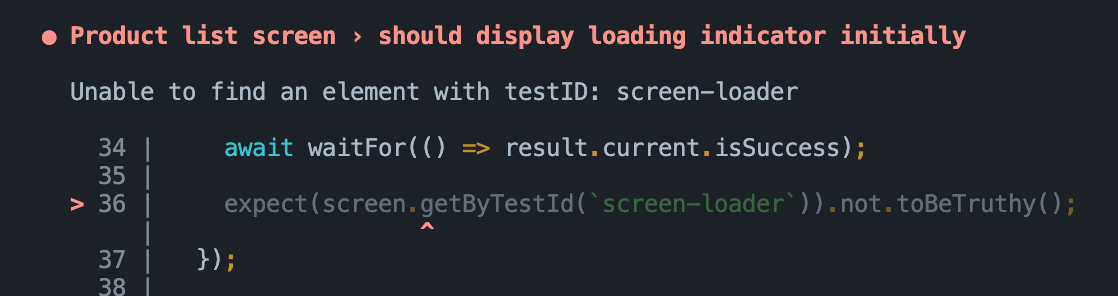
getByTestId-এর বদলে queryByTestId ব্যবহারের কারণ হলো আমরা জানি ডেটা আনার পরে screen loader কম্পোনেন্ট দেখা যাবে না, তাই getByTestId ব্যবহার করলে error throw করত।
getByTestId ব্যবহার করলে আমরা এরকম error পেতাম:
2.1.2. Test case: প্রোডাক্ট লিস্টের ডেটা সঠিকভাবে দেখানো উচিত
import { renderHook } from "@testing-library/react-hooks";
import { render, screen } from "@testing-library/react-native";
import React from "react";
import { useGetAllProducts } from "../../api/product";
import { createReactQueryWrapper } from "../../utils/testing";
import ProductListScreen from "../product-list";

const navigateMock = jest.fn();
const navigation = { navigate: navigateMock } as any;
const route = jest.fn() as any;

const component = <ProductListScreen navigation={navigation} route={route} />;

describe("Product list screen", () => {
  it("should display product list data correctly", async () => {
    // Render the component and wait for it to load
    render(component, { wrapper: createReactQueryWrapper });

    // Check that no product card is rendered before fetching data
    expect(screen.queryByTestId(`product-list-card-1`)).not.toBeTruthy();

    // Fetch the product data
    const { result, waitFor } = renderHook(() => useGetAllProducts(), {
      wrapper: createReactQueryWrapper,
    });

    // Wait for the data to be fetched successfully
    await waitFor(() => result.current.isSuccess);

    // Check that each product card is rendered for each product in the data
    for (const { id } of result.current.data!) {
      expect(screen.queryByTestId(`product-list-card-${id}`)).toBeTruthy();
    }
  });
});
এই টেস্ট কোড যাচাই করে প্রোডাক্ট লিস্ট স্ক্রিন আনা প্রোডাক্টের ডেটা সঠিকভাবে দেখাচ্ছে কি না।
এবারও আমরা ডেটা সফলভাবে আনা পর্যন্ত অপেক্ষা করি, তারপর আনা ডেটার ওপর loop চালিয়ে প্রোডাক্ট লিস্টের ডেটা সঠিকভাবে দেখানো হচ্ছে কি না নিশ্চিত করি: ডেটার প্রতিটি প্রোডাক্টের জন্য product-list-card-${id} testID-সহ একটি প্রোডাক্ট লিস্ট কার্ড থাকবে বলে আশা করি। id প্রপার্টি প্রোডাক্ট ID-এর ভিত্তিতে ডাইনামিকভাবে তৈরি হয়। টেস্ট ব্যর্থ হলে বুঝতে হবে প্রোডাক্ট লিস্টের আইটেমগুলো প্রোডাক্টের ডেটা সঠিকভাবে দেখাচ্ছে না।
লক্ষ করুন, নিচে লিস্টের আইটেম রেন্ডার করতে আমরা কীভাবে renderItem ফাংশন ব্যবহার করছিলাম। ProductListCard কম্পোনেন্টের জন্য একটি ডাইনামিক testID তৈরি করতে আমরা product.id নিয়ে product-list-card string-এর সাথে জুড়ে দিই। এভাবে আমরা সব প্রোডাক্টকে তাদের নিজ নিজ testID prop-সহ টেস্ট করতে পারব।
const renderItem = ({ item: product }: ListRenderItemInfo<Product>) => {
  return (
    <ProductListCard
      {...product}
      testID={`product-list-card-${product.id}`}
      basketButtonTestID={`basket-button-${product.id}`}
      isInBasket={
        typeof productsInBasket.find(
          (productInBasket) => productInBasket.product.id === product.id
        ) !== "undefined"
      }
      onAddToBasketPress={onAddToBasketPress(product)}
      onPress={onProductCardPress(product.id)}
    />
  );
};
2.1.3. Test case: সব প্রোডাক্ট আনার query ব্যর্থ হলে error টেক্সট দেখানো উচিত
এই test case-এ আমরা সেই পরিস্থিতি টেস্ট করছি যেখানে সব প্রোডাক্ট আনার API কল ব্যর্থ হয়।
import { renderHook } from "@testing-library/react-hooks";
import { render, screen } from "@testing-library/react-native";
import React from "react";
import { setupGetAllProductsFailedHandler } from "../../../__mocks__/msw/handlers";
import { useGetAllProducts } from "../../api/product";
import { createReactQueryWrapper } from "../../utils/testing";
import ProductListScreen from "../product-list";

const navigateMock = jest.fn();
const navigation = { navigate: navigateMock } as any;
const route = jest.fn() as any;

const component = <ProductListScreen navigation={navigation} route={route} />;

describe("Product list screen", () => {
  it("should display error text in case get all products query fails", async () => {
    // Set up the mock handler for GET requests to the /products endpoint that returns an error response
    setupGetAllProductsFailedHandler();

    // Render the ProductListScreen component wrapped in the React Query wrapper
    render(component, { wrapper: createReactQueryWrapper });

    // Set up a mock React hook that calls the useGetAllProducts hook from the API module
    const { result, waitFor } = renderHook(() => useGetAllProducts(), {
      wrapper: createReactQueryWrapper,
    });

    // Wait for the useGetAllProducts hook to throw an error
    await waitFor(() => result.current.isError);

    // Assert that the "An error occurred" text is displayed on the screen
    expect(screen.getByText(`An error occurred`)).toBeTruthy();
  });
});
API ব্যর্থতা সিমুলেট করতে আমরা mock server worker (msw) থেকে setupGetAllProductsFailedHandler ফাংশন ব্যবহার করি, যেটি আমরা 1.9. MSW দিয়ে API ডেটা mock করা অংশের line 38-এ ইমপ্লিমেন্ট করেছি। তারপর render ফাংশন দিয়ে ProductListScreen কম্পোনেন্ট রেন্ডার করি, আর renderHook ফাংশন দিয়ে ডেটা আনা useGetAllProducts hook কল করি।
result.current অবজেক্টের isError প্রপার্টি true হওয়া পর্যন্ত অপেক্ষা করতে আমরা @testing-library/react-hooks-এর waitFor ফাংশন ব্যবহার করি। এতে নিশ্চিত হয় hook-এর কাজ শেষ হয়েছে আর API কল ব্যর্থ হয়েছে। সবশেষে @testing-library/react-native-এর getByText ফাংশন দিয়ে টেক্সটটি আছে কি না দেখে আমরা নিশ্চিত করি যে স্ক্রিনে “An error occurred” error মেসেজ দেখানো হবে। প্রোডাক্ট লিস্ট স্ক্রিনের সোর্স কোড দেখে আপনি এটা আবার যাচাই করতে পারেন।
2.1.4. Test case: প্রথম প্রোডাক্ট আইটেমে চাপ দিলে navigation action কল হওয়া উচিত
আমরা নিচের কোড স্নিপেট টেস্ট করব, যেটি আসলে আমাদের প্রোডাক্ট লিস্ট স্ক্রিন থেকে নেওয়া। লিস্টের যেকোনো প্রোডাক্ট লিস্ট কার্ডে ব্যবহারকারীর চাপ দেওয়ার অ্যাকশন সামলানোর দায়িত্ব এই কোডের।
const onProductCardPress = React.useCallback(
  (productId: number) => () => {
    navigation.navigate(RouteNames.productDetail, { id: productId });
  },
  [navigation]
);

const renderItem = ({ item: product }: ListRenderItemInfo<Product>) => {
  return (
    <ProductListCard
      {...product}
      testID={`product-list-card-${product.id}`}
      basketButtonTestID={`basket-button-${product.id}`}
      isInBasket={
        typeof productsInBasket.find(
          (productInBasket) => productInBasket.product.id === product.id
        ) !== "undefined"
      }
      onAddToBasketPress={onAddToBasketPress(product)}
      onPress={onProductCardPress(product.id)}
    />
  );
};
চলুন নিচে দেখি কীভাবে এটা টেস্ট করা যায়:
import { renderHook } from "@testing-library/react-hooks";
import { fireEvent, render, screen } from "@testing-library/react-native";
import React from "react";
import { useGetAllProducts } from "../../api/product";
import { RouteNames } from "../../navigation/route-names";
import { createReactQueryWrapper } from "../../utils/testing";
import ProductListScreen from "../product-list";

const navigateMock = jest.fn();
const navigation = { navigate: navigateMock } as any;
const route = jest.fn() as any;

const component = <ProductListScreen navigation={navigation} route={route} />;

describe("Product list screen", () => {
  it("should call navigation action on pressing the first product item", async () => {
    // render ProductListScreen component with createReactQueryWrapper as a wrapper
    render(component, { wrapper: createReactQueryWrapper });

    // render hook for useGetAllProducts with createReactQueryWrapper as a wrapper
    const { result, waitFor } = renderHook(() => useGetAllProducts(), {
      wrapper: createReactQueryWrapper,
    });

    // wait for useGetAllProducts to succeed
    await waitFor(() => result.current.isSuccess);

    // find first product item and simulate a press event on it
    const firstProductItem = screen.getByTestId(`product-list-card-1`);
    fireEvent.press(firstProductItem);

    // assert that navigation action was called with correct route name and params
    expect(navigateMock).toHaveBeenCalledWith(RouteNames.productDetail, {
      id: 1,
    });
  });
});
এই টেস্ট কোড স্নিপেটে আমরা যাচাই করছি একটি প্রোডাক্ট আইটেমে চাপ দিলে navigation action কল হয় কি না। প্রথমে ProductListScreen কম্পোনেন্ট রেন্ডার করি আর আগের test case-গুলোর মতোই ডেটা সফলভাবে আনা পর্যন্ত অপেক্ষা করি। এরপর লিস্ট থেকে প্রথম প্রোডাক্ট আইটেম নিই আর fireEvent.press দিয়ে তাতে একটি press ইভেন্ট সিমুলেট করি। সবশেষে আশা করি navigation অবজেক্টের navigate ফাংশন প্রত্যাশিত RouteName আর productId parameter দিয়ে কল হয়েছে।
2.1.5. Test case: প্রোডাক্ট আইটেমের বাস্কেট আইকনে চাপ দিলে প্রোডাক্ট সঠিকভাবে যোগ/সরানো উচিত
নিচের test case সেই পরিস্থিতি টেস্ট করছে যেখানে ব্যবহারকারী Product List স্ক্রিনের প্রোডাক্ট কার্ডের বাস্কেট আইকনে চাপ দিয়ে বাস্কেটে একটি প্রোডাক্ট যোগ করেন আর সরান।
import { NavigationContainer } from "@react-navigation/native";
import { renderHook } from "@testing-library/react-hooks";
import { fireEvent, render, screen } from "@testing-library/react-native";
import React from "react";
import { useGetAllProducts } from "../../api/product";
import ProductStack from "../../navigation/product-stack";
import { useProductStore } from "../../store/product";
import { createReactQueryWrapper } from "../../utils/testing";

// We render the whole app stack instead of rendering just the screen
// because we need access to the react-navigation's header, which wouldn't
// be possible if we just rendered the screen.
const rootAppComponent = (
  <NavigationContainer>
    <ProductStack />
  </NavigationContainer>
);

describe("Product list screen", () => {
  it("should add/remove product item correctly on pressing product items basket icon", async () => {
    // We render the entire app stack and use the createReactQueryWrapper as a
    // wrapper for the render function to set up the React Query Provider.
    render(rootAppComponent, {
      wrapper: createReactQueryWrapper,
    });

    // We use the renderHook function to invoke the useGetAllProducts hook which
    // fetches the data.
    const { result, waitFor } = renderHook(() => useGetAllProducts(), {
      wrapper: createReactQueryWrapper,
    });

    // We use the renderHook function to get access to the useProductStore hook
    // which we will use to check that the products in the basket were added/removed correctly.
    const { result: productStore } = renderHook(() => useProductStore(), {
      wrapper: createReactQueryWrapper,
    });

    // We wait for the useGetAllProducts hook to complete fetching the data before proceeding
    // with the test.
    await waitFor(() => result.current.isSuccess);

    // We get the basket button for the first product item using the getByTestId function.
    const firstProductItemBasketButton = screen.getByTestId(`basket-button-1`);

    // We click the basket button for the first product item.
    fireEvent.press(firstProductItemBasketButton);

    // We check that the basket icon quantity text is present using the getByTestId function.
    expect(screen.getByTestId("basket-icon-quantity-text-1")).toBeTruthy();

    // We check that the products in the basket have been added correctly using the productStore.
    expect(productStore.current.productsInBasket).toHaveLength(1);
    expect(productStore.current.productsInBasket[0].quantity).toBe(1);
    expect(productStore.current.productsInBasket[0].product).toMatchObject(
      result.current.data![0]
    );

    // We click the basket button for the first product item again to remove it from the basket.
    fireEvent.press(firstProductItemBasketButton);

    // We check that the basket icon quantity text is not present.
    expect(
      screen.queryByTestId("basket-icon-quantity-text-1")
    ).not.toBeTruthy();

    // We check that the products in the basket have been removed correctly using the productStore.
    expect(productStore.current.productsInBasket).toHaveLength(0);
  });
});
header-এর বাস্কেট আইকনের ফাংশনালিটি টেস্ট করতে ProductListScreen-এর পাশাপাশি পুরো ProductStack রেন্ডার করতে হবে। কারণ test ID দিয়ে বাস্কেট আইকন পেতে আমাদের Product List স্ক্রিনের header-এ পৌঁছাতে হবে। এর জন্য NavigationContainer-সহ পুরো ProductStack রেন্ডার করা থাকা দরকার।
সফলভাবে প্রোডাক্ট আনা শেষ হলে এটি fireEvent.press দিয়ে প্রথম প্রোডাক্ট আইটেমের বাস্কেট আইকনে চাপ দেওয়া সিমুলেট করে, যা প্রোডাক্টটিকে বাস্কেটে যোগ করে। তারপর আমরা দেখি বাস্কেট আইকন সঠিক পরিমাণ দেখাচ্ছে কি না, আর প্রোডাক্টটি প্রোডাক্ট store-এর productsInBasket array-তে সঠিক পরিমাণ আর প্রোডাক্ট অবজেক্টসহ যোগ হয়েছে কি না।
এরপর বাস্কেট থেকে প্রোডাক্টটি সরাতে আবার বাস্কেট আইকনে চাপ দেওয়া সিমুলেট করি, আর দেখি বাস্কেট আইকন আর পরিমাণ দেখাচ্ছে না কি না এবং প্রোডাক্ট store-এর productsInBasket array খালি কি না।
সংক্ষেপে, এই test case Product List স্ক্রিনের প্রোডাক্ট কার্ডের বাস্কেট আইকনে চাপ দিয়ে বাস্কেটে প্রোডাক্ট যোগ ও সরানো এবং তাদের পরিমাণ বদলানোর ফাংশনালিটি টেস্ট করছে, আর নিশ্চিত করছে যে প্রোডাক্ট store বাস্কেটের প্রোডাক্ট আর তাদের পরিমাণ সঠিকভাবে ম্যানেজ করে।
2.1.6. প্রোডাক্ট লিস্ট স্ক্রিনের সম্পূর্ণ টেস্ট ফ্লো
প্রোডাক্ট লিস্ট স্ক্রিনের সম্পূর্ণ টেস্ট ফ্লো নিচে দেওয়া হলো:
import { NavigationContainer } from "@react-navigation/native";
import { renderHook } from "@testing-library/react-hooks";
import { fireEvent, render, screen } from "@testing-library/react-native";
import React from "react";
import { setupGetAllProductsFailedHandler } from "../../../__mocks__/msw/handlers";
import { useGetAllProducts } from "../../api/product";
import ProductStack from "../../navigation/product-stack";
import { RouteNames } from "../../navigation/route-names";
import { useProductStore } from "../../store/product";
import { createReactQueryWrapper } from "../../utils/testing";
import ProductListScreen from "../product-list";

// We render the whole app stack instead of rendering just the screen
// because we need access to the react-navigation's header, which wouldn't
// be possible if we just rendered the screen.
const rootAppComponent = (
  <NavigationContainer>
    <ProductStack />
  </NavigationContainer>
);
const navigateMock = jest.fn();
const navigation = { navigate: navigateMock } as any;
const route = jest.fn() as any;

const component = <ProductListScreen navigation={navigation} route={route} />;

describe("Product list screen", () => {
  it("should display loading indicator initially", async () => {
    // We render the component and expect to see a loading indicator
    render(component, { wrapper: createReactQueryWrapper });
    expect(screen.queryByTestId(`screen-loader`)).toBeTruthy();

    // We render the product list using useGetAllProducts hook and wait until the products are loaded
    const { result, waitFor } = renderHook(() => useGetAllProducts(), {
      wrapper: createReactQueryWrapper,
    });
    await waitFor(() => result.current.isSuccess);

    // We expect the loading indicator to disappear after the products are loaded
    expect(screen.queryByTestId(`screen-loader`)).not.toBeTruthy();
  });

  it("should display product list data correctly", async () => {
    // Render the component and wait for it to load
    render(component, { wrapper: createReactQueryWrapper });

    // Check that no product card is rendered before fetching data
    expect(screen.queryByTestId(`product-list-card-1`)).not.toBeTruthy();

    // Fetch the product data
    const { result, waitFor } = renderHook(() => useGetAllProducts(), {
      wrapper: createReactQueryWrapper,
    });

    // Wait for the data to be fetched successfully
    await waitFor(() => result.current.isSuccess);

    // Check that each product card is rendered for each product in the data
    for (const { id } of result.current.data!) {
      expect(screen.queryByTestId(`product-list-card-${id}`)).toBeTruthy();
    }
  });

  it("should display error text in case get all products query fails", async () => {
    // Set up the mock handler for GET requests to the /products endpoint that returns an error response
    setupGetAllProductsFailedHandler();

    // Render the ProductListScreen component wrapped in the React Query wrapper
    render(component, { wrapper: createReactQueryWrapper });

    // Set up a mock React hook that calls the useGetAllProducts hook from the API module
    const { result, waitFor } = renderHook(() => useGetAllProducts(), {
      wrapper: createReactQueryWrapper,
    });

    // Wait for the useGetAllProducts hook to throw an error
    await waitFor(() => result.current.isError);

    // Assert that the "An error occurred" text is displayed on the screen
    expect(screen.getByText(`An error occurred`)).toBeTruthy();
  });

  it("should call navigation action on pressing the first product item", async () => {
    // Render the ProductListScreen component along with react-query wrapper
    render(component, { wrapper: createReactQueryWrapper });

    // Render the useGetAllProducts hook with react-query wrapper to fetch data
    const { result, waitFor } = renderHook(() => useGetAllProducts(), {
      wrapper: createReactQueryWrapper,
    });

    // Wait for the data to be fetched
    await waitFor(() => result.current.isSuccess);

    // Find the first product card in the list and simulate a press event on it
    const firstProductItem = screen.getByTestId(`product-list-card-1`);
    fireEvent.press(firstProductItem);

    // Expect that the navigation function is called with the correct route name and params
    expect(navigateMock).toHaveBeenCalledWith(RouteNames.productDetail, {
      id: 1,
    });
  });

  it("should add/remove product item correctly on pressing product items basket icon", async () => {
    // We render the entire app stack and use the createReactQueryWrapper as a
    // wrapper for the render function to set up the React Query Provider.
    render(rootAppComponent, {
      wrapper: createReactQueryWrapper,
    });

    // We use the renderHook function to invoke the useGetAllProducts hook which
    // fetches the data.
    const { result, waitFor } = renderHook(() => useGetAllProducts(), {
      wrapper: createReactQueryWrapper,
    });

    // We use the renderHook function to get access to the useProductStore hook
    // which we will use to check that the products in the basket were added/removed correctly.
    const { result: productStore } = renderHook(() => useProductStore(), {
      wrapper: createReactQueryWrapper,
    });

    // We wait for the useGetAllProducts hook to complete fetching the data before proceeding
    // with the test.
    await waitFor(() => result.current.isSuccess);

    // We get the basket button for the first product item using the getByTestId function.
    const firstProductItemBasketButton = screen.getByTestId(`basket-button-1`);

    // We click the basket button for the first product item.
    fireEvent.press(firstProductItemBasketButton);

    // We check that the basket icon quantity text is present using the getByTestId function.
    expect(screen.getByTestId("basket-icon-quantity-text-1")).toBeTruthy();

    // We check that the products in the basket have been added correctly using the productStore.
    expect(productStore.current.productsInBasket).toHaveLength(1);
    expect(productStore.current.productsInBasket[0].quantity).toBe(1);
    expect(productStore.current.productsInBasket[0].product).toMatchObject(
      result.current.data![0]
    );

    // We click the basket button for the first product item again to remove it from the basket.
    fireEvent.press(firstProductItemBasketButton);

    // We check that the basket icon quantity text is not present.
    expect(
      screen.queryByTestId("basket-icon-quantity-text-1")
    ).not.toBeTruthy();

    // We check that the products in the basket have been removed correctly using the productStore.
    expect(productStore.current.productsInBasket).toHaveLength(0);
  });
});
গুছিয়ে আনা
শেষ কথা হলো, এই আর্টিকেলে আমরা React-Query আর Zustand লাইব্রেরি ব্যবহার করা React Native অ্যাপ্লিকেশনের কার্যকর টেস্টিং কৌশল দেখেছি, যে লাইব্রেরিগুলো আজকাল যেকোনো React/React Native অ্যাপ্লিকেশনে বেশ জনপ্রিয়। একটি সাধারণ store অ্যাপকে উদাহরণ হিসেবে ব্যবহার করে আর পূর্ণাঙ্গ ও বিস্তারিত উদাহরণ দিয়ে আমরা টেস্টিং প্রক্রিয়া এবং টেস্ট ইমপ্লিমেন্ট করে কীভাবে কোডের মান নিশ্চিত করা যায় তা দেখিয়েছি। নিচের লিংক থেকে নির্দ্বিধায় সম্পূর্ণ সোর্স কোড দেখে নিন। দিনটা ভালো কাটুক!
প্রকাশিত হয়েছে
এই আর্টিকেলটি এখানেও প্রকাশিত হয়েছে: