
أصبح React Native خيارًا شائعًا لبناء تطبيقات الهاتف بفضل دورة التطوير السريعة والتوافق مع المنصات المختلفة. وللاستفادة القصوى من التطوير بـ React Native، يلجأ المطورون غالبًا إلى مكتبات خارجية مثل React-Query وZustand للتعامل مع جلب البيانات وإدارة الحالة. توفر React-Query طريقة مرنة وفعّالة لجلب البيانات وتخزينها مؤقتًا (caching) وإدارتها، بينما تجعل Zustand إدارة الحالة بسيطة وقوية بنهجها البسيط.
في هذا المقال سنستكشف كيف نختبر بفعالية تطبيقات React Native التي تستخدم هاتين المكتبتين. سنستخدم تطبيق متجر بسيطًا كمثال، وسنقدم أمثلة شاملة ومفصلة لمساعدتك على فهم عملية الاختبار. وبنهاية المقال سيكون لديك فهم جيد لطريقة استخدام React-Query وZustand واختبارهما في تطبيقات React Native الخاصة بك.
1. إعداد البيئة
سنستخدم React Native بالإصدار 0.71.2 لإنشاء تطبيق المتجر، وReact-Query (Tanstack query) بالإصدار 3.39.3 وZustand بالإصدار 4.3.2 للتعامل مع جلب البيانات وإدارة الحالة. سأوفر الكود المصدري الكامل للتطبيق على GitHub، فإذا أردت البدء مباشرة ورؤيته وهو يعمل، يمكنك ذلك عبر الرابط المشارك في نهاية المقال. سيتيح لك هذا متابعة الأمثلة ورؤية الكود الكامل للتطبيق.
1.1 إعداد API المتجر
سنستخدم https://fakestoreapi.com كـ API لعرض تقنيات الاختبار الفعّالة في React Native. سيجلب تطبيق المتجر مجموعة من المنتجات من هذا الـ API ويعرض صفحة تفاصيل لكل منتج. ورغم أن FakeStoreProduct يوفر واجهات REST أخرى يمكننا الاستفادة منها، فإن ذلك سيزيد التعقيد ويبعدنا عن الهدف الأساسي لهذا المقال.
وللتواصل مع الـ API في أنحاء التطبيق، سننشئ نسخة (instance) من axios.
1.2 إعداد نسخة axios
import axios from "axios";

export const BASE_URL = "https://fakestoreapi.com";

export const api = axios.create({
  baseURL: BASE_URL,
});
الخطوة التالية هي إنشاء إعداد react-query الخاص بالـ API.
1.3 إنشاء key-factory لإدارة التخزين المؤقت للاستعلامات
ما هو الـ key-factory؟
ورغم أن بساطة تطبيقنا لا تتطلب بالضرورة استخدام التخزين المؤقت، فسنستفيد مع ذلك من ميزات التخزين المؤقت القوية في React-Query. لذا سننشئ key factory بسيطًا كما هو موضح أدناه.
export const productKeyFactory = {
  products: ["all-products"],
  productById: (id: number) => [...productKeyFactory.products, id],
} as const;
1.4 جلب المنتجات باستخدام react-query
import { AxiosError } from "axios";
import { useQuery, UseQueryOptions } from "react-query";
import { api } from "../axios.instance";
import { productKeyFactory } from "./key-factory";
import { Product } from "./types";

export const getAllProducts = async () => {
  return (await api.get<Array<Product>>("/products")).data;
};

export const useGetAllProducts = (
  options?: UseQueryOptions<
    Array<Product>,
    AxiosError,
    Array<Product>,
    readonly [string]
  >
) => {
  return useQuery({
    queryKey: [...productKeyFactory.products],
    queryFn: getAllProducts,
    ...options,
  });
};
أنشأنا أعلاه الـ hook المسمى useGetAllProducts لجلب المنتجات، مع استخدام مفتاح الاستعلام الذي أنشأناه في القسم السابق.
1.5 جلب تفاصيل المنتج باستخدام react-query
import { AxiosError } from "axios";
import { useQuery, UseQueryOptions } from "react-query";
import { api } from "../axios.instance";
import { productKeyFactory } from "./key-factory";
import { Product } from "./types";

export const getProductById = async (productId: number) => {
  return (await api.get<Product>(`/products/${productId}`)).data;
};

export const useGetProductById = (
  productId: number,
  options?: UseQueryOptions<
    Product,
    AxiosError,
    Product,
    readonly (string | number)[]
  >
) => {
  return useQuery({
    queryFn: () => getProductById(productId),
    queryKey: [...productKeyFactory.productById(productId)],
    ...options,
  });
};
يشبه الـ hook السابق تقريبًا، باستثناء أن الـ hook المسمى useGetProductById سيُستخدم هذه المرة لجلب تفاصيل المنتج بمعرّفه.
1.6 نوع المنتج
لا نتجاوز هذه الخطوة، فلنأخذ فكرة عن شكل كائن المنتج.
export interface Product {
  id: number;
  title: string;
  price: number;
  description: string;
  category: string;
  image: string;
  rating: Rating;
}

export interface Rating {
  rate: number;
  count: number;
}
1.7 هنا يأتي zustand: إدارة المنتجات في السلة
سيتضمن التطبيق ميزات أساسية تتيح للمستخدمين إضافة المنتجات إلى السلة أو إزالتها منها، وتعديل كمية كل منتج. وإضافة إلى ذلك، يستطيع المستخدمون إعادة ضبط السلة بالكامل. ستُدار هذه الوظائف باستخدام Zustand. وفيما يلي سنفحص طريقة تنفيذها.
import { create } from "zustand";
import { shallow } from "zustand/shallow";
import { Product } from "../api/product";

export type ProductInBasket = {
  product: Product;
  quantity: number;
};

export const updateProductQuantity = (
  productsInBasket: Array<ProductInBasket>,
  productId: number,
  updateType: "increase" | "decrease"
) => {
  return productsInBasket.map((productInBasket) => {
    if (productInBasket.product.id === productId) {
      return {
        ...productInBasket,
        quantity:
          updateType === "increase"
            ? productInBasket.quantity + 1
            : productInBasket.quantity - 1,
      };
    }
    return productInBasket;
  });
};

export const increaseProductQuantityInBasket = (
  productsInBasket: Array<ProductInBasket>,
  productId: number
) => {
  return updateProductQuantity(productsInBasket, productId, "increase");
};

export const decreaseProductQuantityInBasket = (
  productsInBasket: Array<ProductInBasket>,
  productId: number
) => {
  return updateProductQuantity(productsInBasket, productId, "decrease");
};

export interface ProductStore {
  productsInBasket: Array<ProductInBasket>;
  actions: {
    addProductToBasket: (val: Product) => void;
    removeProductFromBasket: (productId: number) => void;
    increaseProductQuantityInBasket: (productId: number) => void;
    decreaseProductQuantityInBasket: (productId: number) => void;
    resetAllProductsInBasket: () => void;
  };
}

export const useProductStore = create<ProductStore>((set, get) => ({
  productsInBasket: [],
  actions: {
    addProductToBasket: (product) =>
      set({
        productsInBasket: [
          ...get().productsInBasket,
          { product: product, quantity: 1 },
        ],
      }),
    removeProductFromBasket: (productId) =>
      set({
        productsInBasket: [
          ...get().productsInBasket.filter(
            (productInBasket) => productInBasket.product.id !== productId
          ),
        ],
      }),
    increaseProductQuantityInBasket: (productId) => {
      set({
        productsInBasket: increaseProductQuantityInBasket(
          get().productsInBasket,
          productId
        ),
      });
    },
    resetAllProductsInBasket: () => set({ productsInBasket: [] }),
    decreaseProductQuantityInBasket: (productId) => {
      set({
        productsInBasket: decreaseProductQuantityInBasket(
          get().productsInBasket,
          productId
        ),
      });
    },
  },
}));

export const useProductActions = () =>
  useProductStore((state) => state.actions);

export const useProductsInBasket = () =>
  useProductStore((state) => state.productsInBasket, shallow);
export const useProductsInBasketCount = () =>
  useProductStore((state) => state.productsInBasket.length);
export const useProductInBasketQuantityById = (productId: number | undefined) =>
  useProductStore(
    (state) =>
      state.productsInBasket.find(
        (productInBasket) => productInBasket.product.id === productId
      )?.quantity
  );
يعرّف الجزء الأول من الكود ثلاث دوال: updateProductQuantity وincreaseProductQuantityInBasket وdecreaseProductQuantityInBasket، وهي دوال مساعدة لتحديث كمية منتج في السلة. تأخذ الدالة updateProductQuantity كمدخلات مصفوفة من الكائنات تقابل productsInBasket، ومعرّف منتج، ونوع تحديث (زيادة أو نقصان)، وتعيد مصفوفة productsInBasket جديدة بالكمية المحدّثة للمنتج المعني.
تعرّف الواجهة ProductStore بنية مخزن المنتجات (store). وتحتوي على خاصيتين:
-
productsInBasket مصفوفة من كائنات ProductInBasket تمثل المنتجات الموجودة في السلة.
-
actions كائن يحتوي على دوال لإدارة المنتجات في السلة، منها إضافة منتج، وإزالة منتج، وزيادة كميته أو إنقاصها، وإعادة ضبط السلة.
يُنشأ الـ hook المسمى useProductStore باستخدام الدالة create من Zustand. ويعيد مخزن المنتجات مع حالته وإجراءاته.
أما بقية الـ hooks، وهي useProductActions وuseProductsInBasket وuseProductsInBasketCount وuseProductInBasketQuantityById، فهي selectors مشتقة من الـ hook المسمى useProductStore. وتتيح الوصول إلى أجزاء محددة من مخزن المنتجات، مثل الإجراءات أو عدد المنتجات المفضلة.
من ناحية أخرى، تجدر الإشارة إلى أننا استخدمنا shallow من zustand في useProductsInBasket. والسبب أن مصفوفة الكائنات التي سيعيدها useProductsInBasket ستسبب إعادة عرض (rerender) لأنها ليست من الأنواع البدائية (primitive types)، لذا نخبر zustand ببساطة أننا نريد مقارنة الكائن بشكل سطحي عبر تمرير دالة المساواة السطحية (shallow).
1.8 تثبيت الحزم اللازمة للاختبار
الآن يمكننا الانتقال إلى الجزء الذي يهمنا أكثر: الاختبار. سنستخدم الحزم التالية:
للإيجاز وتجنب إطالة المقال، سنتجاوز بعض خطوات إعداد بيئة الاختبار مثل jest.config.js وts-jest.
لا تتردد في الاطلاع على الطريقة التي أعددنا بها بيئة الاختبار في النهاية عبر رابط الكود المصدري الكامل المتاح في نهاية المقال.
1.9 محاكاة بيانات الـ API باستخدام MSW
لكي نختبر تطبيقنا مع react-query بفعالية، نحتاج إلى محاكاة (mock) الـ API. ولتحقيق ذلك سنستخدم mock service worker (MSW).
import { rest } from "msw";
import { setupServer } from "msw/node";
import { BASE_URL } from "../../src/api/axios.instance";
import {
  GET_ALL_PRODUCTS_MOCK_RESPONSE,
  GET_PRODUCT_BY_ID_MOCK_RESPONSE,
} from "./mock-data";

const getAllProductsUrl = BASE_URL + "/products";
const getProductByIdUrl = BASE_URL + `/products/:id`;

const getAllProductsHandler = rest.get(getAllProductsUrl, (_req, res, ctx) => {
  return res(ctx.status(200), ctx.json(GET_ALL_PRODUCTS_MOCK_RESPONSE));
});

const getProductByIdHandler = rest.get(getProductByIdUrl, (_req, res, ctx) => {
  return res(ctx.status(200), ctx.json(GET_PRODUCT_BY_ID_MOCK_RESPONSE));
});

const handlers = [getAllProductsHandler, getProductByIdHandler];

export const mswServer = setupServer(...handlers);

const getAllProductsFailedHandler = rest.get(
  getAllProductsUrl,
  (_req, res, ctx) => {
    return res(ctx.status(500));
  }
);

const getProductByIdFailedHandler = rest.get(
  getProductByIdUrl,
  (_req, res, ctx) => {
    return res(ctx.status(500));
  }
);

export const setupGetAllProductsFailedHandler = () =>
  mswServer.use(getAllProductsFailedHandler);

export const setupGetProductByIdFailedHandler = () =>
  mswServer.use(getProductByIdFailedHandler);
في الكود أعلاه نستورد الوحدات اللازمة ونُعدّ معالجات MSW. ننشئ نقطتي نهاية (endpoints) وهميتين، واحدة لجلب كل المنتجات والأخرى لجلب منتج بمعرّفه، وكلتاهما تعيد استجابة ناجحة. ولضمان اختبار شامل، ننشئ أيضًا معالجات فاشلة لهاتين النقطتين لمحاكاة سيناريوهات الفشل واختبارها.
ولإكمال إعداد المحاكاة أعلاه، نحتاج إلى استخدام الكائن mswServer في ملف jest.setup.js. نريد ببساطة تهيئة mswServer قبل أي حالات اختبار، وإعادة ضبط المعالجات بعد كل حالة اختبار، وفي النهاية إيقافه.
import "react-native-gesture-handler/jestSetup";
import { mswServer } from "./__mocks__/msw/handlers";

jest.useFakeTimers();

// https://mswjs.io/docs/getting-started/integrate/node#setup

// Establish API mocking before all tests.
beforeAll(() => mswServer.listen());
// Reset any request handlers that we may add during the tests,
// so they don't affect other tests.
afterEach(() => mswServer.resetHandlers());
// Clean up after the tests are finished.
afterAll(() => mswServer.close());

// Silence the warning: Animated: `useNativeDriver` is not supported because the native animated module is missing
jest.mock("react-native/Libraries/Animated/NativeAnimatedHelper");
الآن أصبحنا نحاكي الـ API لنستخدمه في الاختبارات. لكننا لم ننتهِ بعد. نحتاج أيضًا إلى إعداد الاختبار لـ zustand باستخدام التوثيق الذي يوفرونه. سيتيح لنا هذا إعادة ضبط الحالة بين الاختبارات عند استخدام zustand في حالات الاختبار.
1.10 إعداد zustand للاختبار
// https://docs.pmnd.rs/zustand/guides/testing#resetting-state-between-tests-in-react-dom
const { create: actualCreate } = jest.requireActual("zustand"); // if using jest
import { act } from "@testing-library/react-native";

// a variable to hold reset functions for all stores declared in the app
const storeResetFns = new Set();

// when creating a store, we get its initial state, create a reset function and add it in the set
export const create = (createState) => {
  const store = actualCreate(createState);
  const initialState = store.getState();
  storeResetFns.add(() => store.setState(initialState, true));
  return store;
};

// Reset all stores after each test run
beforeEach(() => {
  act(() => storeResetFns.forEach((resetFn) => resetFn()));
});
الأمر الحاسم هنا هو وضع الملف أعلاه في المجلد الصحيح حسب بيئة الاختبار. وبما أننا نستخدم jest، فيجب أن نضع هذا الملف في mocks/zustand.js كما هو موضح في التوثيق.
ربما تشعر الآن بالإرهاق من إعداد بيئة (الاختبار)، لكنني كنت بحاجة إلى تغطيتها على أي حال، لأنها الهيكل العظمي لبيئتنا.
بعد ذلك، لننتقل مباشرة إلى القسم الذي ننشئ فيه الشاشة الخاصة بعرض المنتجات.
2. نظرة عامة على شاشة قائمة المنتجات
كما ذكرنا من قبل، ستكون لدينا شاشة لعرض المنتجات. لنرَ الكود الكامل لشاشة قائمة المنتجات أدناه:
import { DefaultTheme } from "@react-navigation/native";
import * as React from "react";
import {
  FlatList,
  ListRenderItemInfo,
  RefreshControl,
  StyleSheet,
  Text,
  View,
} from "react-native";
import { SafeAreaView } from "react-native-safe-area-context";
import { Product, useGetAllProducts } from "../api/product";
import ProductListCard from "../components/product-list-card";
import ScreenLoading from "../components/screen-loading";
import Spacing from "../components/spacing";
import useRefreshByUser from "../hooks/useRefreshByUser";
import { RouteNames } from "../navigation/route-names";
import { ProductListScreenProps } from "../navigation/types";
import { useProductActions, useProductsInBasket } from "../store/product";
import { COMMON_STYLES } from "../theme/common-styles";

type Props = ProductListScreenProps;

const ProductListScreen: React.FC<Props> = ({ navigation }) => {
  const { data, isLoading, refetch, isError, isSuccess } = useGetAllProducts();

  const { isRefetchingByUser, refetchByUser } = useRefreshByUser(refetch);

  const { addProductToBasket, removeProductFromBasket } = useProductActions();
  const productsInBasket = useProductsInBasket();

  const onAddToBasketPress = React.useCallback(
    (product: Product) => () => {
      if (
        productsInBasket.find(
          (productInBasket) => productInBasket.product.id === product.id
        )
      ) {
        removeProductFromBasket(product.id);
      } else {
        addProductToBasket(product);
      }
    },
    [addProductToBasket, productsInBasket, removeProductFromBasket]
  );

  const onProductCardPress = React.useCallback(
    (productId: number) => () => {
      navigation.navigate(RouteNames.productDetail, { id: productId });
    },
    [navigation]
  );

  const renderItemSeparator = () => (
    <Spacing
      backgroundColor={DefaultTheme.colors.background}
      height={COMMON_STYLES.screenPadding}
    />
  );

  const getKeyExtractor = (item: Product) => item.id.toString();

  const renderItem = ({ item: product }: ListRenderItemInfo<Product>) => {
    return (
      <ProductListCard
        {...product}
        testID={`product-list-card-${product.id}`}
        basketButtonTestID={`basket-button-${product.id}`}
        isInBasket={
          typeof productsInBasket.find(
            (productInBasket) => productInBasket.product.id === product.id
          ) !== "undefined"
        }
        onAddToBasketPress={onAddToBasketPress(product)}
        onPress={onProductCardPress(product.id)}
      />
    );
  };

  if (isLoading) {
    return <ScreenLoading />;
  }

  return (
    <SafeAreaView style={COMMON_STYLES.flex} edges={["bottom"]}>
      {isError && (
        <View style={COMMON_STYLES.flexCenter}>
          <Text>An error occurred</Text>
        </View>
      )}

      {isSuccess && (
        <FlatList<Product>
          data={data}
          testID="product-list-flat-list"
          refreshControl={
            <RefreshControl
              refreshing={isRefetchingByUser}
              onRefresh={refetchByUser}
            />
          }
          renderItem={renderItem}
          numColumns={2}
          ItemSeparatorComponent={renderItemSeparator}
          columnWrapperStyle={styles.columnWrapper}
          contentContainerStyle={styles.contentContainerStyle}
          showsVerticalScrollIndicator={false}
          keyExtractor={getKeyExtractor}
          style={COMMON_STYLES.flex}
        />
      )}
    </SafeAreaView>
  );
};

export default ProductListScreen;

const styles = StyleSheet.create({
  contentContainerStyle: {
    flexGrow: 1,
    padding: COMMON_STYLES.screenPadding,
  },
  columnWrapper: {
    justifyContent: "space-between",
  },
});
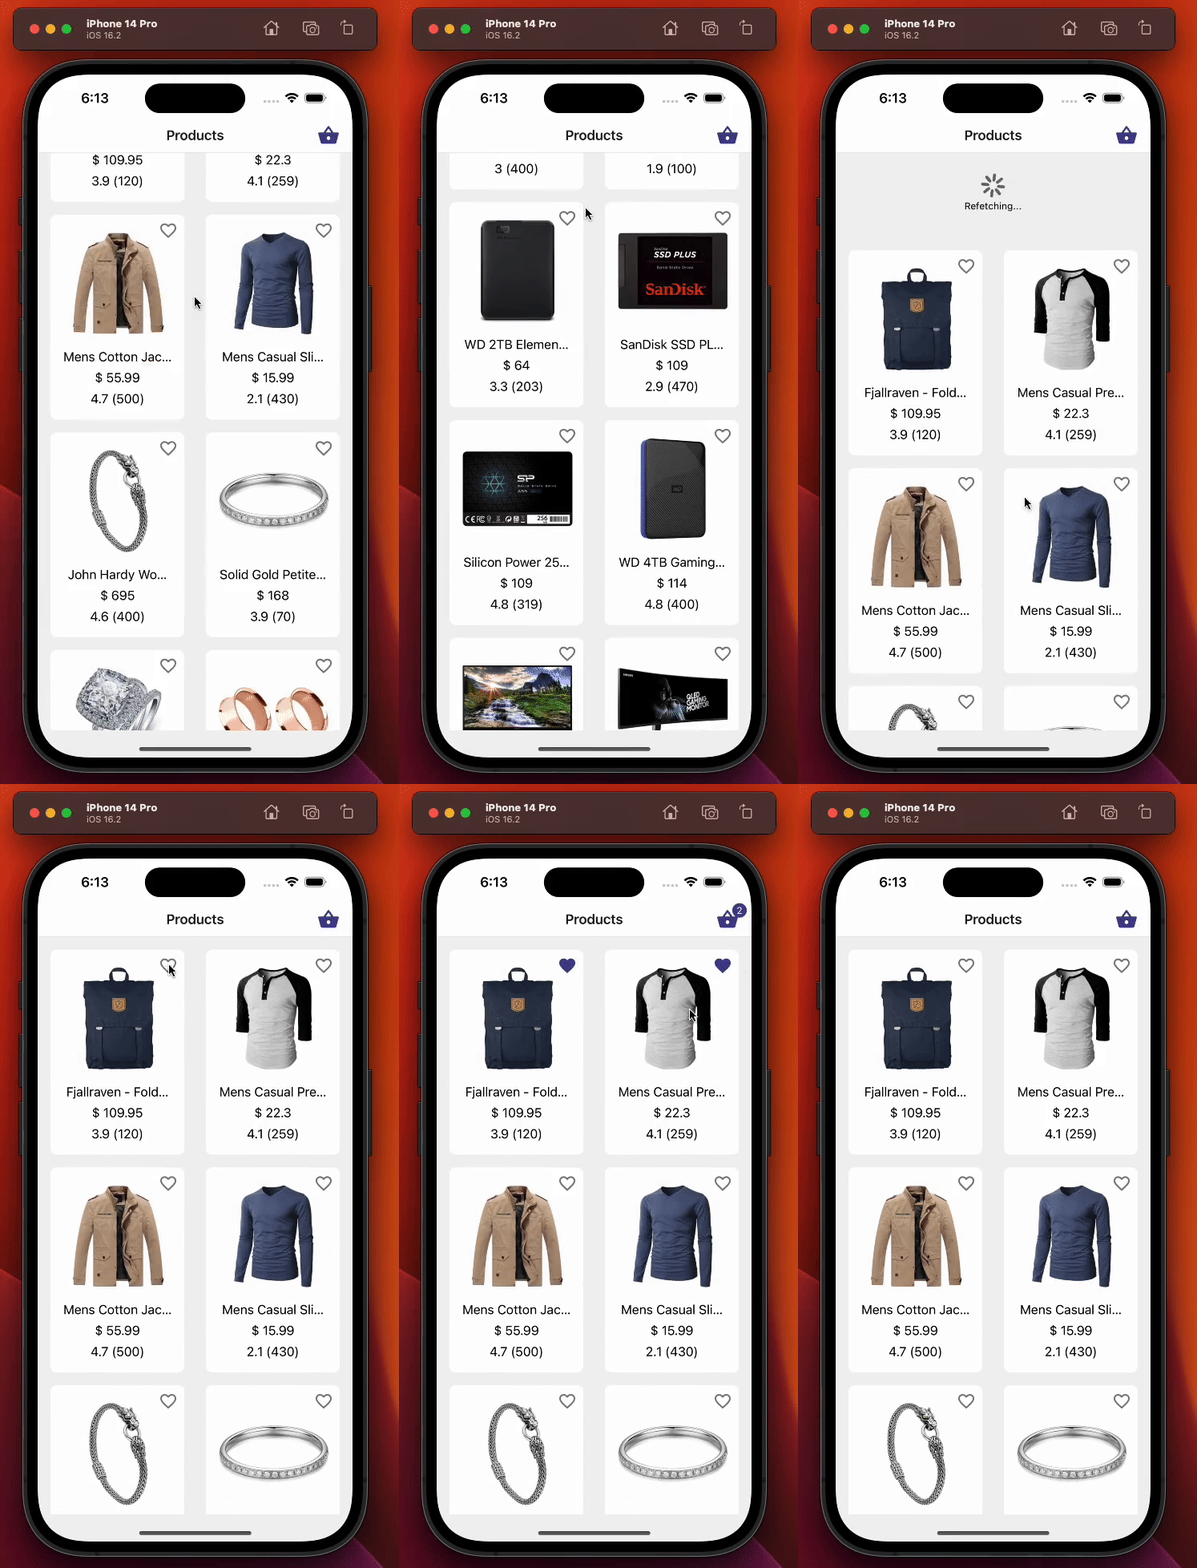
هذه الشاشة مسؤولة عما يلي:
-
عرض المنتجات باستخدام الـ hook المخصص في react query المسمى useGetAllProducts، الذي أنشأناه في قسم 1.4 جلب المنتجات باستخدام react-query.
-
السماح للمستخدمين بإضافة المنتجات إلى السلة أو إزالتها منها باستخدام الـ hook المخصص في zustand المسمى useProductActions، الذي تناولناه أيضًا في قسم 1.7 هنا يأتي zustand: إدارة المنتجات في السلة.
-
إعادة جلب المنتجات عبر السحب للتحديث (pull-to-refresh).
-
تحديث نص الكمية المعروض على أيقونة السلة في يمين الترويسة.
وفيما يلي عرض توضيحي لشاشة قائمة المنتجات:
2.1 اختبار شاشة قائمة المنتجات
في هذا القسم سنختبر شاشة قائمة المنتجات. وحالات الاختبار الأولى التي سننفذها هي:
-
في البداية يجب أن يظهر مؤشر التحميل، رغم أننا نحاكي البيانات. فالعلامة المنطقية isLoading في react-query ستكون قيمتها true لفترة قصيرة. وبعد جلب البيانات تصبح isLoading قيمتها false، ولن يظهر مؤشر التحميل.
-
يجب أن تظهر قائمة المنتجات بدقة بعد جلب البيانات. وسنستخدم الـ prop المسمى testID في المكوّن ProductListCard للتحقق من هذه الحالة.
-
في حال فشل استعلام جلب كل المنتجات، يجب أن تعرض الشاشة رسالة خطأ. وسنستخدم الدالة المساعدة setupGetAllProductsFailedHandler التي أنشأناها في 1.9 محاكاة بيانات الـ API باستخدام MSW.
2.1.1 حالة اختبار: يجب أن يظهر مؤشر التحميل في البداية
import { renderHook } from "@testing-library/react-hooks";
import { render, screen } from "@testing-library/react-native";
import React from "react";
import { useGetAllProducts } from "../../api/product";
import { createReactQueryWrapper } from "../../utils/testing";
import ProductListScreen from "../product-list";

const navigateMock = jest.fn();
const navigation = { navigate: navigateMock } as any;
const route = jest.fn() as any;

const component = <ProductListScreen navigation={navigation} route={route} />;

describe("Product list screen", () => {
  it("should display loading indicator initially", async () => {
    // We render the component and expect to see a loading indicator
    render(component, { wrapper: createReactQueryWrapper });
    expect(screen.queryByTestId(`screen-loader`)).toBeTruthy();

    // We render the product list using useGetAllProducts hook and wait until the products are loaded
    const { result, waitFor } = renderHook(() => useGetAllProducts(), {
      wrapper: createReactQueryWrapper,
    });
    await waitFor(() => result.current.isSuccess);

    // We expect the loading indicator to disappear after the products are loaded
    expect(screen.queryByTestId(`screen-loader`)).not.toBeTruthy();
  });
});
في أعلى الملف استوردنا الوحدات اللازمة لتشغيل الاختبارات. ثم أنشأنا متغيرًا اسمه component لنخزن فيه شاشة قائمة المنتجات، حتى نعيد استخدام هذا المتغير في كل حالات الاختبار. وفوق ذلك، بما أنها شاشة، وقد عرّفنا props الشاشة في قسم 2. نظرة عامة على شاشة قائمة المنتجات، ففي السطر 22 نحتاج أيضًا إلى تقديم props الشاشة المطلوبة: navigation وroute. وسنعود في حالات الاختبار القادمة إلى سبب تفكيكنا (destructure) للكائن navigation أعلاه.
مراجعة قصيرة للمصطلحات التي نحتاج إلى الانتباه إليها لفهم حالات الاختبار:
-
render: تعرض عنصر React المعطى بعمق وتعيد دوالًا مساعدة للاستعلام عن بنية المكونات الناتجة.
-
screen: يحتفظ بقيمة آخر استدعاء لـ render لتسهيل الوصول إلى دوال الاستعلام وغيرها من الدوال التي تعيدها render.
-
renderHook: تعرض مكوّن اختبار يستدعي الـ callback المقدّم، بما في ذلك أي hooks يستدعيها، في كل مرة يُعرض فيها.
بما أن الهدف الأساسي من هذا المقال هو تقديم إرشادات حول طريقة الاختبار، وليس تقديم مقدمة عن مكتبات الاختبار ودوالها، فسنتجاوز الدخول في تفاصيلها العميقة. وعلى أي حال، سنرى أمثلة كافية على استخدامها في أنحاء المقال.
تتحقق حالة الاختبار أعلاه مما إذا كان مكوّن مؤشر تحميل الشاشة يظهر في البداية على الشاشة. تعرض الدالة render المكوّن ProductListScreen ملفوفًا بالدالة createReactQueryWrapper، وهي دالة مساعدة بسيطة تُستخدم لإنشاء QueryClientProvider. وتتحقق الدالة screen.queryByTestId() مما إذا كان مؤشر تحميل الشاشة ظاهرًا.
تُستخدم الدالة renderHook لاختبار الـ hook المسمى useGetAllProducts، الذي يستخدمه المكوّن ProductListScreen لجلب بيانات المنتجات. ويُمرَّر الخيار wrapper إلى الدالة renderHook ليلف الـ hook المسمى useGetAllProducts بالدالة createReactQueryWrapper. ويحتوي المتغير result على القيمة التي يعيدها الـ hook المسمى useGetAllProducts. وفي الوقت نفسه تنتظر الدالة waitFor حتى تصبح الخاصية isSuccess في الكائن result قيمتها true، ما يعني أن بيانات المنتجات جُلبت بنجاح.
ويتحقق الجزء الثاني من أن مكوّن مؤشر تحميل الشاشة لم يعد ظاهرًا بعد جلب بيانات المنتجات بنجاح.
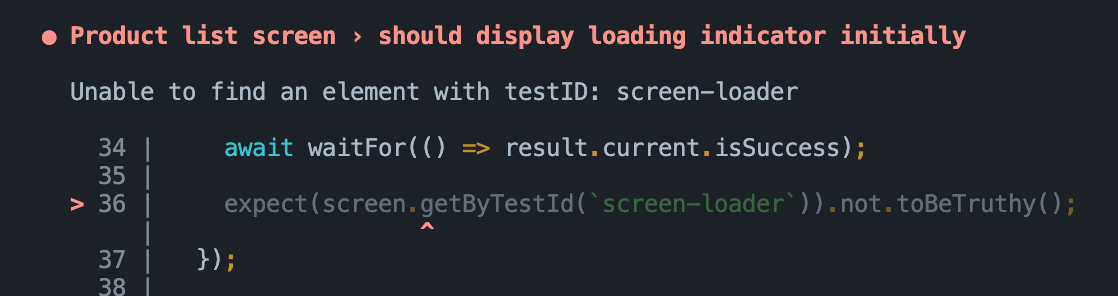
السبب في استخدامنا queryByTestId بدل getByTestId أننا نعرف أن مكوّن مؤشر تحميل الشاشة لن يكون ظاهرًا بعد جلب البيانات، لذا فإن استخدام getByTestId سيرمي خطأ.
وقد يكون الخطأ الذي سنواجهه عند استخدام getByTestId كالتالي:
2.1.2 حالة اختبار: يجب أن تُعرض بيانات قائمة المنتجات بشكل صحيح
import { renderHook } from "@testing-library/react-hooks";
import { render, screen } from "@testing-library/react-native";
import React from "react";
import { useGetAllProducts } from "../../api/product";
import { createReactQueryWrapper } from "../../utils/testing";
import ProductListScreen from "../product-list";

const navigateMock = jest.fn();
const navigation = { navigate: navigateMock } as any;
const route = jest.fn() as any;

const component = <ProductListScreen navigation={navigation} route={route} />;

describe("Product list screen", () => {
  it("should display product list data correctly", async () => {
    // Render the component and wait for it to load
    render(component, { wrapper: createReactQueryWrapper });

    // Check that no product card is rendered before fetching data
    expect(screen.queryByTestId(`product-list-card-1`)).not.toBeTruthy();

    // Fetch the product data
    const { result, waitFor } = renderHook(() => useGetAllProducts(), {
      wrapper: createReactQueryWrapper,
    });

    // Wait for the data to be fetched successfully
    await waitFor(() => result.current.isSuccess);

    // Check that each product card is rendered for each product in the data
    for (const { id } of result.current.data!) {
      expect(screen.queryByTestId(`product-list-card-${id}`)).toBeTruthy();
    }
  });
});
يختبر هذا الكود ما إذا كانت شاشة قائمة المنتجات تعرض بيانات المنتجات المجلوبة بشكل صحيح.
ومرة أخرى ننتظر حتى تُجلب البيانات بنجاح، ثم نتأكد من أن بيانات قائمة المنتجات معروضة بشكل صحيح عبر المرور على البيانات المجلوبة، وتوقّع وجود بطاقة منتج بالقيمة product-list-card-${id} للخاصية testID لكل منتج في البيانات. تُولَّد الخاصية id ديناميكيًا اعتمادًا على معرّف المنتج. وإذا فشل الاختبار، فهذا يعني أن عناصر قائمة المنتجات لا تعرض بيانات المنتجات بشكل صحيح.
لاحظ كيف كنا نستخدم الدالة renderItem لعرض عناصر القائمة أدناه. نمر على product.id وندمجه مع النص product-list-card لتوليد testID ديناميكي للمكوّن ProductListCard. وبهذه الطريقة نستطيع اختبار كل المنتجات مع الـ prop المسمى testID الخاص بكل منها.
const renderItem = ({ item: product }: ListRenderItemInfo<Product>) => {
  return (
    <ProductListCard
      {...product}
      testID={`product-list-card-${product.id}`}
      basketButtonTestID={`basket-button-${product.id}`}
      isInBasket={
        typeof productsInBasket.find(
          (productInBasket) => productInBasket.product.id === product.id
        ) !== "undefined"
      }
      onAddToBasketPress={onAddToBasketPress(product)}
      onPress={onProductCardPress(product.id)}
    />
  );
};
2.1.3 حالة اختبار: يجب أن يظهر نص الخطأ في حال فشل استعلام جلب كل المنتجات
في حالة الاختبار هذه نختبر السيناريو الذي يفشل فيه استدعاء الـ API لجلب كل المنتجات.
import { renderHook } from "@testing-library/react-hooks";
import { render, screen } from "@testing-library/react-native";
import React from "react";
import { setupGetAllProductsFailedHandler } from "../../../__mocks__/msw/handlers";
import { useGetAllProducts } from "../../api/product";
import { createReactQueryWrapper } from "../../utils/testing";
import ProductListScreen from "../product-list";

const navigateMock = jest.fn();
const navigation = { navigate: navigateMock } as any;
const route = jest.fn() as any;

const component = <ProductListScreen navigation={navigation} route={route} />;

describe("Product list screen", () => {
  it("should display error text in case get all products query fails", async () => {
    // Set up the mock handler for GET requests to the /products endpoint that returns an error response
    setupGetAllProductsFailedHandler();

    // Render the ProductListScreen component wrapped in the React Query wrapper
    render(component, { wrapper: createReactQueryWrapper });

    // Set up a mock React hook that calls the useGetAllProducts hook from the API module
    const { result, waitFor } = renderHook(() => useGetAllProducts(), {
      wrapper: createReactQueryWrapper,
    });

    // Wait for the useGetAllProducts hook to throw an error
    await waitFor(() => result.current.isError);

    // Assert that the "An error occurred" text is displayed on the screen
    expect(screen.getByText(`An error occurred`)).toBeTruthy();
  });
});
لمحاكاة فشل الـ API نستخدم الدالة setupGetAllProductsFailedHandler من mock server worker (msw)، التي نفذناها في قسم 1.9 محاكاة بيانات الـ API باستخدام MSW في السطر 38. ثم نعرض المكوّن ProductListScreen باستخدام الدالة render، ونستدعي الـ hook المسمى useGetAllProducts الذي يجلب البيانات باستخدام الدالة renderHook.
نستخدم الدالة waitFor من @testing-library/react-hooks لننتظر حتى تصبح الخاصية isError في الكائن result.current قيمتها true. وهذا يضمن أن الـ hook أنهى التنفيذ وأن استدعاء الـ API فشل. وأخيرًا نتأكد من أن رسالة الخطأ "An error occurred"، التي يمكنك التحقق منها بالنظر في الكود المصدري لشاشة قائمة المنتجات، ستظهر على الشاشة، وذلك بالتحقق من وجود النص باستخدام الدالة getByText من @testing-library/react-native.
2.1.4 حالة اختبار: يجب استدعاء إجراء التنقل عند الضغط على أول منتج
سنختبر مقتطف الكود التالي، وهو مأخوذ فعلًا من شاشة قائمة المنتجات. هذا الكود مسؤول عن التعامل مع ضغط المستخدم على أي بطاقة منتج في القائمة.
const onProductCardPress = React.useCallback(
  (productId: number) => () => {
    navigation.navigate(RouteNames.productDetail, { id: productId });
  },
  [navigation]
);

const renderItem = ({ item: product }: ListRenderItemInfo<Product>) => {
  return (
    <ProductListCard
      {...product}
      testID={`product-list-card-${product.id}`}
      basketButtonTestID={`basket-button-${product.id}`}
      isInBasket={
        typeof productsInBasket.find(
          (productInBasket) => productInBasket.product.id === product.id
        ) !== "undefined"
      }
      onAddToBasketPress={onAddToBasketPress(product)}
      onPress={onProductCardPress(product.id)}
    />
  );
};
لنرَ أدناه كيف نتعامل مع اختباره:
import { renderHook } from "@testing-library/react-hooks";
import { fireEvent, render, screen } from "@testing-library/react-native";
import React from "react";
import { useGetAllProducts } from "../../api/product";
import { RouteNames } from "../../navigation/route-names";
import { createReactQueryWrapper } from "../../utils/testing";
import ProductListScreen from "../product-list";

const navigateMock = jest.fn();
const navigation = { navigate: navigateMock } as any;
const route = jest.fn() as any;

const component = <ProductListScreen navigation={navigation} route={route} />;

describe("Product list screen", () => {
  it("should call navigation action on pressing the first product item", async () => {
    // render ProductListScreen component with createReactQueryWrapper as a wrapper
    render(component, { wrapper: createReactQueryWrapper });

    // render hook for useGetAllProducts with createReactQueryWrapper as a wrapper
    const { result, waitFor } = renderHook(() => useGetAllProducts(), {
      wrapper: createReactQueryWrapper,
    });

    // wait for useGetAllProducts to succeed
    await waitFor(() => result.current.isSuccess);

    // find first product item and simulate a press event on it
    const firstProductItem = screen.getByTestId(`product-list-card-1`);
    fireEvent.press(firstProductItem);

    // assert that navigation action was called with correct route name and params
    expect(navigateMock).toHaveBeenCalledWith(RouteNames.productDetail, {
      id: 1,
    });
  });
});
في مقتطف الاختبار هذا نختبر ما إذا كان إجراء التنقل يُستدعى عند الضغط على منتج. أولًا نعرض المكوّن ProductListScreen وننتظر حتى تُجلب البيانات بنجاح كما في حالات الاختبار السابقة. بعد ذلك نسترجع أول منتج من القائمة ونحاكي حدث ضغط عليه باستخدام fireEvent.press. وأخيرًا نتوقع أن تكون الدالة navigate في الكائن navigation قد استُدعيت بالمعاملين المتوقعين RouteName وproductId.
2.1.5 حالة اختبار: يجب إضافة المنتج وإزالته بشكل صحيح عند الضغط على أيقونة السلة الخاصة به
تختبر حالة الاختبار أدناه السيناريو الذي يضيف فيه المستخدم منتجًا إلى السلة ويزيله منها بالضغط على أيقونة السلة في بطاقة المنتج على شاشة قائمة المنتجات.
import { NavigationContainer } from "@react-navigation/native";
import { renderHook } from "@testing-library/react-hooks";
import { fireEvent, render, screen } from "@testing-library/react-native";
import React from "react";
import { useGetAllProducts } from "../../api/product";
import ProductStack from "../../navigation/product-stack";
import { useProductStore } from "../../store/product";
import { createReactQueryWrapper } from "../../utils/testing";

// We render the whole app stack instead of rendering just the screen
// because we need access to the react-navigation's header, which wouldn't
// be possible if we just rendered the screen.
const rootAppComponent = (
  <NavigationContainer>
    <ProductStack />
  </NavigationContainer>
);

describe("Product list screen", () => {
  it("should add/remove product item correctly on pressing product items basket icon", async () => {
    // We render the entire app stack and use the createReactQueryWrapper as a
    // wrapper for the render function to set up the React Query Provider.
    render(rootAppComponent, {
      wrapper: createReactQueryWrapper,
    });

    // We use the renderHook function to invoke the useGetAllProducts hook which
    // fetches the data.
    const { result, waitFor } = renderHook(() => useGetAllProducts(), {
      wrapper: createReactQueryWrapper,
    });

    // We use the renderHook function to get access to the useProductStore hook
    // which we will use to check that the products in the basket were added/removed correctly.
    const { result: productStore } = renderHook(() => useProductStore(), {
      wrapper: createReactQueryWrapper,
    });

    // We wait for the useGetAllProducts hook to complete fetching the data before proceeding
    // with the test.
    await waitFor(() => result.current.isSuccess);

    // We get the basket button for the first product item using the getByTestId function.
    const firstProductItemBasketButton = screen.getByTestId(`basket-button-1`);

    // We click the basket button for the first product item.
    fireEvent.press(firstProductItemBasketButton);

    // We check that the basket icon quantity text is present using the getByTestId function.
    expect(screen.getByTestId("basket-icon-quantity-text-1")).toBeTruthy();

    // We check that the products in the basket have been added correctly using the productStore.
    expect(productStore.current.productsInBasket).toHaveLength(1);
    expect(productStore.current.productsInBasket[0].quantity).toBe(1);
    expect(productStore.current.productsInBasket[0].product).toMatchObject(
      result.current.data![0]
    );

    // We click the basket button for the first product item again to remove it from the basket.
    fireEvent.press(firstProductItemBasketButton);

    // We check that the basket icon quantity text is not present.
    expect(
      screen.queryByTestId("basket-icon-quantity-text-1")
    ).not.toBeTruthy();

    // We check that the products in the basket have been removed correctly using the productStore.
    expect(productStore.current.productsInBasket).toHaveLength(0);
  });
});
لاختبار وظيفة أيقونة السلة في الترويسة، نحتاج إلى عرض الـ ProductStack كاملًا إضافة إلى ProductListScreen. والسبب أننا نحتاج إلى الوصول إلى ترويسة شاشة قائمة المنتجات للحصول على أيقونة السلة بمعرّف الاختبار الخاص بها. وهذا يتطلب أن يكون ProductStack كاملًا معروضًا، ومعه NavigationContainer.
بعد الانتهاء من جلب المنتجات بنجاح، يستخدم الاختبار fireEvent.press لمحاكاة الضغط على أيقونة السلة في أول منتج، فيُضاف المنتج إلى السلة. ثم نتحقق من أن أيقونة السلة تعرض الكمية الصحيحة، وأن المنتج أضيف إلى المصفوفة productsInBasket في مخزن المنتجات بالكمية الصحيحة وكائن المنتج الصحيح.
بعد ذلك نحاكي الضغط على أيقونة السلة مرة أخرى لإزالة المنتج من السلة، ونتحقق من أن أيقونة السلة لم تعد تعرض الكمية، وأن المصفوفة productsInBasket في مخزن المنتجات أصبحت فارغة.
باختصار، تختبر حالة الاختبار هذه وظيفة إضافة منتج إلى السلة وإزالته منها، وكذلك تعديل الكميات، بالضغط على أيقونة السلة في بطاقة المنتج على شاشة قائمة المنتجات، وتؤكد أن مخزن المنتجات يدير المنتجات وكمياتها في السلة بشكل صحيح.
2.1.6 مسار الاختبار الكامل لشاشة قائمة المنتجات
مسار الاختبار الكامل لشاشة قائمة المنتجات كالتالي:
import { NavigationContainer } from "@react-navigation/native";
import { renderHook } from "@testing-library/react-hooks";
import { fireEvent, render, screen } from "@testing-library/react-native";
import React from "react";
import { setupGetAllProductsFailedHandler } from "../../../__mocks__/msw/handlers";
import { useGetAllProducts } from "../../api/product";
import ProductStack from "../../navigation/product-stack";
import { RouteNames } from "../../navigation/route-names";
import { useProductStore } from "../../store/product";
import { createReactQueryWrapper } from "../../utils/testing";
import ProductListScreen from "../product-list";

// We render the whole app stack instead of rendering just the screen
// because we need access to the react-navigation's header, which wouldn't
// be possible if we just rendered the screen.
const rootAppComponent = (
  <NavigationContainer>
    <ProductStack />
  </NavigationContainer>
);
const navigateMock = jest.fn();
const navigation = { navigate: navigateMock } as any;
const route = jest.fn() as any;

const component = <ProductListScreen navigation={navigation} route={route} />;

describe("Product list screen", () => {
  it("should display loading indicator initially", async () => {
    // We render the component and expect to see a loading indicator
    render(component, { wrapper: createReactQueryWrapper });
    expect(screen.queryByTestId(`screen-loader`)).toBeTruthy();

    // We render the product list using useGetAllProducts hook and wait until the products are loaded
    const { result, waitFor } = renderHook(() => useGetAllProducts(), {
      wrapper: createReactQueryWrapper,
    });
    await waitFor(() => result.current.isSuccess);

    // We expect the loading indicator to disappear after the products are loaded
    expect(screen.queryByTestId(`screen-loader`)).not.toBeTruthy();
  });

  it("should display product list data correctly", async () => {
    // Render the component and wait for it to load
    render(component, { wrapper: createReactQueryWrapper });

    // Check that no product card is rendered before fetching data
    expect(screen.queryByTestId(`product-list-card-1`)).not.toBeTruthy();

    // Fetch the product data
    const { result, waitFor } = renderHook(() => useGetAllProducts(), {
      wrapper: createReactQueryWrapper,
    });

    // Wait for the data to be fetched successfully
    await waitFor(() => result.current.isSuccess);

    // Check that each product card is rendered for each product in the data
    for (const { id } of result.current.data!) {
      expect(screen.queryByTestId(`product-list-card-${id}`)).toBeTruthy();
    }
  });

  it("should display error text in case get all products query fails", async () => {
    // Set up the mock handler for GET requests to the /products endpoint that returns an error response
    setupGetAllProductsFailedHandler();

    // Render the ProductListScreen component wrapped in the React Query wrapper
    render(component, { wrapper: createReactQueryWrapper });

    // Set up a mock React hook that calls the useGetAllProducts hook from the API module
    const { result, waitFor } = renderHook(() => useGetAllProducts(), {
      wrapper: createReactQueryWrapper,
    });

    // Wait for the useGetAllProducts hook to throw an error
    await waitFor(() => result.current.isError);

    // Assert that the "An error occurred" text is displayed on the screen
    expect(screen.getByText(`An error occurred`)).toBeTruthy();
  });

  it("should call navigation action on pressing the first product item", async () => {
    // Render the ProductListScreen component along with react-query wrapper
    render(component, { wrapper: createReactQueryWrapper });

    // Render the useGetAllProducts hook with react-query wrapper to fetch data
    const { result, waitFor } = renderHook(() => useGetAllProducts(), {
      wrapper: createReactQueryWrapper,
    });

    // Wait for the data to be fetched
    await waitFor(() => result.current.isSuccess);

    // Find the first product card in the list and simulate a press event on it
    const firstProductItem = screen.getByTestId(`product-list-card-1`);
    fireEvent.press(firstProductItem);

    // Expect that the navigation function is called with the correct route name and params
    expect(navigateMock).toHaveBeenCalledWith(RouteNames.productDetail, {
      id: 1,
    });
  });

  it("should add/remove product item correctly on pressing product items basket icon", async () => {
    // We render the entire app stack and use the createReactQueryWrapper as a
    // wrapper for the render function to set up the React Query Provider.
    render(rootAppComponent, {
      wrapper: createReactQueryWrapper,
    });

    // We use the renderHook function to invoke the useGetAllProducts hook which
    // fetches the data.
    const { result, waitFor } = renderHook(() => useGetAllProducts(), {
      wrapper: createReactQueryWrapper,
    });

    // We use the renderHook function to get access to the useProductStore hook
    // which we will use to check that the products in the basket were added/removed correctly.
    const { result: productStore } = renderHook(() => useProductStore(), {
      wrapper: createReactQueryWrapper,
    });

    // We wait for the useGetAllProducts hook to complete fetching the data before proceeding
    // with the test.
    await waitFor(() => result.current.isSuccess);

    // We get the basket button for the first product item using the getByTestId function.
    const firstProductItemBasketButton = screen.getByTestId(`basket-button-1`);

    // We click the basket button for the first product item.
    fireEvent.press(firstProductItemBasketButton);

    // We check that the basket icon quantity text is present using the getByTestId function.
    expect(screen.getByTestId("basket-icon-quantity-text-1")).toBeTruthy();

    // We check that the products in the basket have been added correctly using the productStore.
    expect(productStore.current.productsInBasket).toHaveLength(1);
    expect(productStore.current.productsInBasket[0].quantity).toBe(1);
    expect(productStore.current.productsInBasket[0].product).toMatchObject(
      result.current.data![0]
    );

    // We click the basket button for the first product item again to remove it from the basket.
    fireEvent.press(firstProductItemBasketButton);

    // We check that the basket icon quantity text is not present.
    expect(
      screen.queryByTestId("basket-icon-quantity-text-1")
    ).not.toBeTruthy();

    // We check that the products in the basket have been removed correctly using the productStore.
    expect(productStore.current.productsInBasket).toHaveLength(0);
  });
});
الختام
في الختام، استكشف هذا المقال استراتيجيات فعّالة لاختبار تطبيقات React Native التي تستخدم مكتبتي React-Query وZustand، وهما مكتبتان شائعتان جدًا هذه الأيام في تطبيقات React وReact Native. وباستخدام تطبيق متجر بسيط كمثال وتقديم أمثلة شاملة ومفصلة، تناولنا عملية الاختبار وكيفية ضمان جودة الكود عبر كتابة الاختبارات. لا تتردد في الاطلاع على الكود المصدري الكامل عبر الرابط أدناه. أتمنى لك يومًا سعيدًا!
منشور أيضًا على
هذا المقال منشور أيضًا على: